今度は、前回作成したWeb層と連携するOSGi Bundleを作成してみたいと思います。Web層でSTSを使ったOSGi Bundle Projectの作成で散々な目に遭ったので、今回は最初からMavenを利用します。
まずは、Projectの作成。
$ mvn archetype:generate -DgroupId=my.service.bundle -DartifactId=my-service-bundle
$ cd my-service-bundle/
$ mvn eclipse:eclipse
できたら、STSにインポートして、「Maven」→「Enable Dependency Management」とSpring Tools」→「Add OSGi Bundle Project Nature」。デフォルトで作成されている、不要なJavaソースは削除。Javaのビルド設定が何故かJ2SE 1.5になっているので、1.6まで引き上げておきます。あと、Targeted Runtimesに「Virgo Web Server」を設定しておきましょうね。
pom.xml。
<project xmlns="http://maven.apache.org/POM/4.0.0" xmlns:xsi="http://www.w3.org/2001/XMLSchema-instance"
  xsi:schemaLocation="http://maven.apache.org/POM/4.0.0 http://maven.apache.org/xsd/maven-4.0.0.xsd">
  <modelVersion>4.0.0</modelVersion>

  <groupId>my.service.bundle</groupId>
  <artifactId>my-service-bundle</artifactId>
  <version>1.0.0</version>
  <packaging>jar</packaging>

  <name>my-service-bundle</name>
  <url>http://maven.apache.org</url>

  <properties>
    <project.build.sourceEncoding>UTF-8</project.build.sourceEncoding>
  </properties>

  <dependencies>
	<dependency>
	    <groupId>org.springframework</groupId>
	    <artifactId>org.springframework.spring-library</artifactId>
	    <type>libd</type>
	    <version>3.0.0.M3</version>
		<scope>provided</scope>
	</dependency>
  </dependencies>

	<repositories>
		<repository>
		    <id>com.springsource.repository.bundles.snapshot</id>
		    <name>SpringSource Enterprise Bundle Repository - SpringSource Bundle Snapshot</name>
			<url>http://repository.springsource.com/maven/bundles/snapshot</url>
		</repository>
		<repository>
		    <id>com.springsource.repository.bundles.release</id>
		    <name>SpringSource Enterprise Bundle Repository - SpringSource Bundle Releases</name>
			<url>http://repository.springsource.com/maven/bundles/release</url>
		</repository>
		<repository>
			<id>com.springsource.repository.bundle.external</id>
			<name>SpringSource Enterprise Bundle Repository - External Bundle Releases</name>
			<url>http://repository.springsource.com/maven/bundles/external</url>
		</repository>
		<repository>
			<id>com.springsource.repository.bundle.milestone</id>
		    <name>SpringSource Enterprise Bundle Repository - SpringSource Bundle Milestones</name>
			<url>http://repository.springsource.com/maven/bundles/milestone</url>
		</repository>

		<repository>
		    <id>com.springsource.repository.libraries.release</id>
		    <name>SpringSource Enterprise Bundle Repository - SpringSource Library Releases</name>
		    <url>http://repository.springsource.com/maven/libraries/release</url>
		</repository>
		<repository>
		    <id>com.springsource.repository.libraries.external</id>
		    <name>SpringSource Enterprise Bundle Repository - External Library Releases</name>
		    <url>http://repository.springsource.com/maven/libraries/external</url>
		</repository>
		<repository>
		    <id>com.springsource.repository.libraries.milestone</id>
		    <name>SpringSource Enterprise Bundle Repository - Milestone Library Releases</name>
		    <url>http://repository.springsource.com/maven/libraries/milestone</url>
		</repository>
		<repository>
		    <id>com.springsource.repository.libraries.snapshot</id>
		    <name>SpringSource Enterprise Bundle Repository - Snapshot Library Releases</name>
		    <url>http://repository.springsource.com/maven/libraries/snapshot</url>
		</repository>
	</repositories>
</project>
Mavenリポジトリの設定は、greenpages.parentから全部持ってきてしまいました(笑)。
公開するインターフェースの作成。
src/main/java/my/service/bundle/HelloService.java
package my.service.bundle;

public interface HelloService {
	public String getVersion();

	public int getCount();
}
実装クラス。インターフェースとは別パッケージに作成します。
src/main/java/my/service/bundle/internal/HelloServiceImpl.java
package my.service.bundle.internal;

import java.util.concurrent.atomic.AtomicInteger;

import my.service.bundle.HelloService;

import org.springframework.stereotype.Service;

// @Component("helloService")でもOK
@Service("helloService")
public class HelloServiceImpl implements HelloService {
	private AtomicInteger counter = new AtomicInteger();

	@Override
	public String getVersion() {
		return "1.0";
	}

	@Override
	public int getCount() {
		return counter.incrementAndGet();
	}
}
MANIFESTの作成。「src/main/resources」ディレクトリがない場合は、作成した上でソースフォルダに設定してください。
src/main/resources/META-INF/MANIFEST.MF
Manifest-Version: 1.0
Export-Package: my.service.bundle;version="1.0.0"
Bundle-Version: 1.0.0
Bundle-Name: My Service Bundle
Bundle-ManifestVersion: 2
Import-Package: org.springframework.stereotype;version="[3.0,3.1)"
Bundle-SymbolicName: my.service.bundle
外部に公開するパッケージは、「my.service.bundle」のみで実装クラスが所属するパッケージは公開しません。
Springを利用したOSGiの設定。
src/main/resources/META-INF/spring/osgi-context.xml
<?xml version="1.0" encoding="UTF-8"?>
<beans xmlns="http://www.springframework.org/schema/beans"
        xmlns:xsi="http://www.w3.org/2001/XMLSchema-instance"
        xsi:schemaLocation="http://www.springframework.org/schema/beans http://www.springframework.org/schema/beans/spring-beans.xsd
                http://www.springframework.org/schema/osgi http://www.springframework.org/schema/osgi/spring-osgi.xsd"
        xmlns:osgi="http://www.springframework.org/schema/osgi">

        <osgi:service ref="helloService" interface="my.service.bundle.HelloService" />
</beans>
Contextの設定。
src/main/resources/META-INF/spring/module-context.xml
<?xml version="1.0" encoding="UTF-8"?>
<beans xmlns="http://www.springframework.org/schema/beans"
        xmlns:xsi="http://www.w3.org/2001/XMLSchema-instance"
        xsi:schemaLocation="http://www.springframework.org/schema/beans http://www.springframework.org/schema/beans/spring-beans-3.0.xsd
								http://www.springframework.org/schema/context http://www.springframework.org/schema/context/spring-context-3.0.xsd"
        xmlns:context="http://www.springframework.org/schema/context">

        <!--  enables classpath component scanning for this module -->
        <context:component-scan base-package="my.service.bundle.internal" />

</beans>
実装クラスを格納したパッケージを対象とした、コンポーネントスキャンを利用しています。
ここまでやったら、Virgo Web Serverに登録してみます。エラーなくデプロイできて、Virgoの管理コンソールから確認できれば成功です。
続いて、前回作成したWeb Bundleと繋げてみます。ここから先は、前回作成したWeb Bundleの修正です。
依存関係が変わるので、pom.xmlを変更します。依存するプロジェクトの情報を追記してください。
pom.xml
    <dependency>
      <groupId>my.service.bundle</groupId>
      <artifactId>my-service-bundle</artifactId>
      <version>1.0.0</version>
    </dependency>
なお、面倒になったのでService層とリポジトリの設定は一緒にしてしまいました…。
依存パッケージが増えるので、MANIFESTを修正します。
src/main/webapp/META-INF/MANIFEST.MF
Manifest-Version: 1.0
Bundle-SymbolicName: my.web.bundle
Bundle-Version: 1.0.0
Bundle-Name: My Web Bundle
Web-ContextPath: my-web-bundle
Import-Library: org.springframework.spring;version="[3.0,3.1)"
Import-Bundle: com.springsource.org.apache.taglibs.standard;version="[
 1.1.2,1.3)"
Import-Package: my.service.bundle;version="[1.0,2.0)",
 org.eclipse.virgo.web.dm;version="[2.0.0,3.0.0)",
 org.springframework.beans.factory.annotation;version="[3.0,3.1)",
 org.springframework.core.io;version="[3.0,3.1)",
 org.springframework.stereotype;version="[3.0,3.1)",
 org.springframework.web.bind.annotation;version="[3.0,3.1)",
 org.springframework.web.context;version="[3.0,3.1)",
 org.springframework.web.servlet;version="[3.0,3.1)",
 org.springframework.web.servlet.mvc.annotation;version="[3.0,3.1)"
Import-Packageに、「my.service.bundle」を追加しています。
作成したHelloServiceへの参照設定を、applicationContext.xml追加。
src/main/webapp/WEB-INF/applicationContext.xml
<?xml version="1.0" encoding="UTF-8"?>
<beans xmlns="http://www.springframework.org/schema/beans"
	xmlns:osgi="http://www.springframework.org/schema/osgi"
	xmlns:xsi="http://www.w3.org/2001/XMLSchema-instance"
	xmlns:context="http://www.springframework.org/schema/context"
	xsi:schemaLocation="http://www.springframework.org/schema/mvc http://www.springframework.org/schema/mvc/spring-mvc-3.0.xsd
		http://www.springframework.org/schema/beans http://www.springframework.org/schema/beans/spring-beans-3.0.xsd
		http://www.springframework.org/schema/context http://www.springframework.org/schema/context/spring-context-3.0.xsd
		http://www.springframework.org/schema/osgi http://www.springframework.org/schema/osgi/spring-osgi.xsd">

	<!-- import a service from OSGi implementing the Directory interface and make available as a bean called directory -->
	<osgi:reference id="helloService" interface="my.service.bundle.HelloService" />

</beans>
Controllerを、HelloServiceを利用するように修正します。
src/main/java/my/web/bundle/HelloController.java
package my.web.bundle;

import java.util.concurrent.atomic.AtomicInteger;

import my.service.bundle.HelloService;

import org.springframework.beans.factory.annotation.Autowired;
import org.springframework.stereotype.Controller;
import org.springframework.web.bind.annotation.RequestMapping;
import org.springframework.web.servlet.ModelAndView;

@Controller
public class HelloController {
	@Autowired
	private HelloService helloService;

	private AtomicInteger counter = new AtomicInteger();

	@RequestMapping("/index")
	public ModelAndView index() {
		ModelAndView modelAndView = new ModelAndView();
		modelAndView.setViewName("index");
		modelAndView.addObject("myCount", counter.incrementAndGet());
		modelAndView.addObject("version", helloService.getVersion());
		modelAndView.addObject("count", helloService.getCount());

		return modelAndView;
	}
}
Autowiredアノテーションを使って、HelloServiceの実装体をDIするように宣言しています。また、Spring MVCでビューに値を渡す際には、ModelAndViewクラスを利用するようです。どうでもいいですが、すっごい名前だなぁと…。
最後、JSP!
src/main/webapp/WEB-INF/jsp/index.jsp
<%@ taglib prefix="c" uri="http://java.sun.com/jsp/jstl/core" %>
<%@ taglib prefix="fn" uri="http://java.sun.com/jsp/jstl/functions" %>
<html>
<body>
<h2>Hello Spring MVC myCount:${fn:escapeXml(myCount)} Service[Version:${fn:escapeXml(version)}, count:${fn:escapeXml(count)}]</h2>
</body>
</html>
実は、JSPを書くのって相当久しぶりなんですよね…。EL式なんて、初めて書きました。
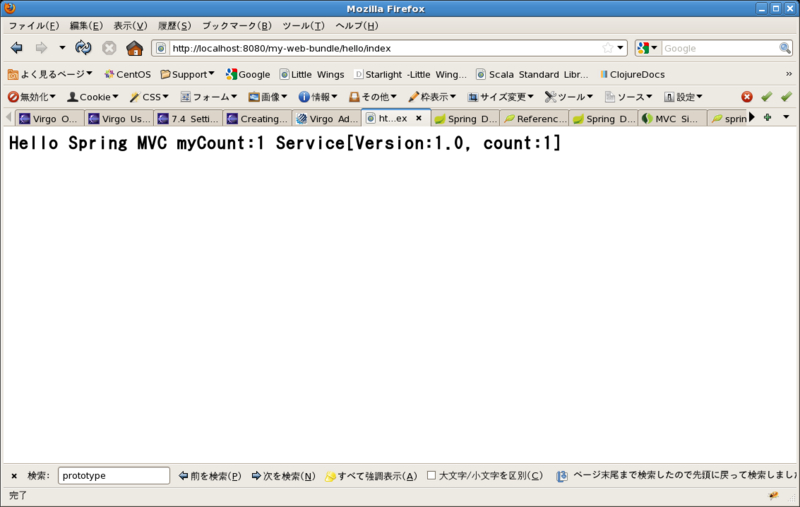
ここまでできたら、Virgo Web Serverにデプロイして動作確認。
http://localhost:8080/my-web-bundle/hello/index

HelloServiceImplが出力しているバージョン番号が確認できますね?また、アクセス回数が増えるごとにmyCount、count両方の値が増加していきます。
※Springの管理するBeanは、デフォルトでSingletonのためです
ここまでくるまで実はいろいろハマっていたのですが、なんとか繋がってよかったです。
あ、ちょっと注意ですがMavenプロジェクトの連結はSTS…というかEclipseに任せているので、プロジェクトをまとめるpom.xmlを書かないとコマンドラインではきっとうまくパッケージングができないと思います…。ローカルリポジトリにインストールしても回避できるかと思いますが、それをするのもちょっとやだなぁ、と。