これは、なにをしたくて書いたもの?
ちょっと、Jupyter Notebookをインストールしてみようかなと。
Jupyter Notebook
Jupyter Notebookは、Pythonのエディタと実行環境をまとめたツールで、プログラムや文章を書いたり、実行結果をまとめたりできます。
Jupyter Notebookをインストールするにあたっての前提条件は、Pythonがインストールされていること、みたいです。
Project Jupyter | Installing the Jupyter Software
While Jupyter runs code in many programming languages, Python is a requirement (Python 3.3 or greater, or Python 2.7) for installing the JupyterLab or the classic Jupyter Notebook.
インストール自体はpipで行うようです。
環境
今回の環境はこちら。
$ lsb_release -a
No LSB modules are available.
Distributor ID: Ubuntu
Description:    Ubuntu 18.04.3 LTS
Release:    18.04
Codename:   bionic


$ python3 -V
Python 3.6.8


$ pip3 -V
pip 9.0.1 from /path/to/lib/python3.6/site-packages (python 3.6)
Jupyter Notebookのインストール
では、ドキュメントに沿ってインストール。
Project Jupyter | Installing the Jupyter Software
pipでインストールします。
$ pip3 install jupyterlab
インストールされた、Jupyter Notebookのバージョン。
$ jupyter --version
jupyter core     : 4.6.0
jupyter-notebook : 6.0.1
qtconsole        : not installed
ipython          : 7.8.0
ipykernel        : 5.1.2
jupyter client   : 5.3.4
jupyter lab      : 1.1.4
nbconvert        : 5.6.0
ipywidgets       : not installed
nbformat         : 4.4.0
traitlets        : 4.3.3
余談
Ubuntu Linuxの場合はaptでもインストールすることが可能です。
jupyter-notebook package : Ubuntu
ですが、このあとのExtensionのインストールなどで困ったことになるので、ここはpipでインストールすることにしました。
Jupyter Notebookを起動してみる
以下のコマンドで、カレントディレクトリを起点として起動します。
$ jupyter notebook
自動でブラウザが起動しますが、コンソールに以下のような出力も行われるので、こちらでアクセスしてもよいでしょう。
    To access the notebook, open this file in a browser:
        file://$HOME/.local/share/jupyter/runtime/nbserver-21589-open.html
    Or copy and paste one of these URLs:
        http://localhost:8888/?token=xxxxx
     or http://127.0.0.1:8888/?token=xxxxx
Web UI。

ヘルプ。
$ jupyter -h
usage: jupyter [-h] [--version] [--config-dir] [--data-dir] [--runtime-dir]
               [--paths] [--json]
               [subcommand]

Jupyter: Interactive Computing

positional arguments:
  subcommand     the subcommand to launch

optional arguments:
  -h, --help     show this help message and exit
  --version      show the jupyter command's version and exit
  --config-dir   show Jupyter config dir
  --data-dir     show Jupyter data dir
  --runtime-dir  show Jupyter runtime dir
  --paths        show all Jupyter paths. Add --json for machine-readable
                 format.
  --json         output paths as machine-readable json

Available subcommands: bundlerextension kernel kernelspec lab labextension
labhub migrate nbconvert nbextension notebook run serverextension troubleshoot
trust
Extensionをインストールする
追加で、Jupyter NotebookのExtensionをインストールします。
jupyter_contrib_nbextensionsは、コミュニティが開発したJupyter NotebookのアンオフィシャルなExtensionです。
Unofficial Jupyter Notebook Extensions — jupyter_contrib_nbextensions 0.5.0 documentation
Extensionの一覧は、こちらです。
List of provided nbextensions — jupyter_contrib_nbextensions 0.5.0 documentation
インストール方法は、こちら。
Installing jupyter_contrib_nbextensions — jupyter_contrib_nbextensions 0.5.0 documentation
pipでインストール。
$ pip3 install jupyter_contrib_nbextensions
インストールされたバージョンは、0.5.1です。
$ pip3 freeze | grep nbextensions
jupyter-contrib-nbextensions==0.5.1
jupyter-nbextensions-configurator==0.4.1
jupyter-nbextensions-configuratorというのは、Extensionの有効/無効をWeb UIで切り替えられるようにするものです。
Extensionをインストールし、jupyter-nbextensions-configuratorを有効にします。
$ jupyter contrib nbextension install --user
$ jupyter nbextensions_configurator enable --user
pipでインストールしたのでは?と思うのですが、「jupyter contrib nbextension install」ではJavaScriptやCSSがインストールされるようです。
Jupyter Notebookを1度終了させて、再度起動。
$ jupyter notebook
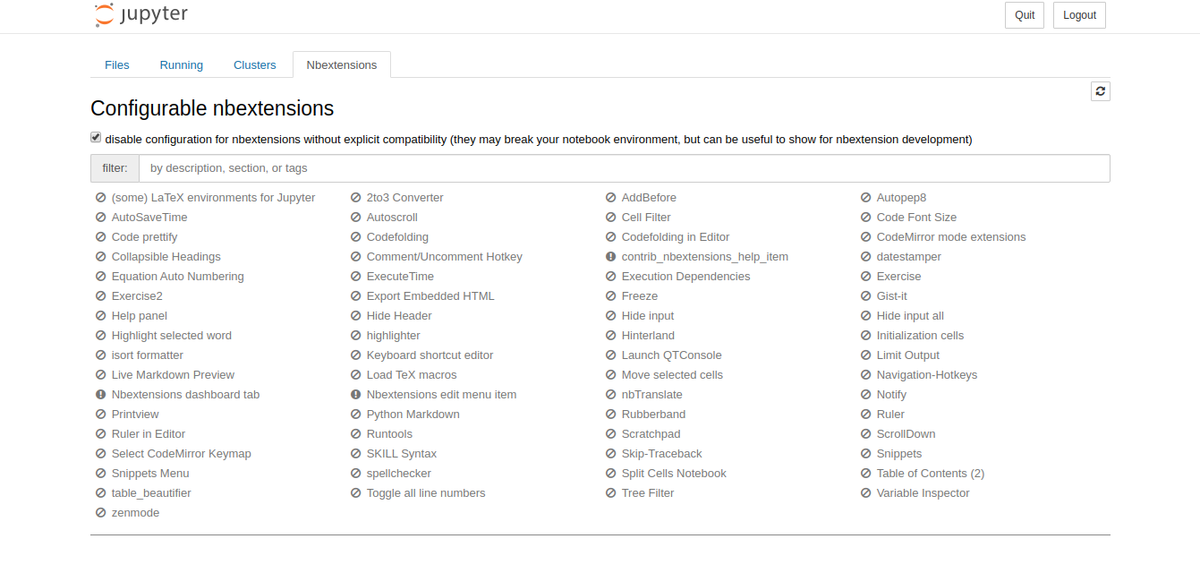
すると、「Nbextensions」というタブが増えています。

最初は全体が「disable」になっているので

こちらのチェックを外して

あとは好きなExtensionを有効にしましょう。

一応、コマンドラインでもExtensionの有効/無効は切り替えられるのですが、Web UIで切り替えられた方が便利でしょう。