今回は、sbtで管理していたプロジェクトをIntelliJに取り込む方法を紹介します。というか、sbtでIntelliJの設定ファイルを生成するプラグインを紹介します、と言った方が正しいですかね。
使用するのは、このsbt-pluginです。
https://github.com/mpeltonen/sbt-idea
まず、普通にsbtプロジェクトを作成する準備をします。
$ mkdir sbt-project-example
$ cd sbt-project-example
$ mkdir -p src/main/scala
$ cat build.sbt
name := "sbt-project-example"

version := "0.0.1-SNAPSHOT"

scalaVersion := "2.9.1"

organization := "littlewings"
$ cat src/main/scala/HelloWorld.scala
object HelloWorld {
  def main(args: Array[String]): Unit = {
    println("Hello World")
  }
}
何の変哲もないsbtプロジェクトですね。
では、ここでプロジェクト直下の「project/plugins」ディレクトリに、build.sbtファイルを作成します。Webモジュール用のプラグイン、xsbt-web-pluginを使用した時もそうでしたが、プラグイン使用時には「project/plugins/build.sbt」ファイルを作成しなくてはいけないようですね。
内容は、以下
https://github.com/mpeltonen/sbt-idea/blob/master/README.md
を参照して作成します。
$ cat project/plugins/build.sbt
resolvers += "sbt-idea-repo" at "http://mpeltonen.github.com/maven/"

libraryDependencies += "com.github.mpeltonen" %% "sbt-idea" % "0.10.0"
作成したら、sbtでreloadを実行してください。
ここまでやると、sbtで「gen-idea」というコマンドが使えるようになっているので、こちらを実行します。
> gen-idea
[info] Trying to create an Idea module default-57c567
[info] Excluding folder target
[info] Created /xxxxx/IdeaProjects/sbt-project-example/.idea/IdeaProject.iml
[info] Created /xxxxx/IdeaProjects/sbt-project-example/.idea
[info] Excluding folder target
[info] Created /xxxxx/IdeaProjects/sbt-project-example/.idea_modules/default-57c567.iml
[info] Created /xxxxx/IdeaProjects/sbt-project-example/.idea_modules/project.iml
…省略…
[warn] 	==== local: tried
[warn] 	  /xxxxx/.ivy2/local/org.scala-tools.sbt/collections_2.8.1/0.10.1/docs/collections_2.8.1-javadoc.jar
[warn] 	==== public: tried
[warn] 	  http://repo1.maven.org/maven2/org/scala-tools/sbt/collections_2.8.1/0.10.1/collections_2.8.1-0.10.1-javadoc.jar
…省略…
[warn] 		:: org.scala-tools.sbt#compiler-interface;0.10.1!compiler-interface.jar(doc)
[warn] 		:: org.scala-tools.sbt#precompiled-2_9_0-1;0.10.1!precompiled-2_9_0-1.jar(src)
[warn] 		:: org.scala-tools.sbt#precompiled-2_9_0-1;0.10.1!precompiled-2_9_0-1.jar(doc)
[warn] 		::::::::::::::::::::::::::::::::::::::::::::::
[info]
[info] :: USE VERBOSE OR DEBUG MESSAGE LEVEL FOR MORE DETAILS
[info] Created /xxxxx/IdeaProjects/sbt-project-example/.idea_modules/project.iml
なんか、いろいろwarnが出ますけど、とりあえず気にしない方向で…。
これで、IntelliJの設定ファイルが生成されたので、sbtを抜けてIntelliJで開いてみましょう。普通に、メニューの「File」→「Open Project」で開けます。
※注意
この手順で作成したIntelliJのプロジェクトを初めて開くとき、インデキシングにかなりパワーを使います。CPUとか張り付くので、ちょっと注意してください
では、作成したプロジェクトの状態を見てみましょう。「Project Structure」を開いて、順に見ていきます。まずは「Project」。

「Project SDK」の欄が、存在しないJDKのバージョンを指していると思うので修正しておきましょう。
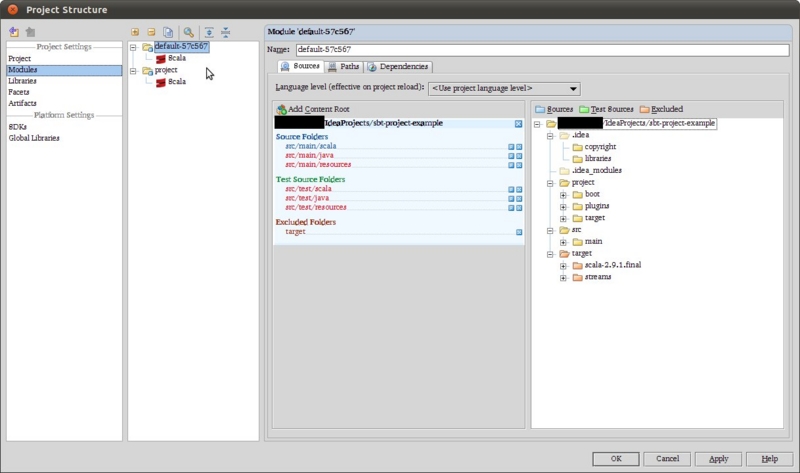
続いて、「Modules」。

Moduleが2つ登録されています。「default-XXXXX」とかいう名前が割り当てられている方が、自分で作成するModuleのようです。「project」の方は、sbtの実行に使うらしくこちらはScalaのバージョンが2.8.1となっています。
「Libraries」には、Scala 2.9.1が多重に入っていますが、あまり気にしない…。

ここまでやれば、あとはSBT Consoleと組み合わせて利用することができます。