Sonatype Nexusが、OSS版でもバージョン3からDocker Registryになれると聞き、「これは!」と思い
自分でも試してみようかと。
http://www.sonatype.org/nexus/
http://www.sonatype.org/nexus/2016/06/29/using-nexus-3-as-a-private-docker-registry/
Nexus RepositoryのDocker Registryを使ってオフラインでConcourse CIを使う
Docker RegistryがOSS版でも使える、というのはいいですね。
※Artifactoryは商用版ではDocker Registryになれる
お題
今回は、以下の内容をやってみようと思います。
- Nexus 3(OSS版)のインストール+HTTPSの有効化
- Mavenリポジトリの作成(グループ:Proxy、Hosted含む)
- npm Registryの作成(グループ:Proxy、Hosted含む)
- Docker Registryの作成(グループ:Proxy、Hosted含む)
ドキュメントは、こちらを参照します。
https://books.sonatype.com/nexus-book/3.2/reference/index.html
Nexus 3(OSS版)のインストールとHTTPSの有効化
まずは、Nexus 3をインストールします。ダウンロードは、以下のようにwgetなどで取得しても、
$ wget https://sonatype-download.global.ssl.fastly.net/nexus/3/nexus-3.2.0-01-unix.tar.gz
ダウンロードページから取得してもよいでしょう。
アーカイブを展開。
$ tar -zxvf nexus-3.2.0-01-unix.tar.gz
$ cd nexus-3.2.0-01
起動自体は、以下のコマンドで行えます。
$ bin/nexus run
Installation and Running / Installing and Running with the Distribution Archive
ただ、Docker RegistryはHTTPS推奨とのことなので、HTTPSを有効化します。Mavenとnpmについては、
HTTPのままいくことにします。
Security / Inbound SSL - Configuring to Serve Content via HTTPS
まずは、JavaのKeystoreが必要です。Jettyのドキュメントを参照と書いてあるので、
こちらに沿って進めます。
http://www.eclipse.org/jetty/documentation/9.3.x/configuring-ssl.html
Keystoreの作成。
$ keytool -keystore etc/ssl/keystore.jks -alias nexus -genkey -keyalg RSA -sigalg SHA256withRSA
Enter keystore password:
Re-enter new password:
What is your first and last name?
  [Unknown]:  my.nexus.repo.example.com
What is the name of your organizational unit?
  [Unknown]:  foo
What is the name of your organization?
  [Unknown]:  bar
What is the name of your City or Locality?
  [Unknown]:  fuga
What is the name of your State or Province?
  [Unknown]:  Tokyo
What is the two-letter country code for this unit?
  [Unknown]:  jp
Is CN=my.nexus.repo.example.com, OU=foo, O=bar, L=fuga, ST=Tokyo, C=jp correct?
  [no]:  yes

Enter key password for <nexus>
	(RETURN if same as keystore password):
続いて、「$data-dir/etc/nexus.properties」に設定を追加しろ、と。
ドキュメントを見ると、$data-dirというのはデフォルトでは「../sonatype-work/nexus3」ですと(今回だと、nexus-3.2.0-01ディレクトリ内から見て)。
というか、ダウンロードしたtar.gz内にもすでにディレクトリがありますしね。
Installation and Running / Directories
Installation and Running / Configuring the Data Directory
というわけで、ファイルを編集。
なお、Nexusのtar.gz展開直後には存在しないので、下記パスにディレクトリとファイルを作成します。
Nexus起動後であれば、デフォルトのファイルが作成されるので、そちらを編集すればよいです。
$ vim ../sonatype-work/nexus3/etc/nexus.properties
こんな感じになりました。
※「application-port-ssl=8443」と「nexus-args」に「${jetty.etc}/jetty-https.xml」を追加
../sonatype-work/nexus3/etc/nexus.properties
# Jetty section
# application-port=8081
# application-host=0.0.0.0
# nexus-args=${jetty.etc}/jetty.xml,${jetty.etc}/jetty-http.xml,${jetty.etc}/jetty-requestlog.xml
# nexus-context-path=/
application-port-ssl=8443
nexus-args=${jetty.etc}/jetty.xml,${jetty.etc}/jetty-http.xml,${jetty.etc}/jetty-https.xml,${jetty.etc}/jetty-requestlog.xml

# Nexus section
# nexus-edition=nexus-pro-edition
# nexus-features=\
# nexus-pro-featureそして、${jetty.etc}/jetty-https.xmlを編集。
$ vim etc/jetty/jetty-https.xml
Keystore作成時に設定したパスワードを設定。
<!--
    <Set name="KeyStorePassword">OBF:1v2j1uum1xtv1zej1zer1xtn1uvk1v1v</Set>
    <Set name="KeyManagerPassword">OBF:1v2j1uum1xtv1zej1zer1xtn1uvk1v1v</Set>
-->
    <Set name="KeyStorePassword">password</Set>
    <Set name="KeyManagerPassword">password</Set>
あとは起動すればOK。
$ bin/nexus run
サーバーへは名前でアクセスできた方が良さそうなので、今回はhostsに追加することにします。
aaa.bb.cc.ddd my.nexus.repo.example.com
とりあえず、この状態で「http://my.nexus.repo.example.com:8081/」にアクセスすると、Nexusのトップページが
見れます。

デフォルトのユーザは
admin / admin123
なので、右の方にある「Sign In」からユーザー名とパスワードをそれぞれ入力します。
ここから、画面上部のバーにある歯車(Server administration and configuration)から作業を進めます。
「Repository」→「Repositories」を選び、

「Create repository」を選択すると、作成可能なリポジトリの一覧が表示されます。
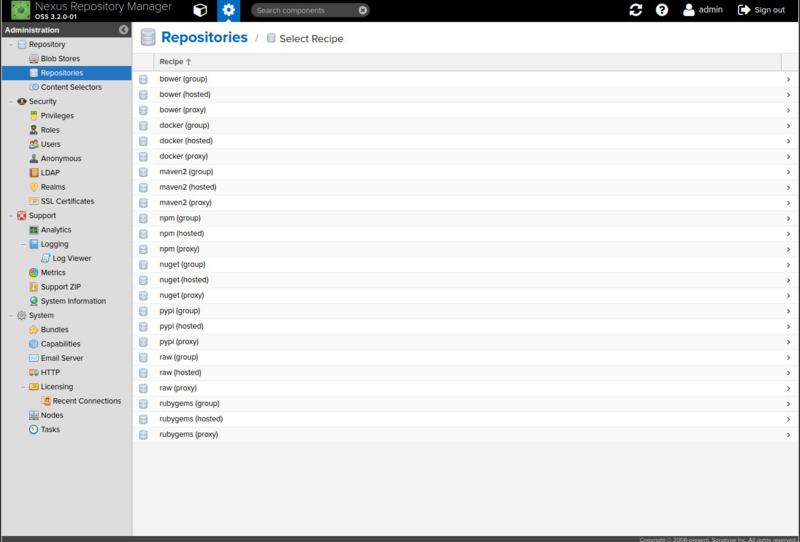
ここから、必要なリポジトリを選択して作業を進めていきましょう。
Mavenリポジトリ
https://books.sonatype.com/nexus-book/3.2/reference/maven.html
また、こちらも参考にしています。
Maven以降もそうなのですが、
- Proxying Repository … 別のリポジトリへのProxyとなるリポジトリ
- Hosting Repository … 自分たちの成果物をデプロイするリポジトリ
- Grouping Repository … 複数のリポジトリをまとめるリポジトリ
の3組をそれぞれ作成していくことにします。
使い方としては、
- ライブラリのダウンロードはGrouping Repositoryを使うように指定(自分たちの成果物)含む
- 自分たちの成果物のデプロイ先はHosting Repositoryを使うように指定
という設定となります。
Proxying Maven Repositories
まずはProxying Maven Repositoriesから。
「Create Repository」で、「maven2 (proxy)」を選択。
今回は、以下の情報で作成しました。
- Name … my-maven-proxy-repo
- Proxy / Remote Storage … https://repo1.maven.org/maven2/
Hosting Maven Repositories
続いて、Hosting Maven Repositories。
「Create Repository」で、「maven2 (hosted)」を選択。
今回は、以下の情報で作成しました。
Grouping Maven Repositories
最後は、Grouping Maven Repositories。
「Create Repository」で、「maven2 (group)」を選択。
今回は、以下の情報で作成しました。
- Name … my-maven-group-repo
- Group / Member repositories … 先ほど作成した「my-maven-proxy-repo」と「my-maven-hosted-repo」を選択
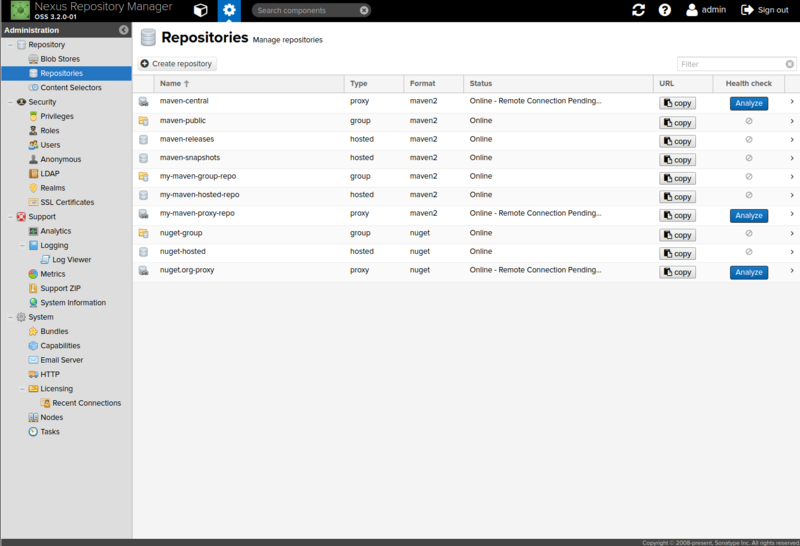
つまり、こんな感じです。

作成後は、こういう一覧に。
使ってみる
では、作成したリポジトリを使ってみましょう。
サンプルをこんな感じで作成。
repositoryやpluginRepositoryに作成したGrouping Maven Repositoryを指定し、distributionManagement / repositoryでは
作成したHosted Maven Repositoryを指定します。
pom.xml
<?xml version="1.0" encoding="UTF-8"?>
<project xmlns="http://maven.apache.org/POM/4.0.0"
         xmlns:xsi="http://www.w3.org/2001/XMLSchema-instance"
         xsi:schemaLocation="http://maven.apache.org/POM/4.0.0 http://maven.apache.org/xsd/maven-4.0.0.xsd">
    <modelVersion>4.0.0</modelVersion>

    <groupId>com.example</groupId>
    <artifactId>greeting-nexus</artifactId>
    <version>1.0.0</version>

    <properties>
        <project.build.sourceEncoding>UTF-8</project.build.sourceEncoding>
        <project.reporting.outputEncoding>UTF-8</project.reporting.outputEncoding>
        <maven.compiler.source>1.8</maven.compiler.source>
        <maven.compiler.target>1.8</maven.compiler.target>
    </properties>

    <dependencies>
        <dependency>
            <groupId>org.apache.commons</groupId>
            <artifactId>commons-lang3</artifactId>
            <version>3.5</version>
        </dependency>
    </dependencies>

    <repositories>
        <repository>
            <id>my-maven-group-repo</id>
            <name>My Maven Group Repository</name>
            <url>http://my.nexus.repo.example.com:8081/repository/my-maven-group-repo/</url>
            <releases>
                <enabled>true</enabled>
            </releases>
            <snapshots>
                <enabled>true</enabled>
            </snapshots>
        </repository>
    </repositories>

    <pluginRepositories>
        <pluginRepository>
            <id>my-maven-group-repo</id>
            <name>My Maven Group Repository</name>
            <url>http://my.nexus.repo.example.com:8081/repository/my-maven-group-repo/</url>
        </pluginRepository>
    </pluginRepositories>

    <distributionManagement>
        <repository>
            <id>my-maven-hosted-repo</id>
            <name>My Maven Hosted Repository</name>
            <url>http://my.nexus.repo.example.com:8081/repository/my-maven-hosted-repo/</url>
        </repository>
    </distributionManagement>
</project>
src/main/java/com/example/GreetingNexus.java
package com.example;

import org.apache.commons.lang3.StringUtils;

public class GreetingNexus {
    public String greet() {
        return StringUtils.replace("Hello %placeholder%!!", "%placeholder%", "Nexus");
    }
}
settings.xmlには、Nexusのアカウント情報を書いておきます。
$HOME/.m2/settings.xml
<settings xmlns="http://maven.apache.org/SETTINGS/1.0.0"
          xmlns:xsi="http://www.w3.org/2001/XMLSchema-instance"
          xsi:schemaLocation="http://maven.apache.org/SETTINGS/1.0.0
                      https://maven.apache.org/xsd/settings-1.0.0.xsd">
    <servers>
        <server>
            <id>my-maven-hosted-repo</id>
            <username>admin</username>
            <password>admin123</password>
        </server>
    </servers>
</settings>
パッケージングとデプロイ。
$ mvn package
$ mvn deploy
成功すると、Nexus上でもデプロイできたことが確認できますよ、と。

これで、他のプロジェクトからでもリポジトリの参照定義しておけばこのライブラリを利用することができます。
    <dependencies>
        <dependency>
            <groupId>com.example</groupId>
            <artifactId>greeting-nexus</artifactId>
            <version>1.0.0</version>
        </dependency>
    </dependencies>
npm Registry
続いて、npm Registryを作成します。
https://books.sonatype.com/nexus-book/3.2/reference/npm.html
作成するのは、以下の3つ。
- Proxying npm Registries
- Private npm Registries
- Grouping npm Registries
使い方は、https://registry.npmjs.orgからダウンロードする、もしくは自分たちの成果物をダウンロードするものについては
Grouping npm Registriesを指定して、成果物をpublishするのはPrivate npm Registriesを指定して、という使い分けになります。
Proxying npm Registries
まずは、Proxying npm Registriesから。
「Create Repository」で、「npm (proxy)」を選択。
今回は、以下の情報で作成しました。
- Name … my-npm-proxy-repo
- Proxy / Remote Storage … https://registry.npmjs.org
Private npm Registries
続いて、Private npm Registries。
「Create Repository」で、「npm (hosted)」を選択。
今回は、以下の情報で作成しました。
- Name … my-npm-hosted-repo
Grouping npm Registries
最後は、Grouping npm Registries。
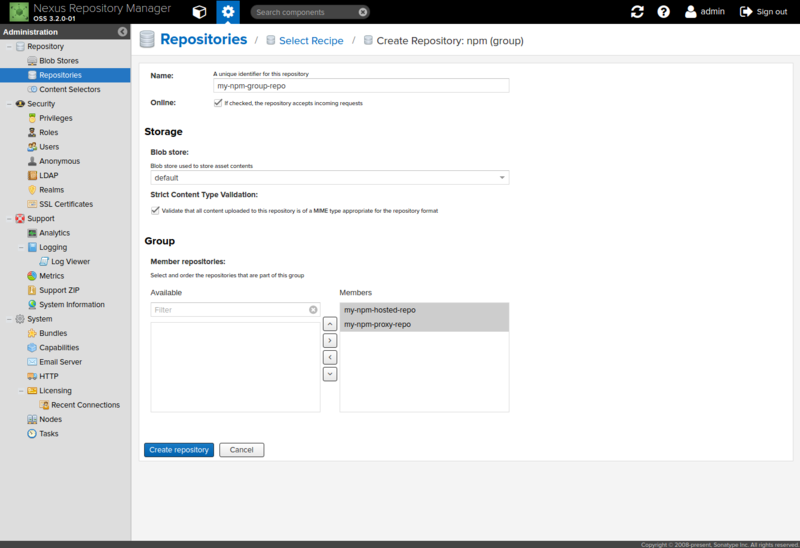
「Create Repository」で、「npm (group)」を選択。
今回は、以下の情報で作成しました。
- Name … my-npm-group-repo
- Group / Member repositories … 先ほど作成した「my-npm-proxy-repo」と「my-npm-hosted-repo」を選択
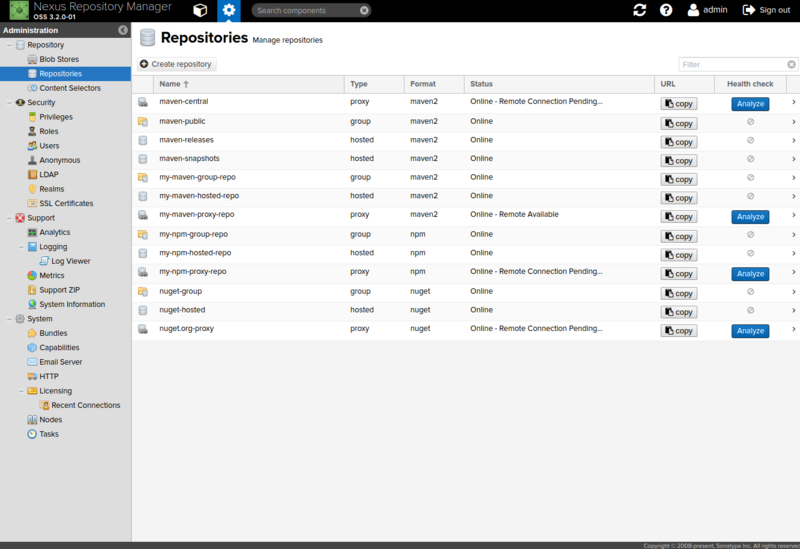
つまり、こんな感じです。
作成後は、こういう一覧に。
使ってみる
では、作成したnpm Registryを使ってみましょう。
作成したGrouping npm Registryを、npmで使うように登録します。
$ npm config set registry http://my.nexus.repo.example.com:8081/repository/my-npm-group-repo/
もしくは、「$HOME/.npmrc」に以下のように記載。
$HOME/.npmrc
registry=http://my.nexus.repo.example.com:8081/repository/my-npm-group-repo/
では、リポジトリを使うサンプルを作成しょう。今回はlodashを使うようにしてみます。ダウンロードの様子がわかるように、
「--loglevel info」を付与していますが、通常は不要です。
$ npm --loglevel info i --save lodash
こんな感じで、作成したリポジトリを使ってそうなことがわかればOKですね。
npm info retry fetch attempt 1 at 21:13:50
npm info attempt registry request try #1 at 21:13:50
npm http fetch GET http://my.nexus.repo.example.com:8081/repository/my-npm-group-repo/lodash/-/lodash-4.17.4.tgz
npm http fetch 200 http://my.nexus.repo.example.com:8081/repository/my-npm-group-repo/lodash/-/lodash-4.17.4.tgz
package.jsonは、こんな感じ(ほぼデフォルトです)。
package.json
{
  "name": "greeting-nexus",
  "version": "1.0.0",
  "description": "",
  "main": "index.js",
  "scripts": {
    "test": "echo \"Error: no test specified\" && exit 1"
  },
  "author": "",
  "license": "ISC",
  "dependencies": {
    "lodash": "^4.17.4"
  }
}
サンプルプログラム。
index.js
const _ = require("lodash");

function greetNexus() {
    return _.reduce(["Hello", " ", "Nexus", "!!"], (acc, s) => acc + s, "");
};

module.exports = greetNexus;
publish前に、Nexus用のユーザを「npm login」で登録します。この時に、「--registry」で先ほど作成した
Private npm Registryを指定…しようと思ったのですが、
$ npm login --registry=http://my.nexus.repo.example.com:8081/repository/my-npm-hosted-repo/
registryにすでに別のリポジトリがある状態だとうまくいかないみたいなので、
Authentication Using Basic Auth
を参考にして認証情報を作成。
$ echo -n 'admin:admin123' | openssl base64
YWRtaW46YWRtaW4xMjM=
作成した情報を「_auth」として、email、always-authと一緒にregistryの"前に"登録します。
$HOME/.npmrc
email=foo@example.com
always-auth=true
_auth=YWRtaW46YWRtaW4xMjM=

registry=http://my.nexus.repo.example.com:8081/repository/my-npm-group-repo/
そして、publish。ここでも、Private npm Registryを指定します。
$ npm publish --registry http://my.nexus.repo.example.com:8081/repository/my-npm-hosted-repo/
もしくは、package.jsonに以下のように記述して
  "publishConfig" : {
    "registry" : "http://my.nexus.repo.example.com:8081/repository/my-npm-hosted-repo/"
  }
単純にpublishしてもOKです。
$ npm publish
成功すると、Nexus上でもデプロイできたことが確認できます。

使う時は、registryにGrouping npm Registryが登録してある状態で、こんな感じで。
$ npm i --save greeting-nexus
Docker Registry
最後は、Docker Registry。
https://books.sonatype.com/nexus-book/3.0/reference/docker.html
Docker Registryに関しては、@makingさんのブログをかなり参考にしています。
Nexus RepositoryのDocker Registryを使ってオフラインでConcourse CIを使う
作成するのは、以下の3つ。
- Proxy Repository for Docker
- Hosted Repository for Docker (Private Registry for Docker)
- Repository Groups for Docker
使い方は、Ducker Hub上のDockerイメージやPrivateなDockerイメージをダウンロードするものについてはRepository Groups for Dockerを
指定して、PrivateなDockerイメージを登録するのはHosted Repository for Docker (Private Registry for Docker)を指定して、
という使い分けになります。
Proxy Repository for Docker
まずは、Proxy Repository for Dockerから。
「Create Repository」で、「docker (proxy)」を選択。
今回は、以下の情報で作成しました。
- Name … my-docker-proxy-repo
- Proxy / Remote Storage … https://registry-1.docker.io
- Proxy / Docker Index … Docker Hub
Hosted Repository for Docker (Private Registry for Docker)
続いて、Hosted Repository for Docker (Private Registry for Docker)。
Hosted Repository for Docker (Private Registry for Docker)
「Create Repository」で、「docker (hosted)」を選択。
今回は、以下の情報で作成しました。
- Name … my-docker-hosted-repo
- Repository Connectors … HTTPSにチェックを入れ、ポートを18443
なんでRepository Connectorsが要るかって、DockerのクライアントがパスをRegistryの一部として解釈するからっぽいですね。
SSL and Repository Connector Configuration
このために、直接アクセスできる別ポートのConnectorを作る、と。
Docker Registryを作成すると、裏でNexusのログに指定のポートでConnectorが起動したことが確認できます。
2017-01-09 13:32:49,084+0000 INFO [qtp1546393988-574] admin org.eclipse.jetty.server.ServerConnector - Started ServerConnector@66dba7f0{SSL,[ssl, http/1.1]}{0.0.0.0:18443}
Repository Groups for Docker
最後は、Repository Groups for Docker。
「Create Repository」で、「docker (group)」を選択。
今回は、以下の情報で作成しました。
- Name … my-docker-group-repo
- Repository Connectors … HTTPSにチェックを入れ、ポートを28443
- Group / Member repositories … 先ほど作成した「my-docker-proxy-repo」と「my-docker-hosted-repo」を選択
つまり、こんな感じです。

作成後は、こういう一覧に。

使ってみる
では、作成したDocker Registryを使ってみましょう。
今回、証明書が自前なので、Insecure Registryの設定が必要です。
接続先ごとにディレクトリを作成して、
## Repository Group for Docker
$ sudo mkdir -p /etc/docker/certs.d/my.nexus.repo.example.com:28443/

## Hosted Repository for Docker (Private Registry for Docker)
$ sudo mkdir -p /etc/docker/certs.d/my.nexus.repo.example.com:18443/
作成したディレクトリに証明書をコピーします。
※証明書は、Nexusから引っこ抜きました
## Repository Group for Docker
$ sudo cp ca.crt /etc/docker/certs.d/my.nexus.repo.example.com:28443/

## Hosted Repository for Docker (Private Registry for Docker)
$ sudo cp ca.crt /etc/docker/certs.d/my.nexus.repo.example.com:18443/
そして、手順に従い「/etc/default/docker」ファイルを編集。以下のように追記しました。
※もしくは「/etc/sysconfig/docker」ファイルに指定します
DOCKER_OPTS="--insecure-registry my.nexus.repo.example.com:28443 --insecure-registry my.nexus.repo.example.com:18443"
で、Dockerを再起動。
$ sudo service docker stop
$ sudo service docker start
Docker HubからイメージをPullしてみます。Repository Group for Dockerにログイン。
$ docker login my.nexus.repo.example.com:28443
Username: admin
Password:
Login Succeeded
Repository Group for Docker越しに、Docker HubからFedoraのイメージをPullしましょう。
$ docker pull my.nexus.repo.example.com:28443/fedora:25
25: Pulling from fedora
0fc456f626d7: Pull complete
Digest: sha256:a99209cbb485b98d17b47be2bf990a7fbd63b4d3fa61395a313308d99a326930
Status: Downloaded newer image for my.nexus.repo.example.com:28443/fedora:25
OKそうです。
では、このFedoraのイメージを使って新しいイメージを作ってHosted Repository for Docker (Private Registry for Docker)に
Pushしてみましょう。
Dockerfile
FROM my.nexus.repo.example.com:28443/fedora:25

CMD ["echo", "Hello Nexus!!"]
ビルド。
$ docker build -t my.nexus.repo.example.com:18443/kazuhira/greeting-nexus:latest .
Sending build context to Docker daemon 2.048 kB
Step 1 : FROM my.nexus.repo.example.com:28443/fedora:25
 ---> a1e614f0f30e
Step 2 : CMD echo Hello Nexus!!
 ---> Using cache
 ---> d2c8e16b1dcd
Successfully built d2c8e16b1dcd
Hosted Repository for Docker (Private Registry for Docker)側にログイン。
$ docker login my.nexus.repo.example.com:18443
Username: admin
Password:
Login Succeeded
Push。
$ docker push my.nexus.repo.example.com:18443/kazuhira/greeting-nexus:latest
The push refers to a repository [my.nexus.repo.example.com:18443/kazuhira/greeting-nexus]
e4f86288aaf7: Pushed
latest: digest: sha256:af4fc1cb2606196b5de47f739b0d3d42a75f23adb9904eb99409495afa9008fc size: 529
成功すると、Nexus上でもデプロイできたことが確認できます。

使う時は、Repository Group for Dockerの方から取得すればOKです。
$ docker run -it --rm my.nexus.repo.example.com:28443/kazuhira/greeting-nexus:latest
Unable to find image 'my.nexus.repo.example.com:28443/kazuhira/greeting-nexus:latest' locally
latest: Pulling from kazuhira/greeting-nexus
Digest: sha256:af4fc1cb2606196b5de47f739b0d3d42a75f23adb9904eb99409495afa9008fc
Status: Downloaded newer image for my.nexus.repo.example.com:28443/kazuhira/greeting-nexus:latest
Hello Nexus!!