フロントエンド系の勉強を進めるにあたり、どうするのがいいのかなーと思う今日この頃です。
そんな中、ちょっと気になっているElectronを試してみることにしました。
Electron | Build cross platform desktop apps with JavaScript, HTML, and CSS.
Electronって何?という話ですが、こちらの記事を見るのがいいかなーと思います。
最新版で学ぶElectron入門 - HTML5でPCアプリを開発する利点と手順 - ICS MEDIA
Webの技術(JavaScript、HTML5など)を使って、クロスプラットフォームで動作するデスクトップアプリケーションを作成するためのフレームワークだそうです。Chromiumを内包しているためWebの技術がそのまま使え、作成したアプリケーションを各プラットフォームで実行可能な状態にパッケージングすることもできます。採用事例としては、Visual Studio Code、Atomといったものがあるそうな。
では、まずは試してみるということで、Get Startedをマネしていってみましょう。
プロジェクトの作成
まずは、プロジェクトの作成と関連モジュールの導入。
$ npm init
$ npm install --save-dev electron-prebuilt electron-packager
「electron-packager」はElectronを動かすだけなら不要ですが、最終的に実行可能ファイルにする時に必要なので、入れています。
GitHubにある、Quick Startリポジトリを見つつ作っていきます。
GitHub - electron/electron-quick-start: Clone to try a simple Electron app
とりあえず、エントリポイントはmain.jsとするのが通例みたいなので、package.jsonでの「main」指定はmain.jsとしました。
"main": "main.js",
「script」には、「electron main.js」というタスクを定義しておきます。
  "scripts": {
    "start": "electron main.js",
    "test": "echo \"Error: no test specified\" && exit 1"
  },
このmain.jsの内容は、このように実装。
main.js
"use strict";

const electron = require("electron");

const app = electron.app;
const BrowserWindow = electron.BrowserWindow;

let mainWindow;

var createWindow = () => {
    mainWindow = new BrowserWindow({ width: 800, height: 600 });
    mainWindow.loadURL("file://" + __dirname + "/index.html");
    mainWindow.webContents.openDevTools();
    mainWindow.on("closed", () => mainWindow = null);
};

app.on("ready", createWindow);

app.on("window-all-closed", () => {
    if (process.platform !== "darwin") {
        app.quit();
    }
});

app.on("activate", () => {
    if (mainWindow === null) {
        createWindow();
    }
});
まあ、こちらのファイルの内容をちょっと変えたものです。
https://github.com/electron/electron-quick-start/blob/master/main.js
index.htmlもほぼQuick Startのままですが、自作のスクリプトを読み込むように変更して作成。
index.html
<!DOCTYPE html>
<html>
  <head>
    <meta charset="UTF-8">
    <title>Hello World!</title>
  </head>
  <body>
    <h1>Hello World!</h1>
    We are using node <script>document.write(process.versions.node)</script>,
    Chromium <script>document.write(process.versions.chrome)</script>,
    and Electron <script>document.write(process.versions.electron)</script>.
    <div id="message"></div>
    <script type="text/javascript" src="src/show.js"></script>
  </body>
</html>
ここで、作成したスクリプトはこのような内容になっています。
src/show.js
document
    .getElementById("message")
    .appendChild(document.createTextNode("Hello My Electron Applicaiton!!"));
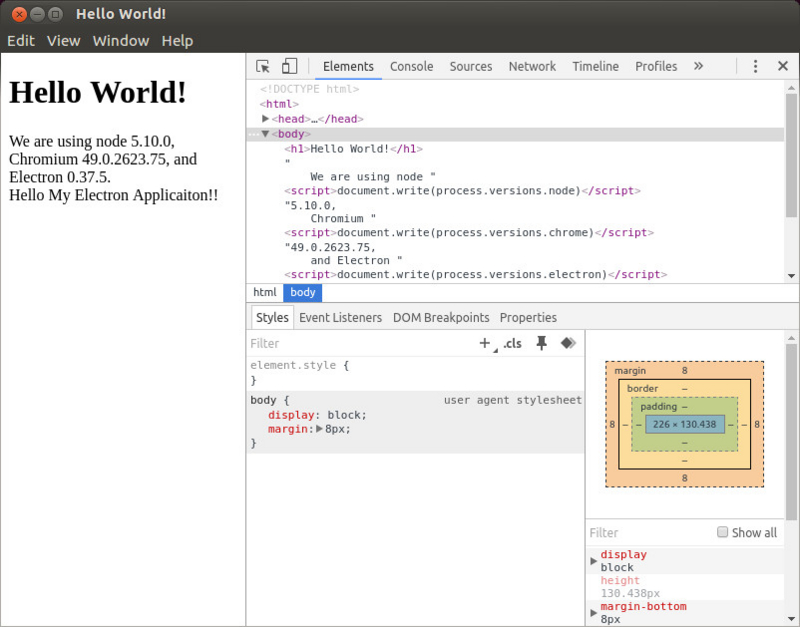
では、実行してみます。
$ npm run start
それっぽく動いています!
では、パッケージングしてみましょう。package.jsonに、「package」というタスクを用意し、electron-packagerでLinuxとWindows用にパッケージングするようにしてみます。
  "scripts": {
    "start": "electron main.js",
    "package": "electron-packager . getting-started --platform=linux,win32 --arch=x64 --overwrite",
    "test": "echo \"Error: no test specified\" && exit 1"
  },
実行。
$ npm run package
この設定だと、カレントディレクトリに以下のようなディレクトリが作成されます。
$ ls -d1 getting-started-*
getting-started-linux-x64
getting-started-win32-x64
現在動作させている環境はLinuxなので、Linux用のアプリケーションを動かしてみます。
$ getting-started-linux-x64/getting-started
結果は先ほどと一緒なので、割愛。Windows用のものをWindowsに持っていって動かしても、問題なく動きました。
electron-packagerのオプションにどのようなものが指定できるかは、cli.jsのヘルプを見るとよいでしょう。
$ node node_modules/electron-packager/cli.js --help
ところで、この状態だとカレントディレクトリの内容がまるっとパッケージングされてしまっています。
$ ls -1 getting-started-linux-x64/resources/app
index.html
main.js
node_modules
package.json
src
Browserify+Babelでやってみる
と、とりあえず試してみたのですが、上記の状態だとnode_modulesディレクトリも丸ごとパッケージングされてしまいますし、作成するスクリプトにはBabelを適用しておきたいなーという欲があり、以下の構成も試してみることにしました。
- gulp
- Browserify+Watchify
- Babel
- DOMの書き換えはjQueryをrequire
requireのサンプルとして、jQueryを使っているのはご愛嬌…。
npmプロジェクトの作成と、依存関係のインストールはこちら。
$ npm init
$ npm install --save-dev electron-prebuilt electron-packager gulp browserify babelify babel-preset-es2015 gulp-load-plugins gulp-util gulp-uglify gulp-sourcemaps vinyl-source-stream vinyl-buffer watchify del
$ npm install --save jquery babel-polyfill
エントリポイントは、やっぱりmain.jsです。
"main": "main.js",
gulpの設定ファイルは、こちら。ちょっとECMAScript 6っぽくして書いてみました。
gulpfile.js
"use strict";

const gulp = require("gulp");
const $ = require("gulp-load-plugins")();
const browserify = require("browserify");
const watchify = require("watchify");
const babelify = require("babelify");
const source = require("vinyl-source-stream")
const buffer = require("vinyl-buffer");
const del = require("del");

gulp.task("clean", () => del.sync("dist/*"));

gulp.task("copy-entrypoints", () => {
    gulp.src(["package.json", "index.html", "main.js"]).pipe(gulp.dest('dist'));
});

let createBundler = plugins => {
    return browserify({ entries: ["src/app.js"],
                 debug: true,
                 plugin: plugins
               })
    .transform(babelify, { presets: ["es2015"] });
};

let bundle = bundler => {
    bundler
        .bundle()
        .on("error", $.util.log)
        .on("end", () => $.util.log("browserify compile success."))
        .pipe(source("app.js"))
        .pipe(buffer())
        .pipe($.uglify())
        .pipe($.sourcemaps.init({ loadMaps: true }))
        .pipe($.sourcemaps.write("./"))
        .pipe(gulp.dest("dist"));
};

gulp.task("build", () => {
    bundle(createBundler([]));
});

gulp.task("continuous-build", () => {
    let bundler = createBundler([watchify]);
    let rebundle = () => bundle(bundler);

    bundler.on("update", rebundle);
    rebundle(bundler);
});

gulp.task("default", ["copy-entrypoints", "build"]);
この設定を踏まえて、npmでのタスクは以下のように定義。
  "scripts": {
    "build": "gulp copy-entrypoints build",
    "continuous-build": "gulp copy-entrypoints continuous-build",
    "start": "gulp copy-entrypoints build && electron dist/main.js",
    "package": "gulp copy-entrypoints build && electron-packager dist getting-started --platform=linux --arch=x64 --overwrite",
    "clean": "gulp clean",
    "test": "echo \"Error: no test specified\" && exit 1"
  },
「build」で必要なファイルをコピーしつつBrowserifyでビルド、「continuous-build」でWatchify付きビルド、「start」でビルド後にElectron起動、「package」でビルド後にパッケージングです。
最終的にdistディレクトリにファイルを集めるようにしているので、Browserifyによるビルド結果の出力先もdistにしています。この時、エントリポイントであるmain.jsやindex.htmlもコピーしておきます。また、エントリポイントを示すpackage.jsonも必要なので、合わせてコピー。
gulp.task("copy-entrypoints", () => {
    gulp.src(["package.json", "index.html", "main.js"]).pipe(gulp.dest('dist'));
});
electron-packagerのビルド元の指定も、distにしてあります。
electron-packager dist getting-started --platform=linux --arch=x64 --overwrite
main.jsは、先ほどとまったく同じなので省略。
index.htmlは、読み込むスクリプトのみが変わりました。
  <body>
    <h1>Hello World!</h1>
    We are using node <script>document.write(process.versions.node)</script>,
    Chromium <script>document.write(process.versions.chrome)</script>,
    and Electron <script>document.write(process.versions.electron)</script>.
    <div id="message"></div>
    <script type="text/javascript" src="app.js"></script>
  </body>
Browserifyでビルドするスクリプトは、こちら。内容的には最初に書いたsrc/show.jsと同じですが、BabelとjQueryの利用が入っています。
src/app.js
import "babel-polyfill";
import $ from "jquery";

$(() => $("#message").text("Hello My Electron Applicaiton!!"));
あとは、ビルドしたり
$ npm run build
もしくはビルド後に起動。
$ npm run start
結果は、最初の例とそう変わらないのでやっぱり割愛。
また、この時にもうひとつターミナルを立ち上げてWatchifyを使った変更監視によるビルドもできます。
$ npm run continuous-build
パッケージングは先ほどと同じですが、
$ npm run package
今回はBrowserifyでバンドルしているのと、distディレクトリしか見ていないのでnode_modulesなどが入らなくなります。
$ ls -1 getting-started-linux-x64/resources/app
app.js
app.js.map
index.html
main.js
package.json
まとめ
Electronを簡単にですが、BabelやBrowserifyも組み合わせつつ試してみました。この感じだと、SPAで開発していく感じなんでしょうねぇ。そのあたり全然知らないですけど。
フロントエンドの勉強も含めて、ちょっとずつ試していけたらなぁと思います。
