これは、なにをしたくて書いたもの?
- Sonatype Nexusを使ってリポジトリを作るのに、Web Consoleにログインして作るのが面倒だなーと思って他の方法は?と
- できれば、Sonatype Nexus 3と2、それぞれで知りたい
- REST APIと、スクリプトが使えるらしい
- 試してみよう
今回は、MavenリポジトリとnpmリポジトリをWeb Consoleを使うことなく作成してみたいと思います。
環境
Sonatype Nexusは、今回はDockerイメージを使用しました。
Sonatype Nexus 3。バージョンは、3.13.0-01です。
起動。
※タグは3.13.0ですが、中身は3.13.0-01です
$ docker container run -it --rm --name nexus3 sonatype/nexus3:3.13.0
Sonatype Nexus 2。バージョンは、2.14.9-01です。
起動。
$ docker container run -it --rm --name nexus sonatype/nexus:2.14.9-01
Sonatype Nexus 3
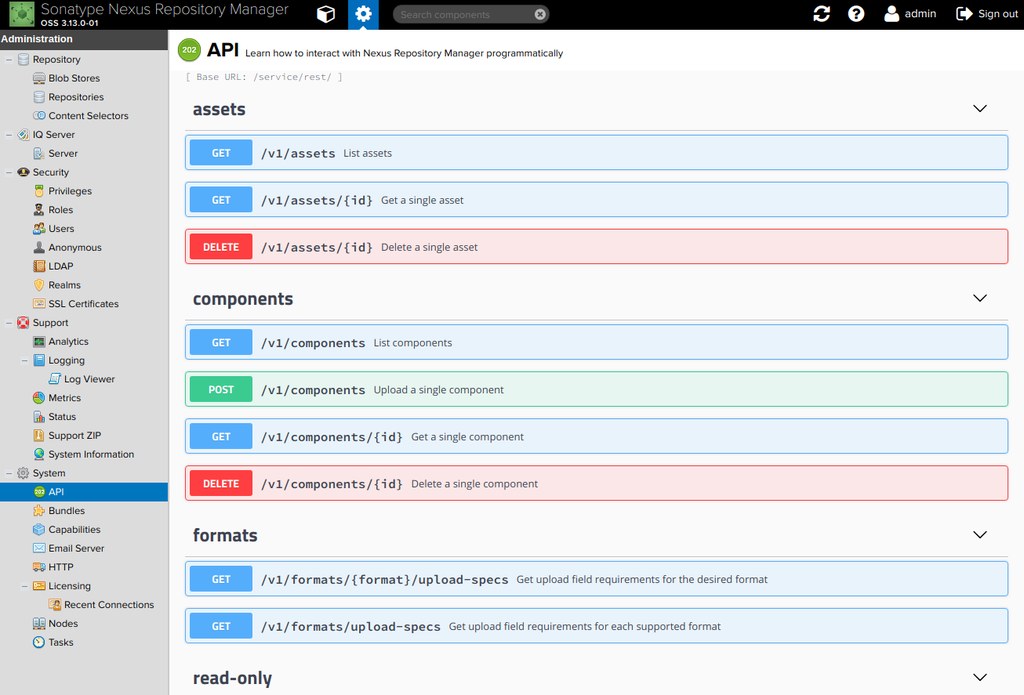
Sonatype Nexus 3では、REST APIとスクリプトを使用します。
例えば、リポジトリの一覧は、Repositories APIで確認することができます。
起動直後だと、こんな感じです。
$ curl -XGET -u admin:admin123 http://172.17.0.2:8081/service/rest/v1/repositories
[ {
  "name" : "nuget-group",
  "format" : "nuget",
  "type" : "group",
  "url" : "http://172.17.0.2:8081/repository/nuget-group"
}, {
  "name" : "maven-snapshots",
  "format" : "maven2",
  "type" : "hosted",
  "url" : "http://172.17.0.2:8081/repository/maven-snapshots"
}, {
  "name" : "maven-central",
  "format" : "maven2",
  "type" : "proxy",
  "url" : "http://172.17.0.2:8081/repository/maven-central"
}, {
  "name" : "nuget.org-proxy",
  "format" : "nuget",
  "type" : "proxy",
  "url" : "http://172.17.0.2:8081/repository/nuget.org-proxy"
}, {
  "name" : "maven-releases",
  "format" : "maven2",
  "type" : "hosted",
  "url" : "http://172.17.0.2:8081/repository/maven-releases"
}, {
  "name" : "nuget-hosted",
  "format" : "nuget",
  "type" : "hosted",
  "url" : "http://172.17.0.2:8081/repository/nuget-hosted"
}, {
  "name" : "maven-public",
  "format" : "maven2",
  "type" : "group",
  "url" : "http://172.17.0.2:8081/repository/maven-public"
}
これらのAPIは、NexusのWeb Consoleからも確認することができます。

Mavenリポジトリを作成する
https://github.com/sonatype/nexus-book-examples/tree/nexus-3.x/scripting/simple-shell-example
スクリプトとして登録する、JSONファイルを作成します。 create-maven.json
{
    "name": "create-maven",
    "type": "groovy",
    "content": "repository.createMavenHosted('my-maven-hosted-repo'); repository.createMavenProxy('my-maven-proxy-repo', 'https://repo.maven.apache.org/maven2'); repository.createMavenGroup('my-maven-group-repo', ['my-maven-hosted-repo', 'my-maven-proxy-repo'])"
}
nameがスクリプトの名前で、typeがスクリプトの言語です。スクリプトに使える言語はGroovyのみなようなので、
「groovy」と指定します。
The scripting language used on the repository manager is Groovy. Any editor can be used to author the scripts.
contentは、実行するスクリプトです。セミコロンで区切ってリポジトリを3つ作っているので、ちょっと見づらいですが…。
今回は、以下の3つを作成します。
- Hosted Repository
- Proxy Repository(Maven Central RepositoryのProxy)
- Group Repository
スクリプト内でいくと、Hosted Repository。第1引数は、リポジトリ名です。
repository.createMavenHosted('my-maven-hosted-repo');
Proxy Repository。第2引数は、プロキシ先のURLですね。
repository.createMavenProxy('my-maven-proxy-repo', 'https://repo.maven.apache.org/maven2');
そして、これらをまとめたGroup Repository。
repository.createMavenGroup('my-maven-group-repo', ['my-maven-hosted-repo', 'my-maven-proxy-repo'])
記述はGroovyなので、今回のように複数の記述をしていなければ、セミコロンはなくてもOKです。
repository.createMavenHosted('my-maven-hosted-repo')
で、このスクリプトを登録します。要認証。
$ curl -u admin:admin123 -i -H "Content-Type: application/json" 'http://172.17.0.2:8081/service/rest/v1/script/' -d @create-maven.json
HTTP/1.1 204 No Content
Date: Sat, 08 Sep 2018 14:20:01 GMT
Server: Nexus/3.13.0-01 (OSS)
X-Content-Type-Options: nosniff
「http://ホスト名:ポート/service/rest/v1/script/」が、エンドポイントです。
実行には、この登録したスクリプトを呼び出すことで行います。
$ curl -u admin:admin123 -i -XPOST -H "Content-Type: text/plain" 'http://172.17.0.2:8081/service/rest/v1/script/create-maven/run'
HTTP/1.1 200 OK
Date: Sat, 08 Sep 2018 14:27:41 GMT
Server: Nexus/3.13.0-01 (OSS)
X-Content-Type-Options: nosniff
Content-Type: application/json
Content-Length: 142

{
  "name" : "create-maven",
  "result" : "RepositoryImpl$$EnhancerByGuice$$c5f0822b{type=group, format=maven2, name='my-maven-group-repo'}"
「http://ホスト名:ポート/service/rest/v1/script/[登録したスクリプトのname]]/run」が、エンドポイントになります。
これで、リポジトリが作成されました。
確認。
$ curl -XGET -u admin:admin123 http://172.17.0.2:8081/service/rest/v1/repositories
追加分です。
, {
  "name" : "my-maven-proxy-repo",
  "format" : "maven2",
  "type" : "proxy",
  "url" : "http://172.17.0.2:8081/repository/my-maven-proxy-repo"
}, {
  "name" : "my-maven-hosted-repo",
  "format" : "maven2",
  "type" : "hosted",
  "url" : "http://172.17.0.2:8081/repository/my-maven-hosted-repo"
}, {
  "name" : "my-maven-group-repo",
  "format" : "maven2",
  "type" : "group",
  "url" : "http://172.17.0.2:8081/repository/my-maven-group-repo"
}
不要になったスクリプトは、削除。
$ curl -u admin:admin123 -i -XDELETE 'http://172.17.0.2:8081/service/rest/v1/script/create-maven'
HTTP/1.1 204 No Content
Date: Sat, 08 Sep 2018 15:30:32 GMT
Server: Nexus/3.13.0-01 (OSS)
X-Content-Type-Options: nosniff
更新はPUTで行うなどしますが、スクリプトに関するREST APIはこちらで。
ところで、このGroovyスクリプトでどういうことが書けるのか、よくわかりませんよね?
暗黙的に、以下の変数が使えるようになっているようです。
- core
- repository
- blobStore
- security
しかし、JavadocはJAR形態での提供のみです。
Development environments such as IntelliJ IDEA or Eclipse IDE can download the relevant JavaDoc and Sources JAR files to ease your development. Typically you would create your scripts in src/main/groovy or src/main/scripts.
オンラインでAPI見れないんですかぃ…。
あとは、ソースコードを見る感じですね。今回のRepositoryに関する部分であれば、こちらのようです。
Groovyのデフォルト引数を使っていくつか省略しているものがあるのですが、完全な定義、指摘できる引数を
確認したければ見ておくとよいでしょう。
その他のオブジェクトは、こちらのようで。
npmリポジトリを作成する
続いて、npmリポジトリ。
Nexusに登録する、スクリプトの定義は、こちら。 create-npm.json
{
    "name": "create-npm",
    "type": "groovy",
    "content": "repository.createNpmHosted('my-npm-hosted-repo'); repository.createNpmProxy('my-npm-proxy-repo','https://registry.npmjs.org'); repository.createNpmGroup('my-npm-group-repo', ['my-npm-hosted-repo', 'my-npm-proxy-repo'])"
}
こちらも、以下の3つを作成します。
- Hosted Repository
- Proxy Repository(npm RepositoryのProxy)
- Group Repository
スクリプトの部分を抜粋すると、こうですね。
repository.createNpmHosted('my-npm-hosted-repo')
repository.createNpmProxy('my-npm-proxy-repo','https://registry.npmjs.org')
repository.createNpmGroup('my-npm-group-repo', ['my-npm-hosted-repo', 'my-npm-proxy-repo'])
登録。
$ curl -u admin:admin123 -i -H "Content-Type: application/json" 'http://172.17.0.2:8081/service/rest/v1/script/' -d @create-npm.json
HTTP/1.1 204 No Content
Date: Sat, 08 Sep 2018 16:02:06 GMT
Server: Nexus/3.13.0-01 (OSS)
X-Content-Type-Options: nosniff
スクリプト実行。
$ curl -u admin:admin123 -i -XPOST -H "Content-Type: text/plain" 'http://172.17.0.2:8081/service/rest/v1/script/create-npm/run'
HTTP/1.1 200 OK
Date: Sat, 08 Sep 2018 16:03:29 GMT
Server: Nexus/3.13.0-01 (OSS)
X-Content-Type-Options: nosniff
Content-Type: application/json
Content-Length: 135

{
  "name" : "create-npm",
  "result" : "RepositoryImpl$$EnhancerByGuice$$c5f0822b{type=group, format=npm, name='my-npm-group-repo'}"
確認。
$ curl -XGET -u admin:admin123 http://172.17.0.2:8081/service/rest/v1/repositories
抜粋結果は、こちら。
{
  "name" : "my-npm-proxy-repo",
  "format" : "npm",
  "type" : "proxy",
  "url" : "http://172.17.0.2:8081/repository/my-npm-proxy-repo"
}, {
  "name" : "my-npm-hosted-repo",
  "format" : "npm",
  "type" : "hosted",
  "url" : "http://172.17.0.2:8081/repository/my-npm-hosted-repo"
}, {
  "name" : "my-npm-group-repo",
  "format" : "npm",
  "type" : "group",
  "url" : "http://172.17.0.2:8081/repository/my-npm-group-repo"
}
npmリポジトリは、これで作成完了です。
Sonatype Nexus 2
Sonatype Nexus 2の場合は、REST APIを使用します。
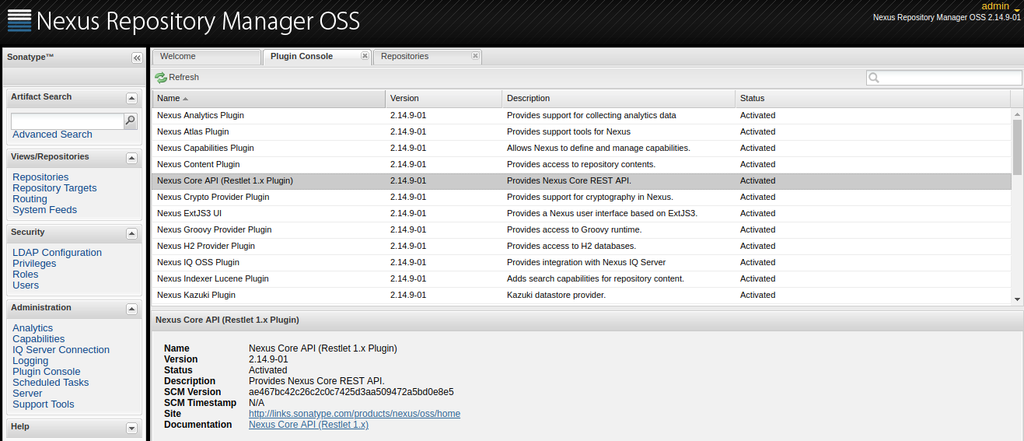
オンラインのドキュメントはこれ以上ないので、Web Consoleにログイン後、「Administration」→「Plugin Console」を選び、
「Nexus Core API (Restlet 1.x Plugin)」を選択すると、詳細部分に「Documentation」が表示されるので、こちらを参照します。

こんな感じです。

これで各APIのエンドポイントやサポートしているHTTPメソッドはわかるのですが、パラメーターの詳細が全然わからないので、
既存のリポジトリの情報をREST APIで参照したり、Web Consoleで1度作成してREST APIで参照したりするとよいでしょう。
※XML Schemaを見ることはできるのですが、それだけだと参考にならない&パラメーター足りなかったり…
Hosted、Proxy Repositoryの確認に使うAPIは、こちら。
リポジトリの一覧。
HTTP GET / http://[ホスト]:[ポート]/nexus/service/local/repositories
リポジトリの詳細。
HTTP GET / http://[ホスト]:[ポート]/nexus/service/local/repositories/[リポジトリのID]
Group Repositoryは、エンドポイントが変わります。
リポジトリの一覧。
HTTP GET / http://[ホスト]:[ポート]/nexus/service/local/repo_groups
リポジトリの詳細。
HTTP GET / http://[ホスト]:[ポート]/nexus/service/local/repo_groups/[リポジトリのID]
例えば、Sonatype Nexus 2のインストール直後のHosted、Proxy Repositoryの一覧は、このようになります。
※長いので、いくつか省略しました
※アクセスは、要認証
$ curl -u admin:admin123 http://172.17.0.2:8081/nexus/service/local/repositories
<repositories>
  <data>
    <repositories-item>
      <resourceURI>http://172.17.0.2:8081/nexus/service/local/repositories/central</resourceURI>
      <contentResourceURI>http://172.17.0.2:8081/nexus/content/repositories/central</contentResourceURI>
      <id>central</id>
      <name>Central</name>
      <repoType>proxy</repoType>
      <repoPolicy>RELEASE</repoPolicy>
      <provider>maven2</provider>
      <providerRole>org.sonatype.nexus.proxy.repository.Repository</providerRole>
      <format>maven2</format>
      <userManaged>true</userManaged>
      <exposed>true</exposed>
      <effectiveLocalStorageUrl>file:/sonatype-work/storage/central</effectiveLocalStorageUrl>
      <remoteUri>https://repo.maven.apache.org/maven2</remoteUri>
    </repositories-item>

   ...

    <repositories-item>
      <resourceURI>http://172.17.0.2:8081/nexus/service/local/repositories/central-m1</resourceURI>
      <contentResourceURI>http://172.17.0.2:8081/nexus/content/shadows/central-m1</contentResourceURI>
      <id>central-m1</id>
      <name>Central M1 shadow</name>
      <repoType>virtual</repoType>
      <repoPolicy>RELEASE</repoPolicy>
      <provider>m2-m1-shadow</provider>
      <providerRole>org.sonatype.nexus.proxy.repository.ShadowRepository</providerRole>
      <format>maven1</format>
      <userManaged>true</userManaged>
      <exposed>true</exposed>
      <effectiveLocalStorageUrl>file:/sonatype-work/storage/central-m1</effectiveLocalStorageUrl>
    </repositories-item>

   ...

    <repositories-item>
      <resourceURI>http://172.17.0.2:8081/nexus/service/local/repositories/releases</resourceURI>
      <contentResourceURI>http://172.17.0.2:8081/nexus/content/repositories/releases</contentResourceURI>
      <id>releases</id>
      <name>Releases</name>
      <repoType>hosted</repoType>
      <repoPolicy>RELEASE</repoPolicy>
      <provider>maven2</provider>
      <providerRole>org.sonatype.nexus.proxy.repository.Repository</providerRole>
      <format>maven2</format>
      <userManaged>true</userManaged>
      <exposed>true</exposed>
      <effectiveLocalStorageUrl>file:/sonatype-work/storage/releases</effectiveLocalStorageUrl>
    </repositories-item>
  </data>
</repositories>
デフォルトで作成されている、MavenのHosted Repositoryの情報。
$ curl -u admin:admin123 http://172.17.0.2:8081/nexus/service/local/repositories/releases
<repository>
  <data>
    <contentResourceURI>http://172.17.0.2:8081/nexus/content/repositories/releases</contentResourceURI>
    <id>releases</id>
    <name>Releases</name>
    <provider>maven2</provider>
    <providerRole>org.sonatype.nexus.proxy.repository.Repository</providerRole>
    <format>maven2</format>
    <repoType>hosted</repoType>
    <exposed>true</exposed>
    <writePolicy>ALLOW_WRITE_ONCE</writePolicy>
    <browseable>true</browseable>
    <indexable>true</indexable>
    <notFoundCacheTTL>1440</notFoundCacheTTL>
    <repoPolicy>RELEASE</repoPolicy>
    <downloadRemoteIndexes>false</downloadRemoteIndexes>
    <defaultLocalStorageUrl>file:/sonatype-work/storage/releases</defaultLocalStorageUrl>
  </data>
</repository>
こんな感じです。
XMLの内容は、Web Consoleで確認することができる情報ほぼそのままなので、こちらを参考にリクエストとなるXMLを作成して
POSTします。
Mavenリポジトリを作成する
- Hosted Repository
- Proxy Repository
- Group Repository
それぞれひとつずつ作成していきます。
Hosted Repository。 create-maven2-hosted.xml
<?xml version="1.0" encoding="UTF-8"?>
<repository>
  <data>
    <id>my-maven-hosted-repo</id>
    <name>My Maven Hosted Repo</name>
    <repoType>hosted</repoType>
    <repoPolicy>RELEASE</repoPolicy>
    <provider>maven2</provider>
    <providerRole>org.sonatype.nexus.proxy.repository.Repository</providerRole>
    <format>maven2</format>
    <exposed>true</exposed>
    <browseable>true</browseable>
    <indexable>true</indexable>
    <notFoundCacheTTL>1440</notFoundCacheTTL>
  </data>
</repository>
URIやストレージのファイルパスの指定がありませんが、これはNexus側が設定してくれます。
idはURLのキーになったりしますし、providerやformatでMaven Repositoryであることを指定するなど、
けっこういろいろ設定する必要があります。はしょるとデフォルト値となるのですが、これがWeb Consoleで
デフォルト状態で作成した場合とは同じにならない…。
作成。
$ curl -u admin:admin123 -i -XPOST -H 'Content-Type: application/xml' http://172.17.0.2:8081/nexus/service/local/repositories -d @create-maven2-hosted.xml
結果。
HTTP/1.1 201 Created
Date: Sun, 09 Sep 2018 09:12:29 GMT
X-Frame-Options: SAMEORIGIN
X-Content-Type-Options: nosniff
Server: Nexus/2.14.9-01 Noelios-Restlet-Engine/1.1.6-SONATYPE-5348-V8
Content-Type: application/xml; charset=UTF-8
Content-Length: 789

<repository>
  <data>
    <contentResourceURI>http://172.17.0.2:8081/nexus/content/repositories/my-maven-hosted-repo</contentResourceURI>
    <id>my-maven-hosted-repo</id>
    <name>My Maven Hosted Repo</name>
    <provider>maven2</provider>
    <providerRole>org.sonatype.nexus.proxy.repository.Repository</providerRole>
    <format>maven2</format>
    <repoType>hosted</repoType>
    <exposed>true</exposed>
    <writePolicy>ALLOW_WRITE_ONCE</writePolicy>
    <browseable>true</browseable>
    <indexable>true</indexable>
    <notFoundCacheTTL>1440</notFoundCacheTTL>
    <repoPolicy>RELEASE</repoPolicy>
    <downloadRemoteIndexes>false</downloadRemoteIndexes>
    <defaultLocalStorageUrl>file:/sonatype-work/storage/my-maven-hosted-repo</defaultLocalStorageUrl>
  </data>
</repository>
続いて、Proxy Repositoryを作成します。
<?xml version="1.0" encoding="UTF-8"?>
<repository>
  <data>
    <id>my-maven-proxy-repo</id>
    <name>My Maven Proxy Repo</name>
    <provider>maven2</provider>
    <providerRole>org.sonatype.nexus.proxy.repository.Repository</providerRole>
    <format>maven2</format>
    <repoType>proxy</repoType>
    <exposed>true</exposed>
    <writePolicy>READ_ONLY</writePolicy>
    <browseable>true</browseable>
    <indexable>true</indexable>
    <notFoundCacheTTL>1440</notFoundCacheTTL>
    <repoPolicy>RELEASE</repoPolicy>
    <checksumPolicy>WARN</checksumPolicy>
    <downloadRemoteIndexes>false</downloadRemoteIndexes>
    <remoteStorage>
      <remoteStorageUrl>https://repo.maven.apache.org/maven2</remoteStorageUrl>
    </remoteStorage>
    <fileTypeValidation>true</fileTypeValidation>
    <artifactMaxAge>-1</artifactMaxAge>
    <metadataMaxAge>1440</metadataMaxAge>
    <itemMaxAge>1440</itemMaxAge>
    <autoBlockActive>true</autoBlockActive>
  </data>
</repository>
こちらは、repoTypeがproxyとなり、remoteStorageおよびremoteStrageUrlを設定する必要があります。
作成。
$ curl -u admin:admin123 -i -XPOST -H 'Content-Type: application/xml' http://172.17.0.2:8081/nexus/service/local/repositories -d @create-maven2-proxy.xml
結果。
HTTP/1.1 201 Created
Date: Sun, 09 Sep 2018 09:13:01 GMT
X-Frame-Options: SAMEORIGIN
X-Content-Type-Options: nosniff
Server: Nexus/2.14.9-01 Noelios-Restlet-Engine/1.1.6-SONATYPE-5348-V8
Content-Type: application/xml; charset=UTF-8
Content-Length: 1145

<repository>
  <data>
    <contentResourceURI>http://172.17.0.2:8081/nexus/content/repositories/my-maven-proxy-repo</contentResourceURI>
    <id>my-maven-proxy-repo</id>
    <name>My Maven Proxy Repo</name>
    <provider>maven2</provider>
    <providerRole>org.sonatype.nexus.proxy.repository.Repository</providerRole>
    <format>maven2</format>
    <repoType>proxy</repoType>
    <exposed>true</exposed>
    <writePolicy>READ_ONLY</writePolicy>
    <browseable>true</browseable>
    <indexable>true</indexable>
    <notFoundCacheTTL>1440</notFoundCacheTTL>
    <repoPolicy>RELEASE</repoPolicy>
    <checksumPolicy>WARN</checksumPolicy>
    <downloadRemoteIndexes>false</downloadRemoteIndexes>
    <defaultLocalStorageUrl>file:/sonatype-work/storage/my-maven-proxy-repo</defaultLocalStorageUrl>
    <remoteStorage>
      <remoteStorageUrl>https://repo.maven.apache.org/maven2</remoteStorageUrl>
    </remoteStorage>
    <fileTypeValidation>true</fileTypeValidation>
    <artifactMaxAge>-1</artifactMaxAge>
    <metadataMaxAge>1440</metadataMaxAge>
    <itemMaxAge>1440</itemMaxAge>
    <autoBlockActive>true</autoBlockActive>
  </data>
</repository>
最後、Group Repositoryです。
こちらは、タグの構造がだいぶ変わります。 create-maven2-group.xml
<?xml version="1.0" encoding="UTF-8"?>
<repo-group>
  <data>
    <id>my-maven-group-repo</id>
    <name>My Maven Group Repo</name>
    <provider>maven2</provider>
    <format>maven2</format>
    <repoType>group</repoType>
    <exposed>true</exposed>
    <repositories>
      <repo-group-member>
        <id>my-maven-hosted-repo</id>
      </repo-group-member>
      <repo-group-member>
        <id>my-maven-proxy-repo</id>
      </repo-group-member>
    </repositories>
  </data>
</repo-group>
repositories / repo-group-member内に、追加するリポジトリのidを指定すればOKです。nameなどは、Nexus側が設定してくれます。
エンドポイントは、HostedやProxy Repositoryと異なるので、注意。
$ curl -u admin:admin123 -i -XPOST -H 'Content-Type: application/xml' http://172.17.0.2:8081/nexus/service/local/repo_groups -d @create-maven2-group.xml
結果。
HTTP/1.1 201 Created
Date: Sun, 09 Sep 2018 09:13:26 GMT
X-Frame-Options: SAMEORIGIN
X-Content-Type-Options: nosniff
Server: Nexus/2.14.9-01 Noelios-Restlet-Engine/1.1.6-SONATYPE-5348-V8
Content-Type: application/xml; charset=UTF-8
Content-Length: 867

<repo-group>
  <data>
    <contentResourceURI>http://172.17.0.2:8081/nexus/content/groups/my-maven-group-repo</contentResourceURI>
    <id>my-maven-group-repo</id>
    <name>My Maven Group Repo</name>
    <provider>maven2</provider>
    <format>maven2</format>
    <repoType>group</repoType>
    <exposed>true</exposed>
    <repositories>
      <repo-group-member>
        <id>my-maven-hosted-repo</id>
        <name>My Maven Hosted Repo</name>
        <resourceURI>http://172.17.0.2:8081/nexus/service/local/repo_groups/my-maven-hosted-repo</resourceURI>
      </repo-group-member>
      <repo-group-member>
        <id>my-maven-proxy-repo</id>
        <name>My Maven Proxy Repo</name>
        <resourceURI>http://172.17.0.2:8081/nexus/service/local/repo_groups/my-maven-proxy-repo</resourceURI>
      </repo-group-member>
    </repositories>
  </data>
</repo-group>
これで、MavenリポジトリをREST APIで作れるようになりました、と。
npmリポジトリを作成する
最後は、npmリポジトリを作成します。こちらも、3種類のリポジトリを作成しましょう。
npm Hosted Repositoryから。
create-npm-hosted.xml
<?xml version="1.0" encoding="UTF-8"?>
<repository>
  <data>
    <id>my-npm-hosted-repo</id>
    <name>My npm Hosted Repo</name>
    <repoType>hosted</repoType>
    <provider>npm-hosted</provider>
    <providerRole>org.sonatype.nexus.proxy.repository.Repository</providerRole>
    <format>npm</format>
    <exposed>true</exposed>
    <writePolicy>ALLOW_WRITE_ONCE</writePolicy>
    <browseable>true</browseable>
    <indexable>false</indexable>
    <notFoundCacheTTL>1440</notFoundCacheTTL>
    <repoPolicy>MIXED</repoPolicy>
    <checksumPolicy>IGNORE</checksumPolicy>
    <downloadRemoteIndexes>false</downloadRemoteIndexes>
  </data>
</repository>
providerが、「npm-hosted」となっているところがポイントです。Mavenの時は、Hosted、Proxy、Groupに関わらず「maven2」でした。
npmの場合は、Hosted、Proxy、Groupそれぞれで異なります。
あと、repoPolicyやchecksumPolicy、indexableなどもMavenリポジトリの時とは異なります。
1度Web Consoleからリポジトリを作成して、内容をREST APIで確認してみるとよいでしょう。
作成。
$ curl -u admin:admin123 -i -XPOST -H 'Content-Type: application/xml' http://172.17.0.2:8081/nexus/service/local/repositories -d @create-npm-hosted.xml
結果。
HTTP/1.1 201 Created
Date: Sun, 09 Sep 2018 11:00:38 GMT
X-Frame-Options: SAMEORIGIN
X-Content-Type-Options: nosniff
Server: Nexus/2.14.9-01 Noelios-Restlet-Engine/1.1.6-SONATYPE-5348-V8
Content-Type: application/xml; charset=UTF-8
Content-Length: 825

<repository>
  <data>
    <contentResourceURI>http://172.17.0.2:8081/nexus/content/repositories/my-npm-hosted-repo</contentResourceURI>
    <id>my-npm-hosted-repo</id>
    <name>My npm Hosted Repo</name>
    <provider>npm-hosted</provider>
    <providerRole>org.sonatype.nexus.proxy.repository.Repository</providerRole>
    <format>npm</format>
    <repoType>hosted</repoType>
    <exposed>true</exposed>
    <writePolicy>ALLOW_WRITE_ONCE</writePolicy>
    <browseable>true</browseable>
    <indexable>false</indexable>
    <notFoundCacheTTL>1440</notFoundCacheTTL>
    <repoPolicy>MIXED</repoPolicy>
    <checksumPolicy>IGNORE</checksumPolicy>
    <downloadRemoteIndexes>false</downloadRemoteIndexes>
    <defaultLocalStorageUrl>file:/sonatype-work/storage/my-npm-hosted-repo</defaultLocalStorageUrl>
  </data>
</repository>
Proxy Repository。
create-npm-proxy.xml
<?xml version="1.0" encoding="UTF-8"?>
<repository>
  <data>
    <id>my-npm-proxy-repo</id>
    <name>My npm Proxy Repo</name>
    <repoType>proxy</repoType>
    <repoPolicy>MIXED</repoPolicy>
    <provider>npm-proxy</provider>
    <providerRole>org.sonatype.nexus.proxy.repository.Repository</providerRole>
    <format>npm</format>
    <exposed>true</exposed>
    <writePolicy>READ_ONLY</writePolicy>
    <browseable>true</browseable>
    <indexable>false</indexable>
    <notFoundCacheTTL>1440</notFoundCacheTTL>
    <checksumPolicy>IGNORE</checksumPolicy>
    <downloadRemoteIndexes>false</downloadRemoteIndexes>
    <remoteStorage>
      <remoteStorageUrl>https://registry.npmjs.org</remoteStorageUrl>
    </remoteStorage>
    <fileTypeValidation>true</fileTypeValidation>
    <artifactMaxAge>0</artifactMaxAge>
    <metadataMaxAge>0</metadataMaxAge>
    <itemMaxAge>1440</itemMaxAge>
    <autoBlockActive>true</autoBlockActive>
  </data>
</repository>
こちらは、providerが「npm-proxy」となります。
作成。
$ curl -u admin:admin123 -i -XPOST -H 'Content-Type: application/xml' http://172.17.0.2:8081/nexus/service/local/repositories -d @create-npm-proxy.xml
結果。
HTTP/1.1 201 Created
Date: Sun, 09 Sep 2018 11:02:41 GMT
X-Frame-Options: SAMEORIGIN
X-Content-Type-Options: nosniff
Server: Nexus/2.14.9-01 Noelios-Restlet-Engine/1.1.6-SONATYPE-5348-V8
Content-Type: application/xml; charset=UTF-8
Content-Length: 1129

<repository>
  <data>
    <contentResourceURI>http://172.17.0.2:8081/nexus/content/repositories/my-npm-proxy-repo</contentResourceURI>
    <id>my-npm-proxy-repo</id>
    <name>My npm Proxy Repo</name>
    <provider>npm-proxy</provider>
    <providerRole>org.sonatype.nexus.proxy.repository.Repository</providerRole>
    <format>npm</format>
    <repoType>proxy</repoType>
    <exposed>true</exposed>
    <writePolicy>READ_ONLY</writePolicy>
    <browseable>true</browseable>
    <indexable>false</indexable>
    <notFoundCacheTTL>1440</notFoundCacheTTL>
    <repoPolicy>MIXED</repoPolicy>
    <checksumPolicy>IGNORE</checksumPolicy>
    <downloadRemoteIndexes>false</downloadRemoteIndexes>
    <defaultLocalStorageUrl>file:/sonatype-work/storage/my-npm-proxy-repo</defaultLocalStorageUrl>
    <remoteStorage>
      <remoteStorageUrl>https://registry.npmjs.org</remoteStorageUrl>
    </remoteStorage>
    <fileTypeValidation>true</fileTypeValidation>
    <artifactMaxAge>0</artifactMaxAge>
    <metadataMaxAge>0</metadataMaxAge>
    <itemMaxAge>1440</itemMaxAge>
    <autoBlockActive>true</autoBlockActive>
  </data>
</repository>
Group Repository。
create-npm-group.xml
<?xml version="1.0" encoding="UTF-8"?>
<repo-group>
  <data>
    <id>my-npm-group-repo</id>
    <name>My npm Group Repo</name>
    <provider>npm-group</provider>
    <format>npm</format>
    <repoType>group</repoType>
    <exposed>true</exposed>
    <repositories>
      <repo-group-member>
        <id>my-npm-hosted-repo</id>
      </repo-group-member>
      <repo-group-member>
        <id>my-npm-proxy-repo</id>
      </repo-group-member>
    </repositories>
  </data>
</repo-group>
こちらは、providerが「npm-group」。
作成。
$ curl -u admin:admin123 -i -XPOST -H 'Content-Type: application/xml' http://172.17.0.2:8081/nexus/service/local/repo_groups -d @create-npm-group.xml
結果。
HTTP/1.1 201 Created
Date: Sun, 09 Sep 2018 11:04:25 GMT
X-Frame-Options: SAMEORIGIN
X-Content-Type-Options: nosniff
Server: Nexus/2.14.9-01 Noelios-Restlet-Engine/1.1.6-SONATYPE-5348-V8
Content-Type: application/xml; charset=UTF-8
Content-Length: 849

<repo-group>
  <data>
    <contentResourceURI>http://172.17.0.2:8081/nexus/content/groups/my-npm-group-repo</contentResourceURI>
    <id>my-npm-group-repo</id>
    <name>My npm Group Repo</name>
    <provider>npm-group</provider>
    <format>npm</format>
    <repoType>group</repoType>
    <exposed>true</exposed>
    <repositories>
      <repo-group-member>
        <id>my-npm-hosted-repo</id>
        <name>My npm Hosted Repo</name>
        <resourceURI>http://172.17.0.2:8081/nexus/service/local/repo_groups/my-npm-hosted-repo</resourceURI>
      </repo-group-member>
      <repo-group-member>
        <id>my-npm-proxy-repo</id>
        <name>My npm Proxy Repo</name>
        <resourceURI>http://172.17.0.2:8081/nexus/service/local/repo_groups/my-npm-proxy-repo</resourceURI>
      </repo-group-member>
    </repositories>
  </data>
</repo-group>
これで、npmリポジトリも作成できました。
だいぶ長くなりましたが、Sonatype Nexus 3と2それぞれで、Web Consoleを使うことなくリポジトリを作成することができそうです。