これは、なにをしたくて書いたもの?
ここまでSpring SecurityのOAuth 2.0サポートとKeycloak 19.0を使っていて、ログアウトをかなり適当にしていました。
こんな感じに、ログアウト用のURLとログアウト後に表示するURLを設定していただけですね。
@EnableWebSecurity
public class OAuth2ClientSecurityConfig {
    @Bean
    public SecurityFilterChain filterChain(HttpSecurity http) throws Exception {
        http
                .authorizeHttpRequests(authorize -> authorize
                        .mvcMatchers("/secure/**").authenticated()
                        .anyRequest().permitAll())
                .oauth2Login(Customizer.withDefaults())
                .logout(logout -> logout
                        .logoutUrl("/logout")
                        .logoutSuccessUrl("/"));

        return http.build();
    }
}
Spring SecurityのOAuth 2.0サポートでKeycloak 19.0を使った認証を試す - CLOVER🍀
これだとSpring Securityを組み込んだアプリケーションからはログアウトするものの、Keycloakからはログアウトしないので再度ログインが
必要なページにアクセスするとそのままするっとログインしてしまいます。Keycloak側はログインしたままだからです。
今回は、Keycloakからもちゃんとログアウトするようにしたいと思います。
Spring SecurityのOAuth 2.0サポートの機能を使ってログアウトする
まず、通常のSpring Securityのログアウトに関する内容は、こちらに記載があります。
Handling Logouts :: Spring Security
Spring SecurityのOAuth 2.0サポートの機能を使って、認可サーバー(OpenID ConnectではOpenID Provider)からもログアウトする方法は、
こちらに書かれています。
Advanced Configuration / OpenID Connect 1.0 Logout
ポイントは、以下になります。
- OpenID Provider(OP)がセッション管理とOpenID Connect Discoveryをサポートしていること
spring.security.oauth2.client.provider.[provider].issuer-uriプロパティに認可サーバー(OP)のURIを設定するOidcClientInitiatedLogoutSuccessHandlerをLogoutSuccessHandlerとして設定する- この時、ログアウト後にリダイレクトしてくるURLを設定する
Keycloak側にも準備は必要になるのですが、わかってしまえば簡単なので進めていきましょう。
環境
今回の環境は、こちら。
$ java --version
openjdk 17.0.4 2022-07-19
OpenJDK Runtime Environment (build 17.0.4+8-Ubuntu-120.04)
OpenJDK 64-Bit Server VM (build 17.0.4+8-Ubuntu-120.04, mixed mode, sharing)


$ mvn --version
Apache Maven 3.8.6 (84538c9988a25aec085021c365c560670ad80f63)
Maven home: $HOME/.sdkman/candidates/maven/current
Java version: 17.0.4, vendor: Private Build, runtime: /usr/lib/jvm/java-17-openjdk-amd64
Default locale: ja_JP, platform encoding: UTF-8
OS name: "linux", version: "5.4.0-125-generic", arch: "amd64", family: "unix"
Keycloakは19.0.2を使い、172.17.0.2で動作しているものとします。
$ bin/kc.sh --version
Keycloak 19.0.2
JVM: 17.0.4.1 (Eclipse Adoptium OpenJDK 64-Bit Server VM 17.0.4.1+1)
OS: Linux 5.4.0-125-generic amd64
Keycloakの管理ユーザーは、起動時に作成しておきます。
$ KEYCLOAK_ADMIN=admin KEYCLOAK_ADMIN_PASSWORD=password bin/kc.sh start-dev
お題
今回は、KeycloakのRealmにユーザーを作成し、シンプルにログアウトするだけにします。特に認可といったところは見ません。
Keycloakの準備
Keycloakの準備をしていきましょう。
以下の情報、手順で作成していきます。
- Realm
- Realmの名前を
sample-realmとして作成
- Realmの名前を
特に、デフォルト設定から変更するところがわかるようにしたいと思います。
- クライアント(Client)
- 作成時
- 作成後
- Settingsタブ
- Root URLを
http://localhost:8080に設定 - Valid redirect URIsに
http://localhost:8080/login/oauth2/code/keycloakを設定- ※アプリケーション側の
spring.security.oauth2.client.registration.keycloak.redirect-uriに指定する値と同じ
- ※アプリケーション側の
- Valid post logout redirect URIsに
http://localhost:8080/welcomeを指定- ログアウト後にクライアントに戻ってくる時のURL
OidcClientInitiatedLogoutSuccessHandler#setPostLogoutRedirectUriに指定する値と同じ
- 保存
- Root URLを
- Settingsタブ
また、CredentialsタブのClient secretの値を控えておきます。
あとは、ユーザーの作成です。
- ユーザー(User)
test-userの作成- 作成時
- Usernameを
test-userとして作成
- Usernameを
- 作成後
- Credentialsタブ
- パスワードを設定
- TemporaryをOffに設定
- 保存
- Credentialsタブ
- 作成時
少し見返しましょう。今回のポイントは、クライアントに設定する「Valid post logout redirect URIs」です。

こちらが今回のテーマでは必要な設定になります。
Spring Bootプロジェクトを作成する。
では、アプリケーションを作成していきます。依存関係にwebとoauth2-clientを指定して、プロジェクトを作成。
$ curl -s https://start.spring.io/starter.tgz \
  -d bootVersion=2.7.3 \
  -d javaVersion=17 \
  -d name=spring-security-oauth2-client-logout-example \
  -d groupId=org.littlewings \
  -d artifactId=spring-security-oauth2-client-logout-example \
  -d version=0.0.1-SNAPSHOT \
  -d packageName=org.littlewings.keycloak.spring \
  -d dependencies=web,oauth2-client \
  -d baseDir=spring-security-oauth2-client-logout-example | tar zxvf -
プロジェクト内に移動。
$ cd spring-security-oauth2-client-logout-example
        <properties>
                <java.version>17</java.version>
        </properties>
        <dependencies>
                <dependency>
                        <groupId>org.springframework.boot</groupId>
                        <artifactId>spring-boot-starter-oauth2-client</artifactId>
                </dependency>
                <dependency>
                        <groupId>org.springframework.boot</groupId>
                        <artifactId>spring-boot-starter-web</artifactId>
                </dependency>

                <dependency>
                        <groupId>org.springframework.boot</groupId>
                        <artifactId>spring-boot-starter-test</artifactId>
                        <scope>test</scope>
                </dependency>
        </dependencies>

        <build>
                <plugins>
                        <plugin>
                                <groupId>org.springframework.boot</groupId>
                                <artifactId>spring-boot-maven-plugin</artifactId>
                        </plugin>
                </plugins>
        </build>
自動生成されたソースコードは、削除しておきます。
$ rm src/main/java/org/littlewings/keycloak/spring/SpringSecurityOauth2ClientLogoutExampleApplication.java src/test/java/org/littlewings/keycloak/spring/SpringSecurityOauth2ClientLogoutExampleApplicationTests.java
ソースコードを作成していきます。
Spring SecurityのOAuth 2.0に関する設定。
src/main/java/org/littlewings/keycloak/spring/OAuth2ClientSecurityConfig.java
package org.littlewings.keycloak.spring;

import org.springframework.beans.factory.annotation.Autowired;
import org.springframework.context.annotation.Bean;
import org.springframework.security.config.Customizer;
import org.springframework.security.config.annotation.web.builders.HttpSecurity;
import org.springframework.security.config.annotation.web.configuration.EnableWebSecurity;
import org.springframework.security.oauth2.client.oidc.web.logout.OidcClientInitiatedLogoutSuccessHandler;
import org.springframework.security.oauth2.client.registration.ClientRegistrationRepository;
import org.springframework.security.web.SecurityFilterChain;
import org.springframework.security.web.authentication.logout.LogoutSuccessHandler;

@EnableWebSecurity
public class OAuth2ClientSecurityConfig {
    @Autowired
    ClientRegistrationRepository clientRegistrationRepository;

    @Bean
    public SecurityFilterChain filterChain(HttpSecurity http) throws Exception {
        http
                .authorizeHttpRequests(authorize -> authorize
                        .mvcMatchers("/auth/**").authenticated()
                        .anyRequest().permitAll())
                .oauth2Login(Customizer.withDefaults())
                .logout(logout -> logout
                        .logoutUrl("/logout")
                        .logoutSuccessHandler(oidcLogoutSuccessHandler()));

        return http.build();
    }

    LogoutSuccessHandler oidcLogoutSuccessHandler() {
        OidcClientInitiatedLogoutSuccessHandler oidcClientInitiatedLogoutSuccessHandler =
                new OidcClientInitiatedLogoutSuccessHandler(clientRegistrationRepository);

        oidcClientInitiatedLogoutSuccessHandler.setPostLogoutRedirectUri("{baseUrl}/welcome");

        return oidcClientInitiatedLogoutSuccessHandler;
    }
}
/auth配下のみ、認証必須にしました。
        http
                .authorizeHttpRequests(authorize -> authorize
                        .mvcMatchers("/auth/**").authenticated()
                        .anyRequest().permitAll())
今回のポイントとなるログアウトに関する内容はほぼドキュメント通りですが、簡単に解説。
ClientRegistrationRepositoryが必要になるので、インジェクションしておきます。
    @Autowired
    ClientRegistrationRepository clientRegistrationRepository;
OidcClientInitiatedLogoutSuccessHandlerのインスタンスを作成します。この時に、ClientRegistrationRepositoryを渡します。
    LogoutSuccessHandler oidcLogoutSuccessHandler() {
        OidcClientInitiatedLogoutSuccessHandler oidcClientInitiatedLogoutSuccessHandler =
                new OidcClientInitiatedLogoutSuccessHandler(clientRegistrationRepository);

        oidcClientInitiatedLogoutSuccessHandler.setPostLogoutRedirectUri("{baseUrl}/welcome");

        return oidcClientInitiatedLogoutSuccessHandler;
    }
OidcClientInitiatedLogoutSuccessHandler#setPostLogoutRedirectUriには、ログアウト後にOPからリダイレクトしてくるURLを設定します。
{baseUrl}はプレースホルダーになっていて、アプリケーションのURLに実行時に書き換えられます。今回はローカルで動作させるので、
http://localhost:8080/welcomeになります。
ここで指定したURLは、Keycloakの「Valid post logout redirect URIs」と合わせる必要があります。
あとは、Spring Securityのログアウトの設定にOidcClientInitiatedLogoutSuccessHandlerのインスタンスを設定します。
                .logout(logout -> logout
                        .logoutUrl("/logout")
                        .logoutSuccessHandler(oidcLogoutSuccessHandler()));
アプリケーション側のログアウトのURLは/logout(デフォルトと同じ)としました。
RestController。
src/main/java/org/littlewings/keycloak/spring/SampleController.java
package org.littlewings.keycloak.spring;

import org.springframework.security.oauth2.client.authentication.OAuth2AuthenticationToken;
import org.springframework.web.bind.annotation.GetMapping;
import org.springframework.web.bind.annotation.RestController;

@RestController
public class SampleController {
    @GetMapping({"", "welcome"})
    public String index() {
        return "Hello, Spring Security Application!!";
    }

    @GetMapping("token")
    public Object token(OAuth2AuthenticationToken authenticationToken) {
        return authenticationToken != null ? authenticationToken : "not login";
    }

    @GetMapping("auth/token")
    public OAuth2AuthenticationToken authenticated(OAuth2AuthenticationToken authenticationToken) {
        return authenticationToken;
    }
}
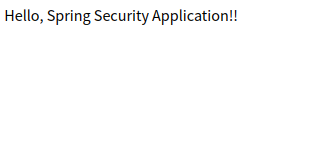
こちらのエンドポイントが、トップページとログアウト後に戻ってくる先を兼ねます。
    @GetMapping({"", "welcome"})
    public String index() {
        return "Hello, Spring Security Application!!";
    }
こちらは、認証必須のエンドポイントですね。
    @GetMapping("auth/token")
    public OAuth2AuthenticationToken authenticated(OAuth2AuthenticationToken authenticationToken) {
        return authenticationToken;
    }
OAuth2AuthenticationTokenクラスは、Spring SecurityのOAuth 2.0サポートにおける認証情報です。
mainクラス。
src/main/java/org/littlewings/keycloak/spring/App.java
package org.littlewings.keycloak.spring;

import org.springframework.boot.SpringApplication;
import org.springframework.boot.autoconfigure.SpringBootApplication;

@SpringBootApplication
public class App {
    public static void main(String... args) {
        SpringApplication.run(App.class, args);
    }
}
アプリケーションの設定。
src/main/resources/application.properties
spring.security.oauth2.client.registration.keycloak.client-id=spring-security-client
spring.security.oauth2.client.registration.keycloak.client-secret=tRvt8SaSlxJxheRgdceEgJ7nMKJQEzAg
spring.security.oauth2.client.registration.keycloak.client-name=spring security oauth2 authorization example
spring.security.oauth2.client.registration.keycloak.authorization-grant-type=authorization_code
spring.security.oauth2.client.registration.keycloak.scope=openid
spring.security.oauth2.client.registration.keycloak.redirect-uri={baseUrl}/login/oauth2/code/{registrationId}

spring.security.oauth2.client.provider.keycloak.authorization-uri=http://172.17.0.2:8080/realms/sample-realm/protocol/openid-connect/auth
spring.security.oauth2.client.provider.keycloak.token-uri=http://172.17.0.2:8080/realms/sample-realm/protocol/openid-connect/token
spring.security.oauth2.client.provider.keycloak.user-info-uri=http://172.17.0.2:8080/realms/sample-realm/protocol/openid-connect/userinfo
spring.security.oauth2.client.provider.keycloak.jwk-set-uri=http://172.17.0.2:8080/realms/sample-realm/protocol/openid-connect/certs
spring.security.oauth2.client.provider.keycloak.issuer-uri=http://172.17.0.2:8080/realms/sample-realm
spring.security.oauth2.client.provider.keycloak.user-name-attribute=preferred_username

spring.jackson.serialization.indent_output=true
#logging.level.org.springframework.security=DEBUG
今回のポイントは、spring.security.oauth2.client.provider.[provider].issuer-uriですね。
spring.security.oauth2.client.provider.keycloak.issuer-uri=http://172.17.0.2:8080/realms/sample-realm
Keycloakの場合は、http(s)://[Keycloakの動作しているホスト](:[port])/realms/[Realm]を指定します。
動作確認してみる
それでは、動作確認していきましょう。
アプリケーションを起動。
$ mvn spring-boot:run
ログインしないまま、http://localhost:8080/にアクセス。
ログインを必要とするhttp://localhost:8080/auth/tokenにアクセス。
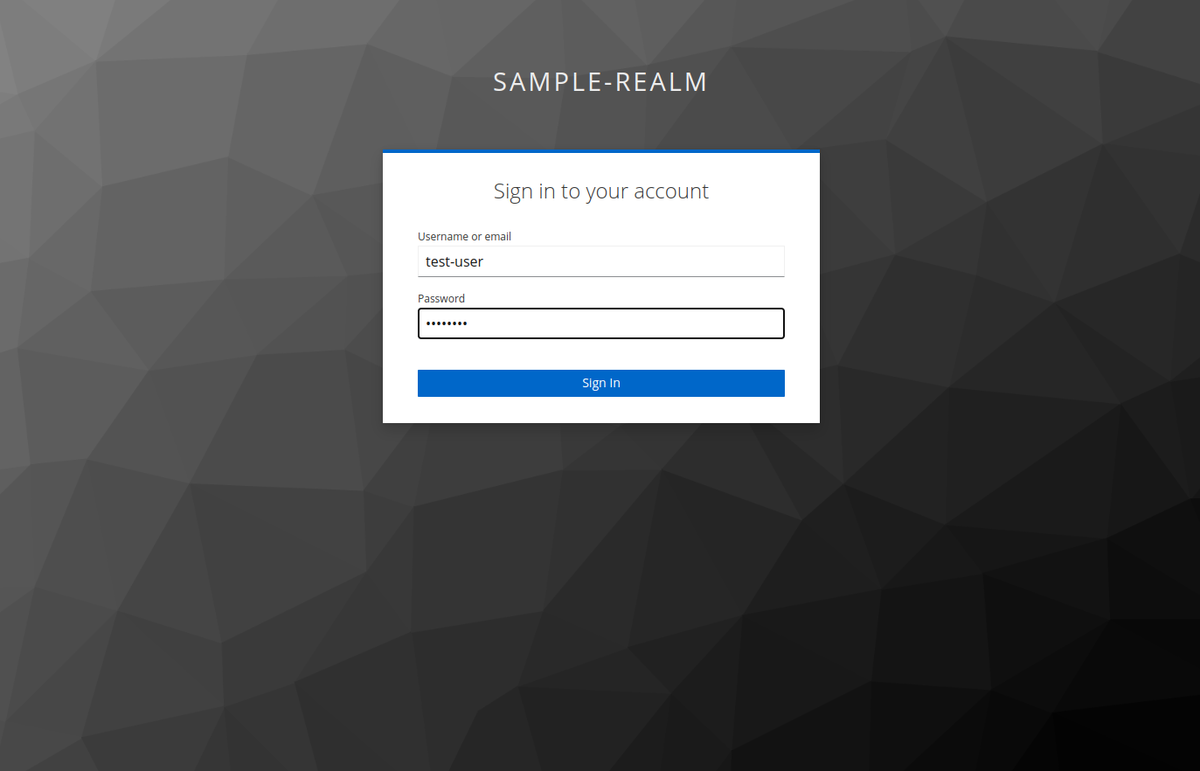
Keycloakのログイン画面にリダイレクトされるので、ログイン情報を入力して「Sign In」。
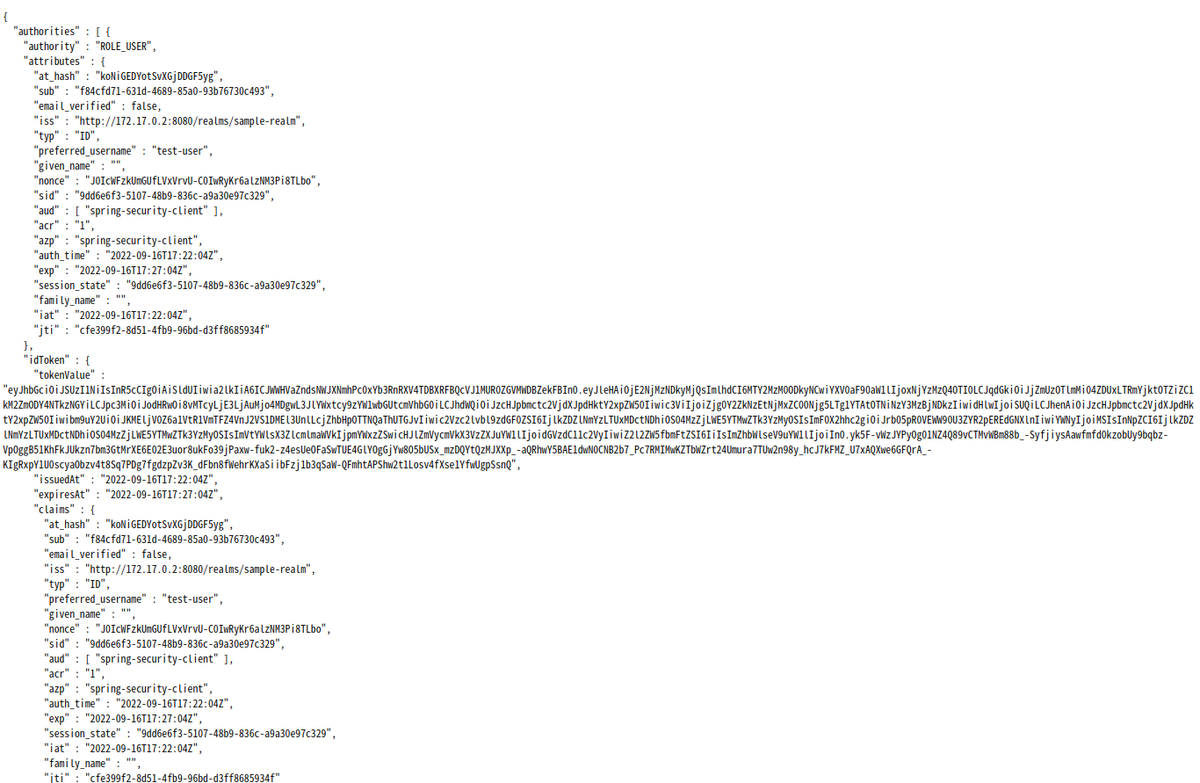
もともとアクセスしたかったhttp://localhost:8080/auth/tokenにリダイレクトされます。
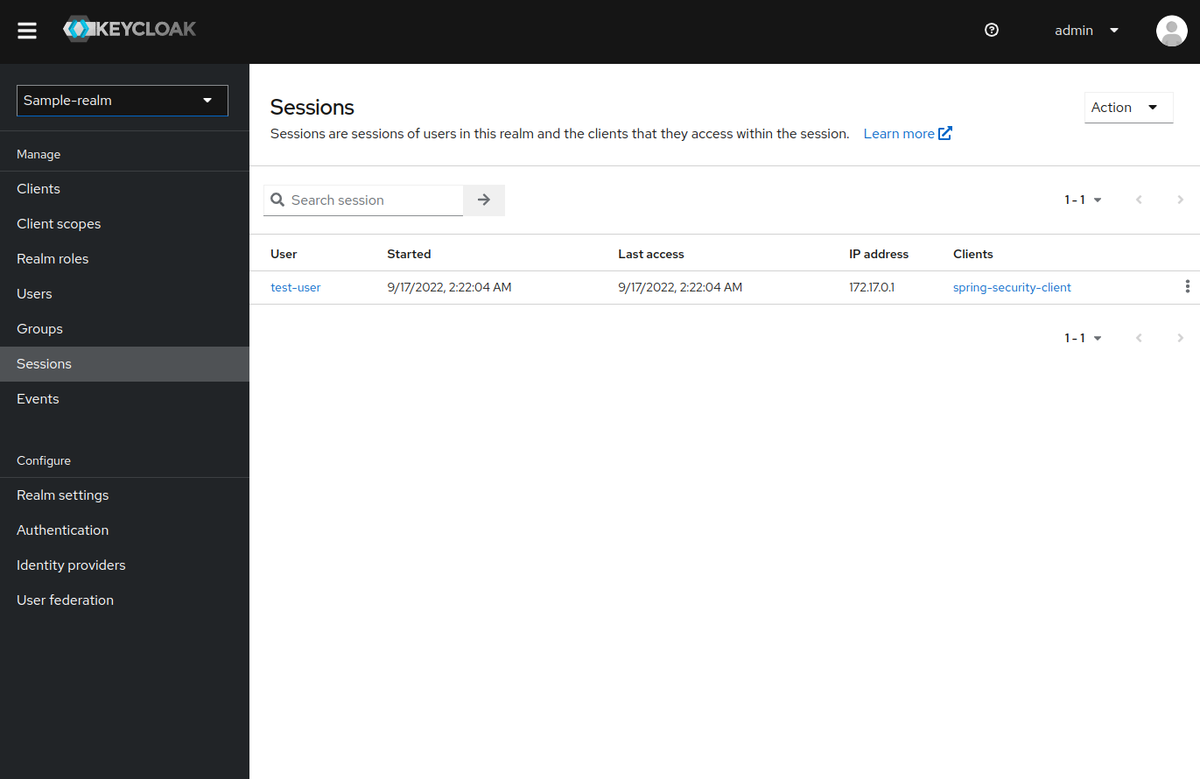
この時、Keycloak側では「Sessions」を見るとログイン済みのユーザーがいることを確認できます。
では、ログアウトしてみましょう。http://localhost:8080/logoutにアクセス。
本当にログアウトするの?的な感じで聞かれますが、ログアウト。

ログアウトすると、http://localhost:8080/welcomeにリダイレクトされます。

ログアウトできたようです。
Keycloak側も確認してみましょう。「Sessions」を見てみます。

ユーザーがいなくなりましたね。
http://localhost:8080/auth/tokenにアクセスすると、今度はログイン画面が表示されるのでログアウトできたみたいですね。

これで、今回確認したかった内容はOKです。
Spring Security OAuth 2.0サポートと、Keycloakの設定をもう少し確認してみる
spring.security.oauth2.client.provider.[provider].issuer-uriに設定したURLからは、どんな情報が得られるんでしょうね。
確認してみましょう。
$ curl -s http://172.17.0.2:8080/realms/sample-realm | jq
{
  "realm": "sample-realm",
  "public_key": "MIIBIjANBgkqhkiG9w0BAQEFAAOCAQ8AMIIBCgKCAQEA1oaWAg884Dr7oydVe/UnDpQ0rjBCpJSzdxsCKH7ATn/kEwnnM/FZ5J5IWu4s8X+Z633kateaSNtK8ig9VaN7+8Hf9K6bb8Tl47aEMWof+7yCoocO9iFWf3mNRAFZAPm2nQz6vkDr5M2GN7ZrVwYhCMAT5vhuiD3+GyefkbFF0QRF6Njw3F+ftpG4UUzysVJCF2MKyZWtA8XOd4KSlFzkh8J5pY/ASg6YtOH4imVYdeCc3GQexWXqkTWEQBfh/xFJE2M/RCs1lOY+Nbx53ntO4nZN1TrQ1K5p6MOr7H8yEud0AFgWgDWaWJ5a1oUGLgObiqS45TFOfZbf/hcvxUmy+QIDAQAB",
  "token-service": "http://172.17.0.2:8080/realms/sample-realm/protocol/openid-connect",
  "account-service": "http://172.17.0.2:8080/realms/sample-realm/account",
  "tokens-not-before": 0
}
これがわかると、Discoveryメタデータへのアクセスもできることになるので、確認してみましょう。
If the OpenID Provider supports both Session Management and Discovery, the client may obtain the end_session_endpoint URL from the OpenID Provider’s Discovery Metadata.
Advanced Configuration / OpenID Connect 1.0 Logout
$ curl -s http://172.17.0.2:8080/realms/sample-realm/.well-known/openid-configuration | jq
{
  "issuer": "http://172.17.0.2:8080/realms/sample-realm",
  "authorization_endpoint": "http://172.17.0.2:8080/realms/sample-realm/protocol/openid-connect/auth",
  "token_endpoint": "http://172.17.0.2:8080/realms/sample-realm/protocol/openid-connect/token",
  "introspection_endpoint": "http://172.17.0.2:8080/realms/sample-realm/protocol/openid-connect/token/introspect",
  "userinfo_endpoint": "http://172.17.0.2:8080/realms/sample-realm/protocol/openid-connect/userinfo",
  "end_session_endpoint": "http://172.17.0.2:8080/realms/sample-realm/protocol/openid-connect/logout",
  "frontchannel_logout_session_supported": true,
  "frontchannel_logout_supported": true,
  "jwks_uri": "http://172.17.0.2:8080/realms/sample-realm/protocol/openid-connect/certs",
  "check_session_iframe": "http://172.17.0.2:8080/realms/sample-realm/protocol/openid-connect/login-status-iframe.html",
  "grant_types_supported": [
    "authorization_code",
    "implicit",
    "refresh_token",
    "password",
    "client_credentials",
    "urn:ietf:params:oauth:grant-type:device_code",
    "urn:openid:params:grant-type:ciba"
  ],
  "acr_values_supported": [
    "0",
    "1"
  ],
  "response_types_supported": [
    "code",
    "none",
    "id_token",
    "token",
    "id_token token",
    "code id_token",
    "code token",
    "code id_token token"
  ],
  "subject_types_supported": [
    "public",
    "pairwise"
  ],
  "id_token_signing_alg_values_supported": [
    "PS384",
    "ES384",
    "RS384",
    "HS256",
    "HS512",
    "ES256",
    "RS256",
    "HS384",
    "ES512",
    "PS256",
    "PS512",
    "RS512"
  ],
  "id_token_encryption_alg_values_supported": [
    "RSA-OAEP",
    "RSA-OAEP-256",
    "RSA1_5"
  ],
  "id_token_encryption_enc_values_supported": [
    "A256GCM",
    "A192GCM",
    "A128GCM",
    "A128CBC-HS256",
    "A192CBC-HS384",
    "A256CBC-HS512"
  ],
  "userinfo_signing_alg_values_supported": [
    "PS384",
    "ES384",
    "RS384",
    "HS256",
    "HS512",
    "ES256",
    "RS256",
    "HS384",
    "ES512",
    "PS256",
    "PS512",
    "RS512",
    "none"
  ],
  "userinfo_encryption_alg_values_supported": [
    "RSA-OAEP",
    "RSA-OAEP-256",
    "RSA1_5"
  ],
  "userinfo_encryption_enc_values_supported": [
    "A256GCM",
    "A192GCM",
    "A128GCM",
    "A128CBC-HS256",
    "A192CBC-HS384",
    "A256CBC-HS512"
  ],
  "request_object_signing_alg_values_supported": [
    "PS384",
    "ES384",
    "RS384",
    "HS256",
    "HS512",
    "ES256",
    "RS256",
    "HS384",
    "ES512",
    "PS256",
    "PS512",
    "RS512",
    "none"
  ],
  "request_object_encryption_alg_values_supported": [
    "RSA-OAEP",
    "RSA-OAEP-256",
    "RSA1_5"
  ],
  "request_object_encryption_enc_values_supported": [
    "A256GCM",
    "A192GCM",
    "A128GCM",
    "A128CBC-HS256",
    "A192CBC-HS384",
    "A256CBC-HS512"
  ],
  "response_modes_supported": [
    "query",
    "fragment",
    "form_post",
    "query.jwt",
    "fragment.jwt",
    "form_post.jwt",
    "jwt"
  ],
  "registration_endpoint": "http://172.17.0.2:8080/realms/sample-realm/clients-registrations/openid-connect",
  "token_endpoint_auth_methods_supported": [
    "private_key_jwt",
    "client_secret_basic",
    "client_secret_post",
    "tls_client_auth",
    "client_secret_jwt"
  ],
  "token_endpoint_auth_signing_alg_values_supported": [
    "PS384",
    "ES384",
    "RS384",
    "HS256",
    "HS512",
    "ES256",
    "RS256",
    "HS384",
    "ES512",
    "PS256",
    "PS512",
    "RS512"
  ],
  "introspection_endpoint_auth_methods_supported": [
    "private_key_jwt",
    "client_secret_basic",
    "client_secret_post",
    "tls_client_auth",
    "client_secret_jwt"
  ],
  "introspection_endpoint_auth_signing_alg_values_supported": [
    "PS384",
    "ES384",
    "RS384",
    "HS256",
    "HS512",
    "ES256",
    "RS256",
    "HS384",
    "ES512",
    "PS256",
    "PS512",
    "RS512"
  ],
  "authorization_signing_alg_values_supported": [
    "PS384",
    "ES384",
    "RS384",
    "HS256",
    "HS512",
    "ES256",
    "RS256",
    "HS384",
    "ES512",
    "PS256",
    "PS512",
    "RS512"
  ],
  "authorization_encryption_alg_values_supported": [
    "RSA-OAEP",
    "RSA-OAEP-256",
    "RSA1_5"
  ],
  "authorization_encryption_enc_values_supported": [
    "A256GCM",
    "A192GCM",
    "A128GCM",
    "A128CBC-HS256",
    "A192CBC-HS384",
    "A256CBC-HS512"
  ],
  "claims_supported": [
    "aud",
    "sub",
    "iss",
    "auth_time",
    "name",
    "given_name",
    "family_name",
    "preferred_username",
    "email",
    "acr"
  ],
  "claim_types_supported": [
    "normal"
  ],
  "claims_parameter_supported": true,
  "scopes_supported": [
    "openid",
    "address",
    "microprofile-jwt",
    "web-origins",
    "acr",
    "profile",
    "offline_access",
    "phone",
    "roles",
    "email"
  ],
  "request_parameter_supported": true,
  "request_uri_parameter_supported": true,
  "require_request_uri_registration": true,
  "code_challenge_methods_supported": [
    "plain",
    "S256"
  ],
  "tls_client_certificate_bound_access_tokens": true,
  "revocation_endpoint": "http://172.17.0.2:8080/realms/sample-realm/protocol/openid-connect/revoke",
  "revocation_endpoint_auth_methods_supported": [
    "private_key_jwt",
    "client_secret_basic",
    "client_secret_post",
    "tls_client_auth",
    "client_secret_jwt"
  ],
  "revocation_endpoint_auth_signing_alg_values_supported": [
    "PS384",
    "ES384",
    "RS384",
    "HS256",
    "HS512",
    "ES256",
    "RS256",
    "HS384",
    "ES512",
    "PS256",
    "PS512",
    "RS512"
  ],
  "backchannel_logout_supported": true,
  "backchannel_logout_session_supported": true,
  "device_authorization_endpoint": "http://172.17.0.2:8080/realms/sample-realm/protocol/openid-connect/auth/device",
  "backchannel_token_delivery_modes_supported": [
    "poll",
    "ping"
  ],
  "backchannel_authentication_endpoint": "http://172.17.0.2:8080/realms/sample-realm/protocol/openid-connect/ext/ciba/auth",
  "backchannel_authentication_request_signing_alg_values_supported": [
    "PS384",
    "ES384",
    "RS384",
    "ES256",
    "RS256",
    "ES512",
    "PS256",
    "PS512",
    "RS512"
  ],
  "require_pushed_authorization_requests": false,
  "pushed_authorization_request_endpoint": "http://172.17.0.2:8080/realms/sample-realm/protocol/openid-connect/ext/par/request",
  "mtls_endpoint_aliases": {
    "token_endpoint": "http://172.17.0.2:8080/realms/sample-realm/protocol/openid-connect/token",
    "revocation_endpoint": "http://172.17.0.2:8080/realms/sample-realm/protocol/openid-connect/revoke",
    "introspection_endpoint": "http://172.17.0.2:8080/realms/sample-realm/protocol/openid-connect/token/introspect",
    "device_authorization_endpoint": "http://172.17.0.2:8080/realms/sample-realm/protocol/openid-connect/auth/device",
    "registration_endpoint": "http://172.17.0.2:8080/realms/sample-realm/clients-registrations/openid-connect",
    "userinfo_endpoint": "http://172.17.0.2:8080/realms/sample-realm/protocol/openid-connect/userinfo",
    "pushed_authorization_request_endpoint": "http://172.17.0.2:8080/realms/sample-realm/protocol/openid-connect/ext/par/request",
    "backchannel_authentication_endpoint": "http://172.17.0.2:8080/realms/sample-realm/protocol/openid-connect/ext/ciba/auth"
  }
}
Spring SecurityのOAuth 2.0のドキュメントでは、end_session_endpointを必要としていたので、アプリケーションの実行時にSpringが
メタデータを把握できるようになったと言えます。
なお、ログアウトURLはこちらですね。
"end_session_endpoint": "http://172.17.0.2:8080/realms/sample-realm/protocol/openid-connect/logout",
ここで、Keycloak側のドキュメントも見てみます。
Server Administration Guide / SSO protocols / OpenID Connect / OIDC Logout
こういう記述がありました。
Once the user is redirected to the logout endpoint, Keycloak is going to send logout requests to clients to let them to invalidate their local user sessions, and potentially redirect the user to some URL once the logout process is finished.
今回試してみた内容(クライアントアプリケーションからログアウトするとともに、Keycloakからもログアウトする話ですね。
そして、post_logout_redirect_uri(Spring SecurityのOAuth 2.0サポートに設定した内容)と「Valid Post Logout Redirect URIs」が
一致しなくてはいけないことも書かれています。
Also the post_logout_redirect_uri parameter needs to match one of the Valid Post Logout Redirect URIs specified in the client configuration.
Keycloakのエンドポイントは、こちらにまとまっています。
Server Administration Guide / SSO protocols / OpenID Connect / / Keycloak server OIDC URI endpoints
今回ログアウトに使用したのはこちらですね。
/realms/{realm-name}/protocol/openid-connect/logout
Used for performing logouts.
ちなみに、「Valid Post Logout Redirect URIs」を削除すると

ログアウト時に「Invalid redirect uri」と言われてエラーになります。

この状態だと、クライアントアプリケーションからはログアウトしたものの、Keycloakからはログインできていない状態になってしまいます。
なので、「Valid Post Logout Redirect URIs」はちゃんとクライアント側の設定と合わせましょう、ということですね。
まとめ
Spring SecurityのOAuth 2.0サポートで、ログアウトの確認をしてみました。
OidcClientInitiatedLogoutSuccessHandler#setPostLogoutRedirectUriで設定していた内容と、Keycloak側の設定が最初は紐付かずに
やや苦労しましたが、最終的にはちゃんと通せたので良かったかなと。