CLOVER🍀

That was when it all began.

Spring SecurityのOAuth 2.0サポートで、Keycloak 19.0のクライアントスコープを使った認可を試す

これは、なにをしたくて書いたもの?

前に、Spring SecurityのOAuth 2.0サポートを使って認証を試してみました。

Spring SecurityのOAuth 2.0サポートでKeycloak 19.0を使った認証を試す - CLOVER🍀

今度は、クライアントスコープを使った認可を簡単に試してみたいと思います。

環境

今回の環境は、こちら。

$ java --version
openjdk 17.0.4 2022-07-19
OpenJDK Runtime Environment (build 17.0.4+8-Ubuntu-120.04)
OpenJDK 64-Bit Server VM (build 17.0.4+8-Ubuntu-120.04, mixed mode, sharing)


$ mvn --version
Apache Maven 3.8.6 (84538c9988a25aec085021c365c560670ad80f63)
Maven home: $HOME/.sdkman/candidates/maven/current
Java version: 17.0.4, vendor: Private Build, runtime: /usr/lib/jvm/java-17-openjdk-amd64
Default locale: ja_JP, platform encoding: UTF-8
OS name: "linux", version: "5.4.0-124-generic", arch: "amd64", family: "unix"

Keycloakは19.0.1を使い、172.17.0.2で動作しているものとします。

$ bin/kc.sh --version
Keycloak 19.0.1
JVM: 17.0.4 (Eclipse Adoptium OpenJDK 64-Bit Server VM 17.0.4+8)
OS: Linux 5.4.0-124-generic amd64

Keycloakの管理ユーザーは、起動時に作成。

$ KEYCLOAK_ADMIN=admin KEYCLOAK_ADMIN_PASSWORD=password bin/kc.sh start-dev

お題

今回は、KeycloakのRealm内に作成したクライアントに対してクライアントスコープを付与し、アプリケーション側ではスコープの有無で
アクセス制御を行ってみたいと思います。

Keycloakの準備

まずは、Keycloakの準備をしておきます。

以下の情報、手順で作成していきます。

  • Realm
    • Realmの名前をsample-realmとして作成

特に、デフォルト設定から変更するところがわかるようにしたいと思います。

  • クライアント(Client)
    • 作成時
    • 作成後
      • Settingsタブ
        • Root URLをhttp://localhost:8080に設定
        • Valid redirect URIsにhttp://localhost:8080/*を設定
        • 保存

また、CredentialsタブのClient secretの値を控えておきます。

クライアントスコープ(Client Scope)は、この後に付与します。

  • ユーザー(User)
    • 作成時
      • Usernameをtest-userとして作成
    • 作成後
      • Credentialsタブ
        • パスワードを設定
        • TemporaryをOffに設定
        • 保存

クライアントスコープ(Client Scope)を作成する

次は、クライアントスコープを作成します。作成したクライアントスコープは、クライアントに付与することになります。

今回は、次の2つのスコープを作成することにします。

  • token
  • message

実際に付与するのは、tokenスコープだけにするのですが。

左メニューの「Client scopes」を選択して

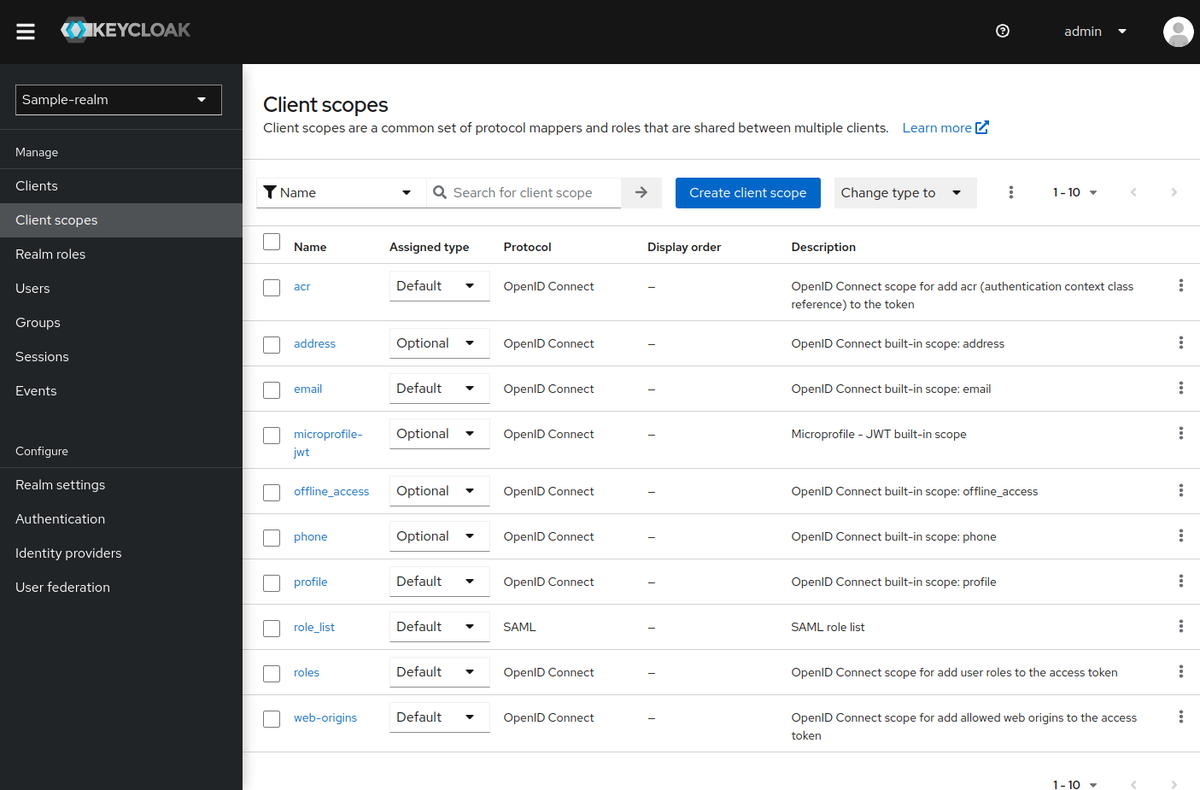
「Create client scope」を選択して、クライアントスコープを作成します。

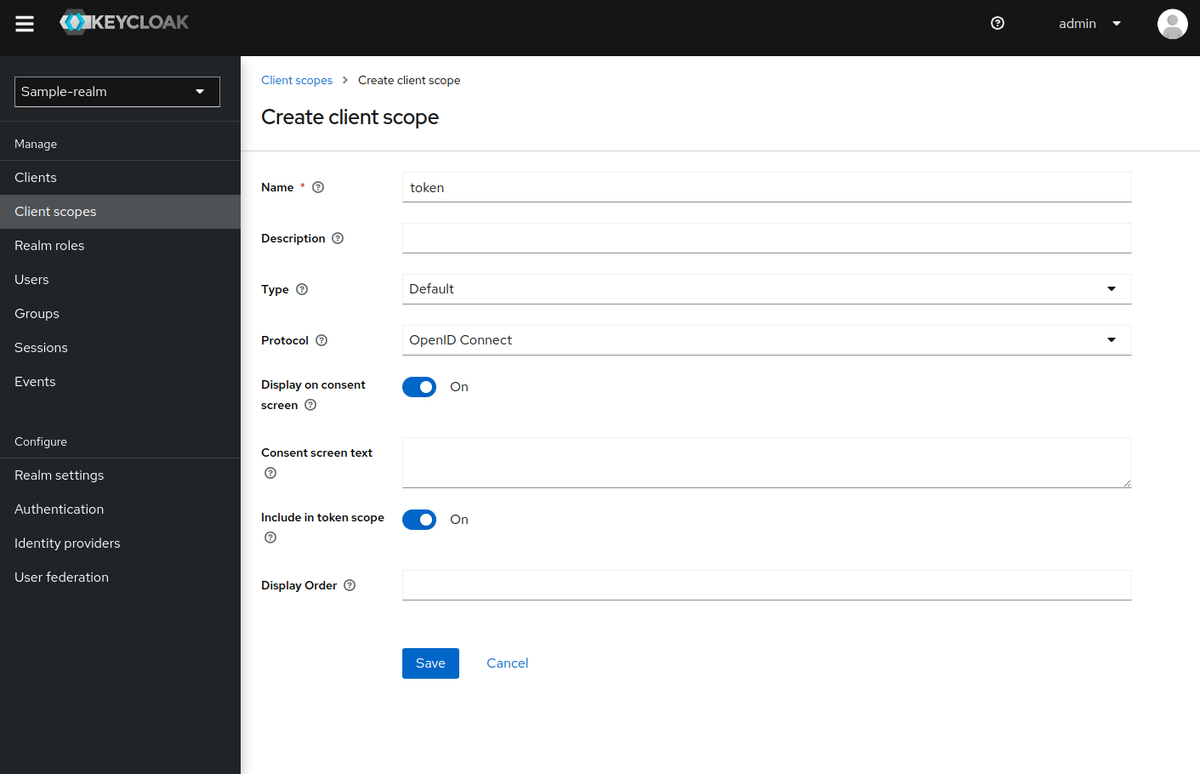
今回はNameとTypeのみを指定して、「Save」。

以下の情報で作成しました。

  • クライアントスコープ
    • token
      • Nameをtokenに設定
      • TypeをDefaultに設定
    • message
      • Nameをmessageに設定
      • TypeをDefaultに設定

ちなみに、ここでの「Type」は以下の3種類から選択できます。

  • Default … 新しくクライアントを作成した際に、自動で「Default」Typeとして付与されるスコープ
  • Optional … 新しくクライアントを作成した際に、自動で「Optional」Typeとして付与されるスコープ
  • None … 新しくクライアントを作成した際に、自動では付与されないスコープ
    • クライアントのスコープの紐づけを行うページで、明示的に付与することは可能

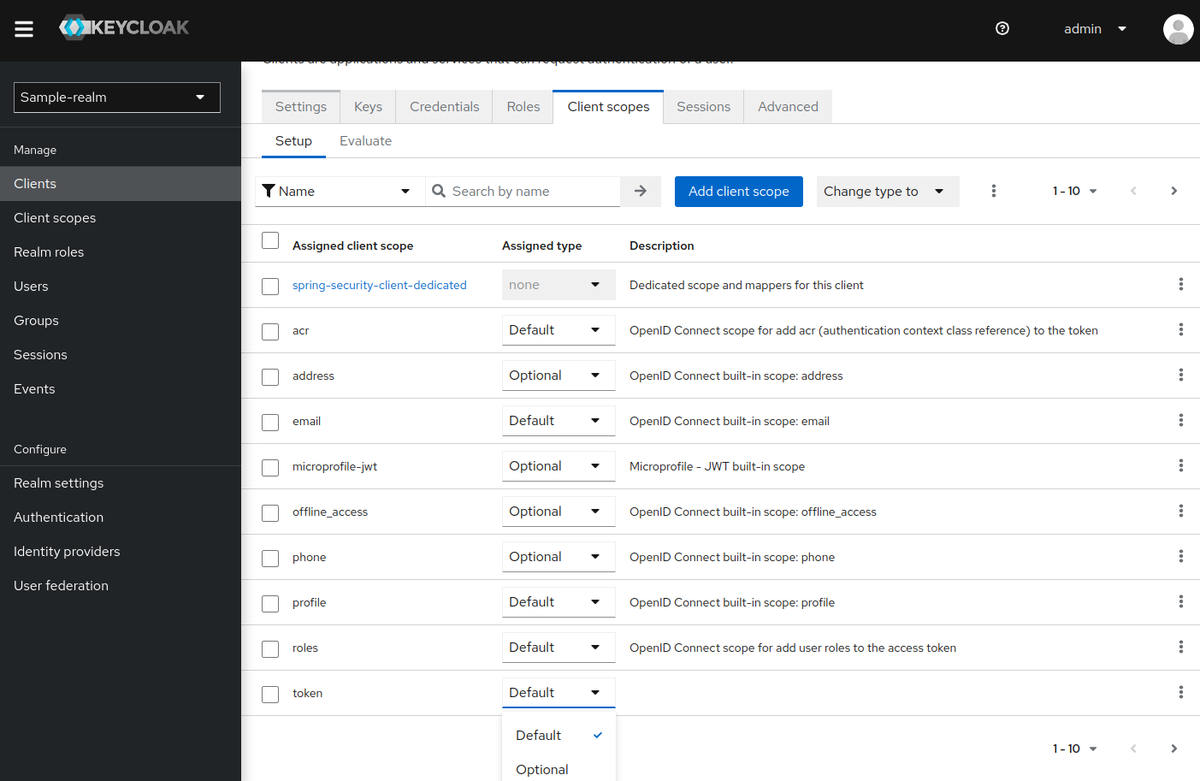
次に、クライアントの「Client scopes」タブを選択して

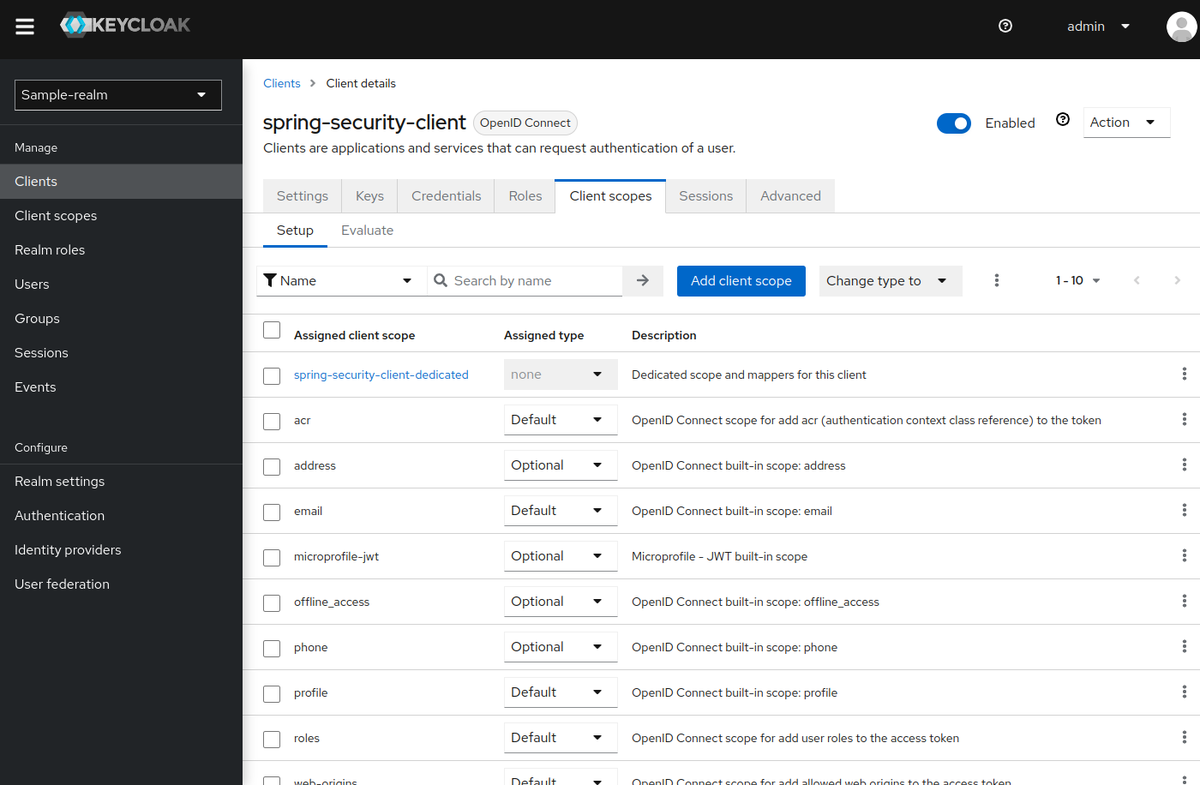
「Add client scope」を押すと、以下のような表示になるので、付与するスコープを選択。

この時、Typeを「Default」と「Optional」から選択できます。

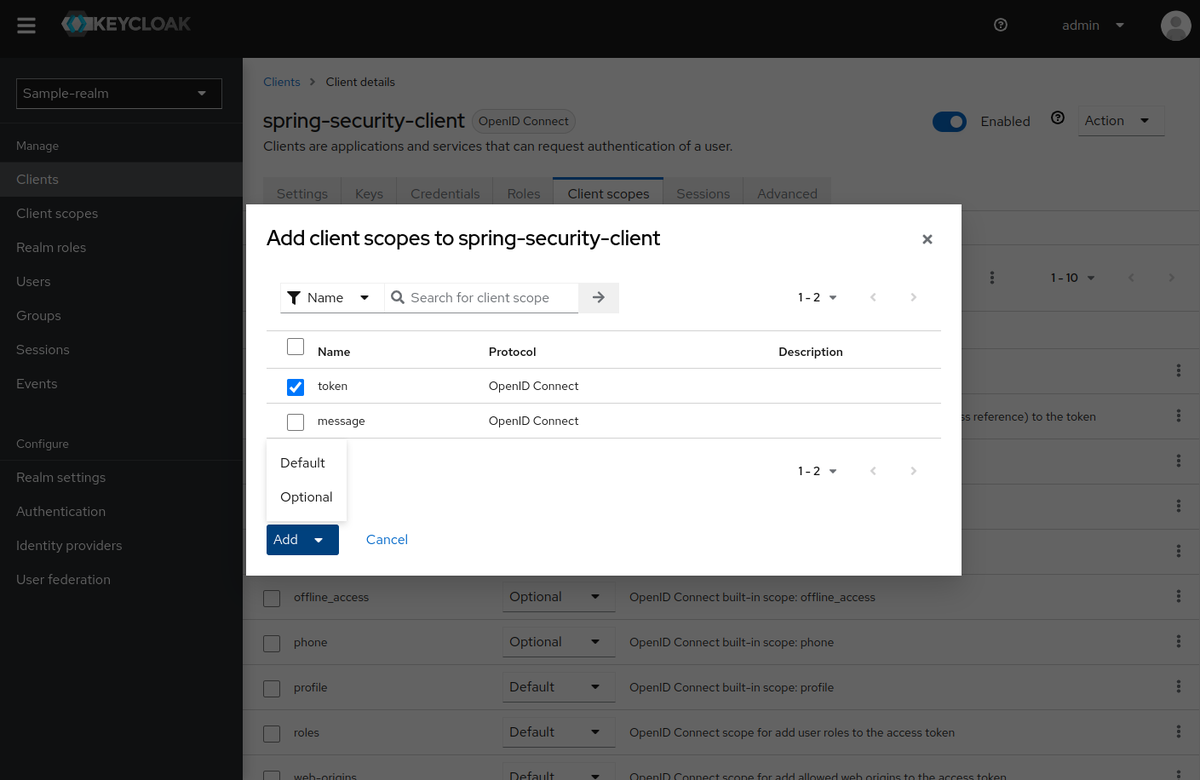
ちなみに、今回はクライアントスコープを作成する際にTypeを「Default」にしていました。つまり、クライアントとクライアントスコープを
作成する順番を逆にすると、作成されたクライアントにはこれらのスコープは自動的に付与されていたことになります。

今回はmesageというスコープについては紐付けないことにしました。

Typeは付与した後でも変更可能ですが。

ところで、ここまで「Default」と「Optional」の意味そのものは説明してきませんでした。

クライアントスコープについては、以下にまとまっています。

Server Administration Guide / Managing OpenID Connect and SAML Clients / Client scopes

「Default」と「Optional」の違いは、以下に書かれています。

Server Administration Guide / Managing OpenID Connect and SAML Clients / Client scopes / Link client scope with the client

それぞれ、以下のようなものになっています。

  • Default Client Scopes … OpenID ConnectおよびSAMLクライアントに適用され、OpenID Connectの場合は認可リクエストのscopeパラメーターの値に関係なく付与される
    • The client will inherit Protocol Mappers and Role Scope Mappings that are defined on the client scope. For the OpenID Connect Protocol, the Mappers and Role Scope Mappings are always applied, regardless of the value used for the scope parameter in the OpenID Connect authorization request.
  • Optional Client Scopes … OpenID Connectクライアントのみのもので、OpenID Connectの認可リクエストのscopeパラメーターで要求された場合のみ適用される
    • Optional client scopes are applied when issuing tokens for this client but only when requested by the scope parameter in the OpenID Connect authorization request.

つまり、ログイン時にユーザーからスコープの利用を許可された場合に付与されるのがOptional Client Scopeで、ユーザーからの許可に関係なく
付与されるのがDefault Client Scopeということになります。

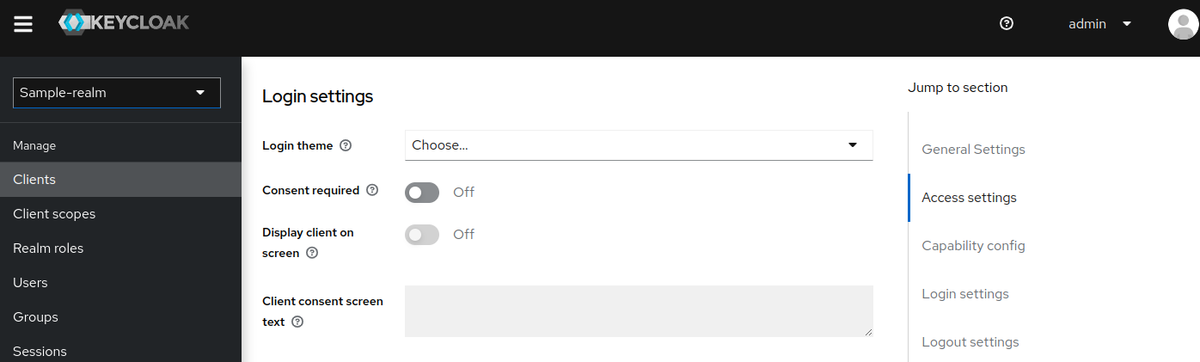
この「許可する」という話ですが、ログイン時にユーザーが選択することになります。この表示を行うには、クライアントの「Login settings」で
以下の設定を行う必要があります。

  • Consent required … On
  • Display client on screen … On
  • Client consent screen text … スコープの許可確認を求める際に、ユーザーに表示する文字列

デフォルトは無効になっているので、ユーザーのログイン時に確認画面は表示されません。

今回は、このままいきます。

Spring Bootプロジェクトを作成する

では、アプリケーションを作成していきましょう。依存関係にweboauth2-clientを指定して、プロジェクトを作成。

$ curl -s https://start.spring.io/starter.tgz \
  -d bootVersion=2.7.3 \
  -d javaVersion=17 \
  -d name=spring-security-oauth2-client-scoped-authz-example \
  -d groupId=org.littlewings \
  -d artifactId=spring-security-oauth2-client-scoped-authz-example \
  -d version=0.0.1-SNAPSHOT \
  -d packageName=org.littlewings.keycloak.spring \
  -d dependencies=web,oauth2-client \
  -d baseDir=spring-security-oauth2-client-scoped-authz-example | tar zxvf -

ディレクトリ内へ移動。

$ cd spring-security-oauth2-client-scoped-authz-example

Mavenプラグインや依存関係など。

        <properties>
                <java.version>17</java.version>
        </properties>
        <dependencies>
                <dependency>
                        <groupId>org.springframework.boot</groupId>
                        <artifactId>spring-boot-starter-oauth2-client</artifactId>
                </dependency>
                <dependency>
                        <groupId>org.springframework.boot</groupId>
                        <artifactId>spring-boot-starter-web</artifactId>
                </dependency>

                <dependency>
                        <groupId>org.springframework.boot</groupId>
                        <artifactId>spring-boot-starter-test</artifactId>
                        <scope>test</scope>
                </dependency>
        </dependencies>

        <build>
                <plugins>
                        <plugin>
                                <groupId>org.springframework.boot</groupId>
                                <artifactId>spring-boot-maven-plugin</artifactId>
                        </plugin>
                </plugins>
        </build>

自動生成されたソースコードは、削除しておきます。

$ rm src/main/java/org/littlewings/keycloak/spring/SpringSecurityOauth2ClientScopedAuthzExampleApplication.java src/test/java/org/littlewings/keycloak/spring/SpringSecurityOauth2ClientScopedAuthzExampleApplicationTests.java

ソースコードの作成。

Spring SecurityのOAuth 2.0に関する設定。

src/main/java/org/littlewings/keycloak/spring/OAuth2ClientSecurityConfig.java

package org.littlewings.keycloak.spring;

import org.springframework.context.annotation.Bean;
import org.springframework.security.config.Customizer;
import org.springframework.security.config.annotation.web.builders.HttpSecurity;
import org.springframework.security.config.annotation.web.configuration.EnableWebSecurity;
import org.springframework.security.web.SecurityFilterChain;

@EnableWebSecurity
public class OAuth2ClientSecurityConfig {
    @Bean
    public SecurityFilterChain filterChain(HttpSecurity http) throws Exception {
        http
                .authorizeHttpRequests(authorize -> authorize
                        .mvcMatchers("/auth/**").authenticated()
                        .mvcMatchers("/scope/message").hasAuthority("SCOPE_message")
                        .mvcMatchers("/scope/token").hasAuthority("SCOPE_token")
                        .anyRequest().permitAll())
                .oauth2Login(Customizer.withDefaults())
                .logout(logout -> logout
                        .logoutUrl("/logout")
                        .logoutSuccessUrl("/"));

        return http.build();
    }
}

/auth配下は認証必須、/scope/messagemessageスコープを権限として要求し、/scope/tokenは同じくtokenスコープを要求します。
それ以外のパスは、認証なしでアクセスできるようにしています。

               .authorizeHttpRequests(authorize -> authorize
                        .mvcMatchers("/auth/**").authenticated()
                        .mvcMatchers("/scope/message").hasAuthority("SCOPE_message")
                        .mvcMatchers("/scope/token").hasAuthority("SCOPE_token")
                        .anyRequest().permitAll())

Authorize HttpServletRequests with AuthorizationFilter :: Spring Security

ここで指定しているスコープは、先ほど作成したクライアントスコープですね。

また、今回はhasAuthorityを使って確認することにします。hasRoleではなく、です。

Authorization Architecture :: Spring Security

Authorize HttpServletRequest with FilterSecurityInterceptor :: Spring Security

hasRoleは、ROLE_を接頭辞とするものですね。

RestController。

src/main/java/org/littlewings/keycloak/spring/ScopedController.java

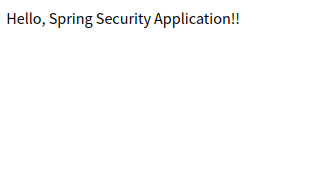
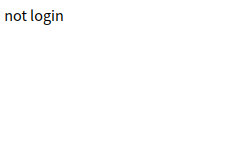
package org.littlewings.keycloak.spring;

import org.springframework.security.oauth2.client.authentication.OAuth2AuthenticationToken;
import org.springframework.web.bind.annotation.GetMapping;
import org.springframework.web.bind.annotation.RestController;

@RestController
public class ScopedController {
    @GetMapping
    public String index() {
        return "Hello, Spring Security Application!!";
    }

    @GetMapping("token")
    public Object token(OAuth2AuthenticationToken authenticationToken) {
        return authenticationToken != null ? authenticationToken : "not login";
    }

    @GetMapping("auth/message")
    public String authenticatedMessage() {
        return "Authenticated!!";
    }

    @GetMapping("scope/message")
    public String authorizedMessage() {
        return "Authorized!!";
    }


    @GetMapping("scope/token")
    public OAuth2AuthenticationToken authorizedToken(OAuth2AuthenticationToken authenticationToken) {
        return authenticationToken;
    }
}

以下の3つのメソッドは、それぞれ認証必須、messageスコープ、tokenスコープを要求するメソッドです。

    @GetMapping("auth/message")
    public String authenticatedMessage() {
        return "Authenticated!!";
    }

    @GetMapping("scope/message")
    public String authorizedMessage() {
        return "Authorized!!";
    }


    @GetMapping("scope/token")
    public OAuth2AuthenticationToken authorizedToken(OAuth2AuthenticationToken authenticationToken) {
        return authenticationToken;
    }

それ以外は、ログインしていなくてもアクセス可能です。

OAuth2AuthenticationTokenクラスは、Spring SecurityのOAuth 2.0サポートにおける認証情報です。

mainクラス。

src/main/java/org/littlewings/keycloak/spring/App.java

package org.littlewings.keycloak.spring;

import org.springframework.boot.SpringApplication;
import org.springframework.boot.autoconfigure.SpringBootApplication;

@SpringBootApplication
public class App {
    public static void main(String... args) {
        SpringApplication.run(App.class, args);
    }
}

設定。

src/main/resources/application.properties

spring.security.oauth2.client.registration.keycloak.client-id=spring-security-client
spring.security.oauth2.client.registration.keycloak.client-secret=UPGaDF2h2CIAbWE4dCv0CK36bfkiXrLq
spring.security.oauth2.client.registration.keycloak.client-name=spring security oauth2 authorization example
spring.security.oauth2.client.registration.keycloak.authorization-grant-type=authorization_code
spring.security.oauth2.client.registration.keycloak.scope=openid
spring.security.oauth2.client.registration.keycloak.redirect-uri={baseUrl}/login/oauth2/code/{registrationId}

spring.security.oauth2.client.provider.keycloak.authorization-uri=http://172.17.0.2:8080/realms/sample-realm/protocol/openid-connect/auth
spring.security.oauth2.client.provider.keycloak.token-uri=http://172.17.0.2:8080/realms/sample-realm/protocol/openid-connect/token
spring.security.oauth2.client.provider.keycloak.user-info-uri=http://172.17.0.2:8080/realms/sample-realm/protocol/openid-connect/userinfo
spring.security.oauth2.client.provider.keycloak.jwk-set-uri=http://172.17.0.2:8080/realms/sample-realm/protocol/openid-connect/certs
spring.security.oauth2.client.provider.keycloak.user-name-attribute=preferred_username

spring.jackson.serialization.indent_output=true
#logging.level.org.springframework.security=DEBUG

OAuth 2.0のフローとしては、認可コードフローを使います。

動作確認してみる

それでは、動作確認してみます。

アプリケーションを起動。

$ mvn spring-boot:run

まずはログインしないまま、http://localhost:8080/にアクセスしてみます。

http://localhost:8080/tokenにアクセス。

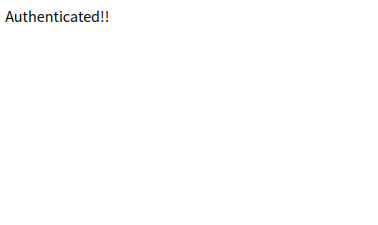
ログインを必要とするhttp://localhost:8080/auth/messageにアクセスしてみます。

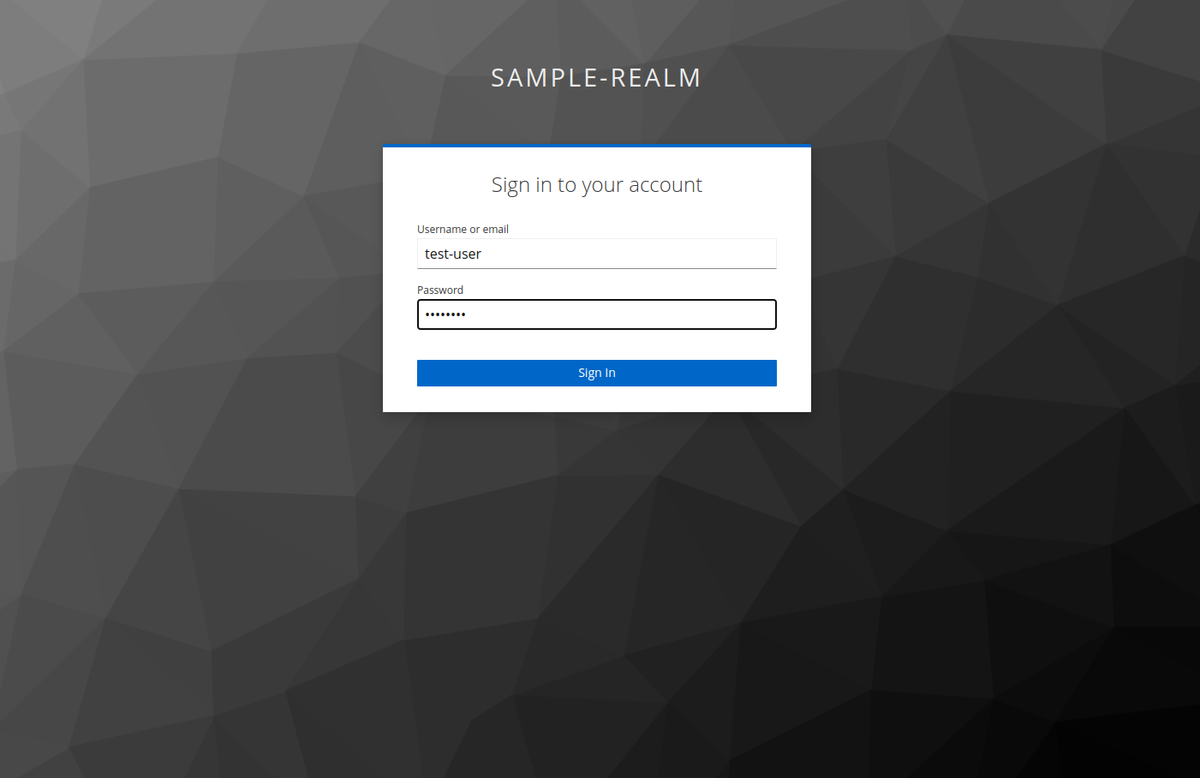
すると、Keycloakのログインページにリダイレクトされるので、先ほど作成したユーザー名とパスワード入力してログイン。

ログインすると、http://localhost:8080/auth/messageにリダイレクトしてきて今度はページが表示されます。

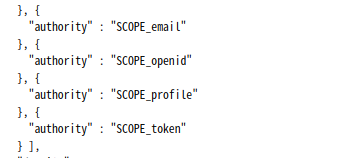
http://localhost:8080/tokenにアクセスすると、今度は認証情報が表示されます。
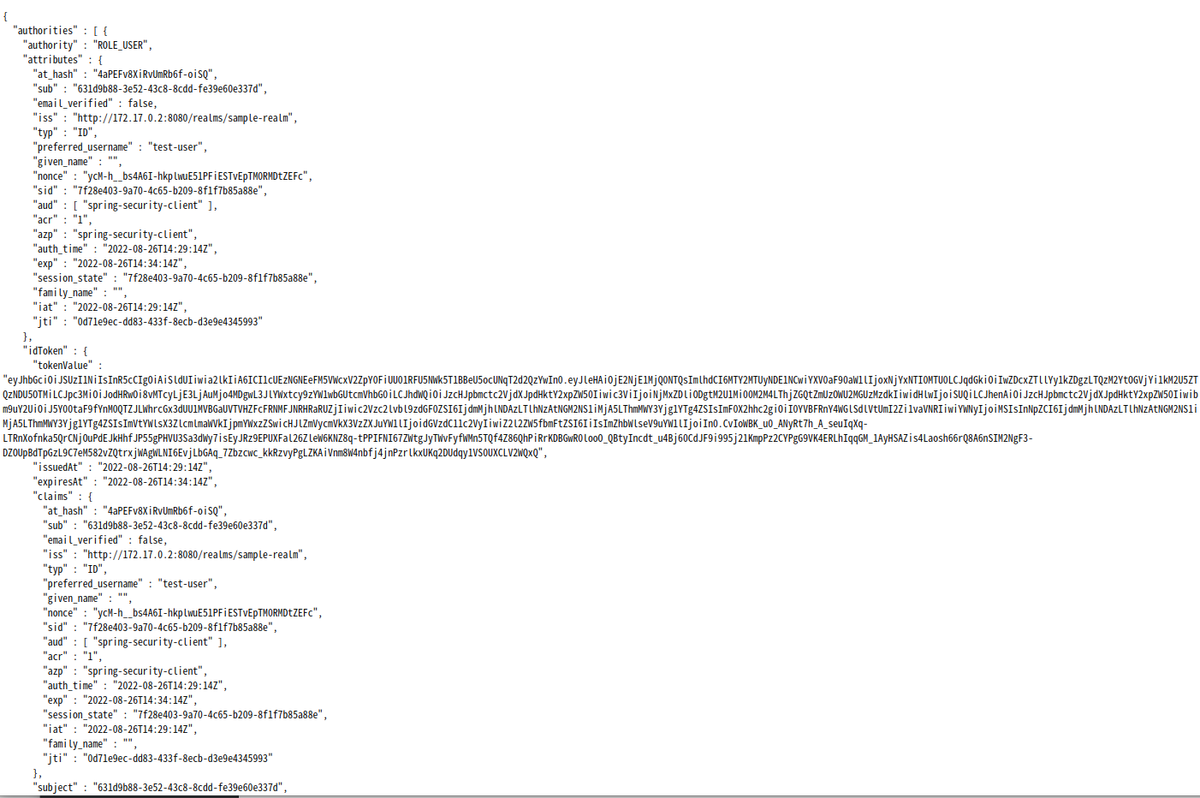
authoritySCOPE_tokenも含まれています。

次は認可を確認します。tokenスコープが必要なhttp://localhost:8080/scope/tokenにアクセスしてみます。

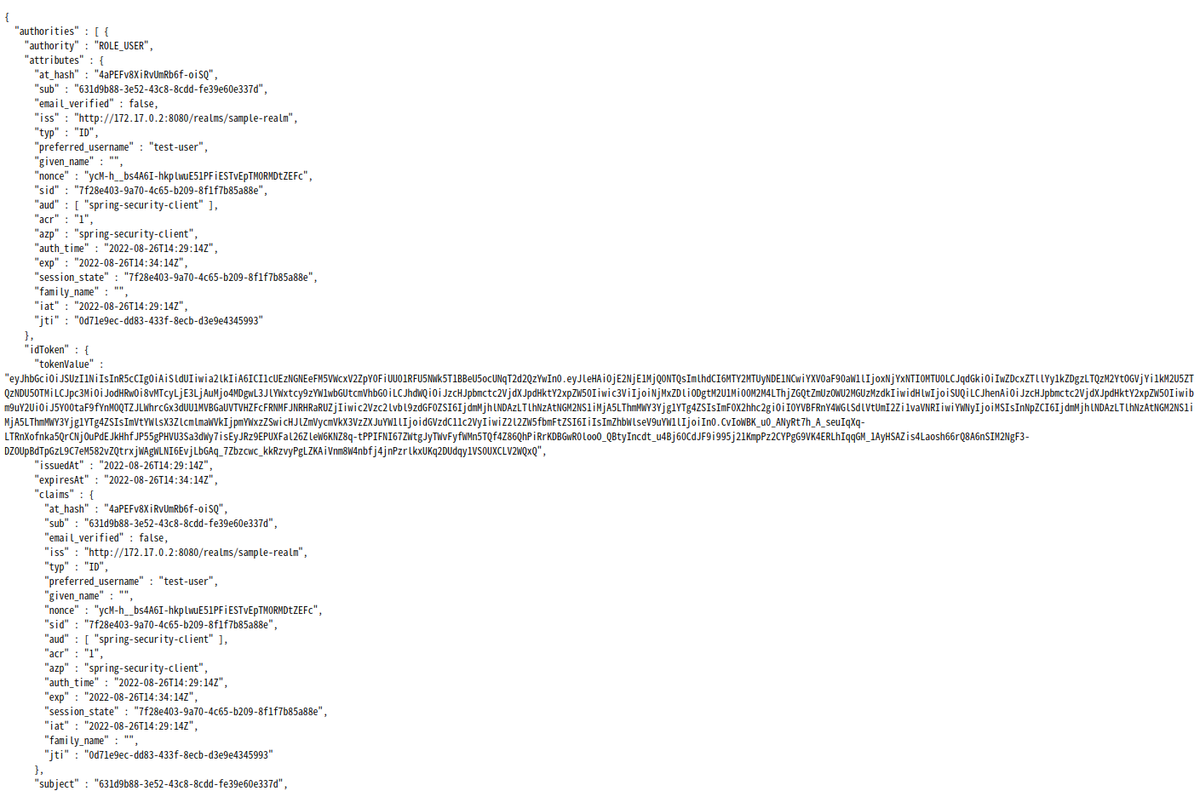
こちらはスコープが付与されているので表示されました。

messageスコープが必要なhttp://localhost:8080/scope/messageにアクセスしてみます。

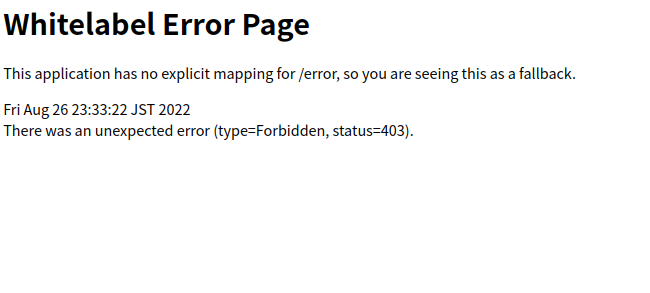
こちらはスコープが保持されていないので、403になりましたね。

OKそうです。

なお、ここでの動作確認には載せていませんが、未ログイン状態で認可が必要なページにアクセスしてもKeycloakのログインページに
リダイレクトされ、ログインに成功すると戻ってきます。実際にアクセス可能かどうかは、持っているスコープ次第ですが。

クライアントスコープが実際どう返ってきているのか確認する

ところで、クライアントスコープにSCOPE_というprefixが付いているのがちょっと気になり。実際どうなっているのか、tcpdum
キャプチャしてみました。

$ sudo tcpdump -i any host 172.17.0.2 and tcp port 8080 -A

こちらのトークンエンドポイントのレスポンスを見てみます。

http://172.17.0.2:8080/realms/sample-realm/protocol/openid-connect/token

こんなレスポンスになっていました。

{"access_token":"eyJhbGciOiJSUzI1NiIsInR5cCIgOiAiSldUIiwia2lkIiA6ICI1cUEzNGNEeFM5VWcxV2ZpY0FiUU01RFU5NWk5T1BBeU5ocUNqT2d2QzYwIn0.eyJleHAiOjE2NjE1MjQ0NTQsImlhdCI6MTY2MTUyNDE1NCwiYXV0aF90aW1lIjoxNjYxNTI0MTU0LCJqdGkiOiJkMGFhNWY2NC05OTUwLTQyZGEtOGRmNC04ZTE1MWM4YjQ0YWIiLCJpc3MiOiJodHRwOi8vMTcyLjE3LjAuMjo4MDgwL3JlYWxtcy9zYW1wbGUtcmVhbG0iLCJhdWQiOiJhY2NvdW50Iiwic3ViIjoiNjMxZDliODgtM2U1Mi00M2M4LThjZGQtZmUzOWU2MGUzMzdkIiwidHlwIjoiQmVhcmVyIiwiYXpwIjoic3ByaW5nLXNlY3VyaXR5LWNsaWVudCIsIm5vbmNlIjoieWNNLWhfX2JzNEE2SS1oa3Bsd3VFNTFQRmlFU1R2RXBUTTBSTUR0WkVGYyIsInNlc3Npb25fc3RhdGUiOiI3ZjI4ZTQwMy05YTcwLTRjNjUtYjIwOS04ZjFmN2I4NWE4OGUiLCJhY3IiOiIxIiwicmVhbG1fYWNjZXNzIjp7InJvbGVzIjpbImRlZmF1bHQtcm9sZXMtc2FtcGxlLXJlYWxtIiwib2ZmbGluZV9hY2Nlc3MiLCJ1bWFfYXV0aG9yaXphdGlvbiJdfSwicmVzb3VyY2VfYWNjZXNzIjp7ImFjY291bnQiOnsicm9sZXMiOlsibWFuYWdlLWFjY291bnQiLCJtYW5hZ2UtYWNjb3VudC1saW5rcyIsInZpZXctcHJvZmlsZSJdfX0sInNjb3BlIjoib3BlbmlkIGVtYWlsIHRva2VuIHByb2ZpbGUiLCJzaWQiOiI3ZjI4ZTQwMy05YTcwLTRjNjUtYjIwOS04ZjFmN2I4NWE4OGUiLCJlbWFpbF92ZXJpZmllZCI6ZmFsc2UsInByZWZlcnJlZF91c2VybmFtZSI6InRlc3QtdXNlciIsImdpdmVuX25hbWUiOiIiLCJmYW1pbHlfbmFtZSI6IiJ9.fXdutTgL4l9mLLB0jLXs-r2LJGRCeL63B67fefN32hBHthFR7DunhK6qYmbBQovnmqboNJgVdDBedhO81z1wiJnIFHloTfTbbA2KFds9b1X5pttC8IXh0JVMixovMajOvUVVaG-E2AJ-Ip1W3eNLH1OohpfJnix8TE-to-fNi3IvadkPn-gneeKq16Vw6cjK3bll6whcrnSWevlAAA7Z9PM1hZU6-j0EZxRWT8dGgpRbAQnYBAYQb8CN6q-J0DtHKcZ4kppEF_awb12yx5ZhBPKYqV_-MmxqtGwu-yXSNGu4x2gR1g3a2P03AljyQzIazL3MfTYAzypNqhhPurhJNQ","expires_in":300,"refresh_expires_in":1800,"refresh_token":"eyJhbGciOiJIUzI1NiIsInR5cCIgOiAiSldUIiwia2lkIiA6ICI2MTFhODMxNi1jMjFjLTQzMDMtYWMzZC1jOTQ0NzlhYzU3NTAifQ.eyJleHAiOjE2NjE1MjU5NTQsImlhdCI6MTY2MTUyNDE1NCwianRpIjoiZGQ2ODUxOTYtOGU3ZS00YmI4LWEyOTQtNzc0NGNlYzJkY2ZlIiwiaXNzIjoiaHR0cDovLzE3Mi4xNy4wLjI6ODA4MC9yZWFsbXMvc2FtcGxlLXJlYWxtIiwiYXVkIjoiaHR0cDovLzE3Mi4xNy4wLjI6ODA4MC9yZWFsbXMvc2FtcGxlLXJlYWxtIiwic3ViIjoiNjMxZDliODgtM2U1Mi00M2M4LThjZGQtZmUzOWU2MGUzMzdkIiwidHlwIjoiUmVmcmVzaCIsImF6cCI6InNwcmluZy1zZWN1cml0eS1jbGllbnQiLCJub25jZSI6InljTS1oX19iczRBNkktaGtwbHd1RTUxUEZpRVNUdkVwVE0wUk1EdFpFRmMiLCJzZXNzaW9uX3N0YXRlIjoiN2YyOGU0MDMtOWE3MC00YzY1LWIyMDktOGYxZjdiODVhODhlIiwic2NvcGUiOiJvcGVuaWQgZW1haWwgdG9rZW4gcHJvZmlsZSIsInNpZCI6IjdmMjhlNDAzLTlhNzAtNGM2NS1iMjA5LThmMWY3Yjg1YTg4ZSJ9.ba5RGn0RSCi6kuJ9N1VqaaesptUn8Np4JM2qNXgKvWA","token_type":"Bearer","id_token":"eyJhbGciOiJSUzI1NiIsInR5cCIgOiAiSldUIiwia2lkIiA6ICI1cUEzNGNEeFM5VWcxV2ZpY0FiUU01RFU5NWk5T1BBeU5ocUNqT2d2QzYwIn0.eyJleHAiOjE2NjE1MjQ0NTQsImlhdCI6MTY2MTUyNDE1NCwiYXV0aF90aW1lIjoxNjYxNTI0MTU0LCJqdGkiOiIwZDcxZTllYy1kZDgzLTQzM2YtOGVjYi1kM2U5ZTQzNDU5OTMiLCJpc3MiOiJodHRwOi8vMTcyLjE3LjAuMjo4MDgwL3JlYWxtcy9zYW1wbGUtcmVhbG0iLCJhdWQiOiJzcHJpbmctc2VjdXJpdHktY2xpZW50Iiwic3ViIjoiNjMxZDliODgtM2U1Mi00M2M4LThjZGQtZmUzOWU2MGUzMzdkIiwidHlwIjoiSUQiLCJhenAiOiJzcHJpbmctc2VjdXJpdHktY2xpZW50Iiwibm9uY2UiOiJ5Y00taF9fYnM0QTZJLWhrcGx3dUU1MVBGaUVTVHZFcFRNMFJNRHRaRUZjIiwic2Vzc2lvbl9zdGF0ZSI6IjdmMjhlNDAzLTlhNzAtNGM2NS1iMjA5LThmMWY3Yjg1YTg4ZSIsImF0X2hhc2giOiI0YVBFRnY4WGlSdlVtUmI2Zi1vaVNRIiwiYWNyIjoiMSIsInNpZCI6IjdmMjhlNDAzLTlhNzAtNGM2NS1iMjA5LThmMWY3Yjg1YTg4ZSIsImVtYWlsX3ZlcmlmaWVkIjpmYWxzZSwicHJlZmVycmVkX3VzZXJuYW1lIjoidGVzdC11c2VyIiwiZ2l2ZW5fbmFtZSI6IiIsImZhbWlseV9uYW1lIjoiIn0.CvIoWBK_u0_ANyRt7h_A_seuIqXq-LTRnXofnka5QrCNjOuPdEJkHhfJP55gPHVU3Sa3dWy7isEyJRz9EPUXFal26ZleW6KNZ8q-tPPIFNI67ZWtgJyTWvFyfWMn5TQf4Z86QhPiRrKDBGwR0looO_QBtyIncdt_u4Bj60CdJF9i995j21KmpPz2CYPgG9VK4ERLhIqqGM_1AyHSAZis4Laosh66rQ8A6nSIM2NgF3-DZOUpBdTpGzL9C7eM582vZQtrxjWAgWLNI6EvjLbGAq_7Zbzcwc_kkRzvyPgLZKAiVnm8W4nbfj4jnPzrlkxUKq2DUdqy1VS0UXCLV2WQxQ","not-before-policy":0,"session_state":"7f28e403-9a70-4c65-b209-8f1f7b85a88e","scope":"openid email token profile"}

よく見ると、スコープはこんな感じになっていますね。

"scope":"openid email token profile"

ということは、SCOPE_というprefixはKeycloakが付与しているものではなさそうです。

Spring Securityが付与しているようですね。

https://github.com/spring-projects/spring-security/blob/5.7.3/oauth2/oauth2-client/src/main/java/org/springframework/security/oauth2/client/oidc/userinfo/OidcUserService.java#L133-L135

確認できて、ちょっとすっきりしました。

デバッグログを確認する

認可が上手くいかない時など、どのようなAuthorityを持っているか確認するには、Spring SecurityのログレベルをDEBUGレベルにすると
よさそうです。

application.propertiesを載せた時にはコメントアウトしていましたが、以下を加えると

logging.level.org.springframework.security=DEBUG

こんな感じでSpring Securityの認証情報がログに出力されるようになります。

2022-08-27 00:17:31.179 DEBUG 28134 --- [nio-8080-exec-5] o.s.security.web.FilterChainProxy        : Securing GET /scope/token
2022-08-27 00:17:31.180 DEBUG 28134 --- [nio-8080-exec-5] w.c.HttpSessionSecurityContextRepository : Retrieved SecurityContextImpl [Authentication=OAuth2AuthenticationToken [Principal=Name: [test-user], Granted Authorities: [[ROLE_USER, SCOPE_email, SCOPE_openid, SCOPE_profile, SCOPE_token]], User Attributes: [{at_hash=--Y8b8Mx9YvzPWAs5u5Atw, sub=631d9b88-3e52-43c8-8cdd-fe39e60e337d, email_verified=false, iss=http://172.17.0.2:8080/realms/sample-realm, typ=ID, preferred_username=test-user, given_name=, nonce=4aLSKGdCQ8LSj0KSgEQ5rE0gRBEttlnmYbzTeR7HA1c, sid=aec8ef3e-7477-4976-a805-f7ef9a4edad5, aud=[spring-security-client], acr=0, azp=spring-security-client, auth_time=2022-08-26T15:09:23Z, exp=2022-08-26T15:22:21Z, session_state=aec8ef3e-7477-4976-a805-f7ef9a4edad5, family_name=, iat=2022-08-26T15:17:21Z, jti=5587dc3c-2b18-4fdb-92cb-ea0e592abc8f}], Credentials=[PROTECTED], Authenticated=true, Details=WebAuthenticationDetails [RemoteIpAddress=0:0:0:0:0:0:0:1, SessionId=E2D9AB9DBD6197EFE41A8B60B2D827F5], Granted Authorities=[ROLE_USER, SCOPE_email, SCOPE_openid, SCOPE_profile, SCOPE_token]]]
2022-08-27 00:17:31.180 DEBUG 28134 --- [nio-8080-exec-5] s.s.w.c.SecurityContextPersistenceFilter : Set SecurityContextHolder to SecurityContextImpl [Authentication=OAuth2AuthenticationToken [Principal=Name: [test-user], Granted Authorities: [[ROLE_USER, SCOPE_email, SCOPE_openid, SCOPE_profile, SCOPE_token]], User Attributes: [{at_hash=--Y8b8Mx9YvzPWAs5u5Atw, sub=631d9b88-3e52-43c8-8cdd-fe39e60e337d, email_verified=false, iss=http://172.17.0.2:8080/realms/sample-realm, typ=ID, preferred_username=test-user, given_name=, nonce=4aLSKGdCQ8LSj0KSgEQ5rE0gRBEttlnmYbzTeR7HA1c, sid=aec8ef3e-7477-4976-a805-f7ef9a4edad5, aud=[spring-security-client], acr=0, azp=spring-security-client, auth_time=2022-08-26T15:09:23Z, exp=2022-08-26T15:22:21Z, session_state=aec8ef3e-7477-4976-a805-f7ef9a4edad5, family_name=, iat=2022-08-26T15:17:21Z, jti=5587dc3c-2b18-4fdb-92cb-ea0e592abc8f}], Credentials=[PROTECTED], Authenticated=true, Details=WebAuthenticationDetails [RemoteIpAddress=0:0:0:0:0:0:0:1, SessionId=E2D9AB9DBD6197EFE41A8B60B2D827F5], Granted Authorities=[ROLE_USER, SCOPE_email, SCOPE_openid, SCOPE_profile, SCOPE_token]]]
2022-08-27 00:17:31.182 DEBUG 28134 --- [nio-8080-exec-5] o.s.security.web.FilterChainProxy        : Secured GET /scope/token
2022-08-27 00:17:31.257 DEBUG 28134 --- [nio-8080-exec-5] s.s.w.c.SecurityContextPersistenceFilter : Cleared SecurityContextHolder to complete request

これらの内容を確認すると、解決が早くなるかもしれません。

まとめ

Spring SecurityのOAuth 2.0サポートで、Keycloakのクライアントスコープを使った認可を試してみました。

こちらは特に問題なく、あっさりと確認できたのでまあ良いかな、と。

動きも予想通りでした。

Trinoから、Hive connectorでAmazon S3互換のオブジェクトストレージMinIOにアクセスしてみる

これは、なにをしたくて書いたもの?

Trinoから、Amazon S3のようなオブジェクトストレージにアクセスしてみたいな、ということで。

今回はAmazon S3互換のオブジェクトストレージであるMinIOを使って、Trinoからアクセスしてみたいと思います。

MinIO | High Performance, Kubernetes Native Object Storage

TrinoからAmazon S3のようなオブジェクトストレージにアクセスするには、Hive connectorを使うとよさそうです。

Hive connector — Trino 393 Documentation

Hive connector

Hive connectorのドキュメントは、こちら。

Hive connector — Trino 393 Documentation

また、Hive connectorでAmazon S3にアクセスするためのドキュメントはこちらです。

Hive connector with Amazon S3 — Trino 393 Documentation

Hive connectorを使用すると、Apache Hiveデータウェアハウスに格納されたデータを参照できます。

このドキュメントによると、Apache Hiveは以下の3つのコンポーネントの組み合わせのようです。

Trinoは、これらのApache Hiveのコンポーネントのうち最初の2つ、データとメタデータのみを使用します。
HiveQLやApache Hiveの実行環境の一部は使用しません。

つまり、Hiveメタストアサービスと実際にストレージに格納されたデータのみを利用する、というわけですね。

こちらのブログエントリーを見ると、Apache Hiveのクエリー(HiveQL)を実行するランタイムをTrinoのランタイムで置き換えていることが
書かれています。

Trino | A gentle introduction to the Hive connector

とりあえず、動かしてみましょうか。

環境

今回の環境は、こちら。

$ java --version
openjdk 17.0.4 2022-07-19
OpenJDK Runtime Environment (build 17.0.4+8-Ubuntu-120.04)
OpenJDK 64-Bit Server VM (build 17.0.4+8-Ubuntu-120.04, mixed mode, sharing)


$ python -V
Python 2.7.18

Trinoのバージョン。表示しているのはTrinoのCLIのバージョンのみですが、サーバーも同じバージョンとします。

$ ./trino --version
Trino CLI 393

MinIO操作用のAWS CLI

$ aws --version
aws-cli/2.7.25 Python/3.9.11 Linux/5.4.0-124-generic exe/x86_64.ubuntu.20 prompt/off

MinIOのバージョンは、こちら。

$ minio --version
minio version RELEASE.2022-08-13T21-54-44Z (commit-id=49862ba3470335decccecb27649167025e18c406)
Runtime: go1.18.5 linux/amd64
License: GNU AGPLv3 <https://www.gnu.org/licenses/agpl-3.0.html>
Copyright: 2015-2022 MinIO, Inc.

MinIOは、172.17.0.2で動作しているものとします。

$ MINIO_ROOT_USER=minioadmin MINIO_ROOT_PASSWORD=minioadmin minio server /var/lib/minio/data --console-address :9001

お題

今回のお題は、MinIOに格納したCSVファイルをTrinoからクエリーできるようにする、でいきたいと思います。データのお題はサザエさんとします。
また、参照したデータをParquet形式で別テーブルとして保存することもやってみましょう。

Apache Hiveメタストアサービスをインストールする

Hive connectorのRequirementsを確認すると、Hive connectorを使用するにはHiveメタストアサービス、もしくは互換性のあるサービス(たとえば
AWS Glue Data CatalogといったHiveメタストア互換の実装が必要なようです。

The Hive connector requires a Hive metastore service (HMS), or a compatible implementation of the Hive metastore, such as AWS Glue Data Catalog.

Hive connector / Requirements

今回は、Apache Hiveが提供するスタンドアロンなHiveメタストアサービスを使用します。

Apache Hive

Hiveメタストアサービスのドキュメントはこちら。バージョン3.0以降ですね(それ以前は別ページ)。

AdminManual Metastore 3.0 Administration - Apache Hive - Apache Software Foundation

ダウンロードは、こちらから。

Downloads

$ curl -LO https://dlcdn.apache.org/hive/hive-standalone-metastore-3.0.0/hive-standalone-metastore-3.0.0-bin.tar.gz

展開して、ディレクトリ内へ。

$ tar xf hive-standalone-metastore-3.0.0-bin.tar.gz
$ cd apache-hive-metastore-3.0.0-bin

ディレクトリ構成を見てみます。

$ tree -d
.
├── bin
│   └── ext
├── binary-package-licenses
├── conf
├── lib
│   ├── php
│   │   └── packages
│   │       └── hive_metastore
│   │           └── metastore
│   └── py
│       └── hive_metastore
└── scripts
    └── metastore
        └── upgrade
            ├── derby
            ├── mssql
            ├── mysql
            ├── oracle
            └── postgres

19 directories

デフォルトの設定ファイルは、こちら。

conf/metastore-site.xml

<?xml version="1.0" encoding="UTF-8" standalone="no"?>
<?xml-stylesheet type="text/xsl" href="configuration.xsl"?><!--
   Licensed to the Apache Software Foundation (ASF) under one or more
   contributor license agreements.  See the NOTICE file distributed with
   this work for additional information regarding copyright ownership.
   The ASF licenses this file to You under the Apache License, Version 2.0
   (the "License"); you may not use this file except in compliance with
   the License.  You may obtain a copy of the License at

       http://www.apache.org/licenses/LICENSE-2.0

   Unless required by applicable law or agreed to in writing, software
   distributed under the License is distributed on an "AS IS" BASIS,
   WITHOUT WARRANTIES OR CONDITIONS OF ANY KIND, either express or implied.
   See the License for the specific language governing permissions and
   limitations under the License.
-->
<!-- These are default values meant to allow easy smoke testing of the metastore.  You will
likely need to add a number of new values. -->
<configuration>
  <property>
    <name>metastore.thrift.uris</name>
    <value>thrift://localhost:9083</value>
    <description>Thrift URI for the remote metastore. Used by metastore client to connect to remote metastore.</description>
  </property>
  <property>
    <name>metastore.task.threads.always</name>
    <value>org.apache.hadoop.hive.metastore.events.EventCleanerTask</value>
  </property>
  <property>
    <name>metastore.expression.proxy</name>
    <value>org.apache.hadoop.hive.metastore.DefaultPartitionExpressionProxy</value>
  </property>
</configuration>

metastore.thrift.urisが、ThriftプロトコルでHiveメタストアサービスにアクセスするためのURLになります。

設定ファイルを少し修正して、こちらの内容に。

conf/metastore-site.xml

<?xml version="1.0" encoding="UTF-8" standalone="no"?>
<?xml-stylesheet type="text/xsl" href="configuration.xsl"?><!--
   Licensed to the Apache Software Foundation (ASF) under one or more
   contributor license agreements.  See the NOTICE file distributed with
   this work for additional information regarding copyright ownership.
   The ASF licenses this file to You under the Apache License, Version 2.0
   (the "License"); you may not use this file except in compliance with
   the License.  You may obtain a copy of the License at

       http://www.apache.org/licenses/LICENSE-2.0

   Unless required by applicable law or agreed to in writing, software
   distributed under the License is distributed on an "AS IS" BASIS,
   WITHOUT WARRANTIES OR CONDITIONS OF ANY KIND, either express or implied.
   See the License for the specific language governing permissions and
   limitations under the License.
-->
<!-- These are default values meant to allow easy smoke testing of the metastore.  You will
likely need to add a number of new values. -->
<configuration>
  <property>
    <name>metastore.thrift.uris</name>
    <value>thrift://localhost:9083</value>
    <description>Thrift URI for the remote metastore. Used by metastore client to connect to remote metastore.</description>
  </property>
  <property>
    <name>metastore.task.threads.always</name>
    <value>org.apache.hadoop.hive.metastore.events.EventCleanerTask</value>
  </property>
  <property>
    <name>metastore.expression.proxy</name>
    <value>org.apache.hadoop.hive.metastore.DefaultPartitionExpressionProxy</value>
  </property>

  <property>
    <name>fs.s3a.impl</name>
    <value>org.apache.hadoop.fs.s3a.S3AFileSystem</value>
  </property>
  <property>
    <name>fs.s3a.access.key</name>
    <value>minioadmin</value>
  </property>
  <property>
    <name>fs.s3a.secret.key</name>
    <value>minioadmin</value>
  </property>
  <property>
    <name>fs.s3a.endpoint</name>
    <value>http://172.17.0.2:9000</value>
  </property>
  <property>
    <name>fs.s3a.path.style.access</name>
    <value>true</value>
  </property>
</configuration>

デフォルトの設定内容から追加したのは、MinIOに接続するためのこの部分です。

  <property>
    <name>fs.s3a.impl</name>
    <value>org.apache.hadoop.fs.s3a.S3AFileSystem</value>
  </property>
  <property>
    <name>fs.s3a.access.key</name>
    <value>minioadmin</value>
  </property>
  <property>
    <name>fs.s3a.secret.key</name>
    <value>minioadmin</value>
  </property>
  <property>
    <name>fs.s3a.endpoint</name>
    <value>http://172.17.0.2:9000</value>
  </property>
  <property>
    <name>fs.s3a.path.style.access</name>
    <value>true</value>
  </property>

ところで、Hiveメタストアサービスを起動するためには、Apache Hadoopが必要なようです。

$ bin/start-metastore
Cannot find hadoop installation: $HADOOP_HOME or $HADOOP_PREFIX must be set or hadoop must be in the path

というわけで、Apache Hadoopもダウンロードしてきます。

Apache Hadoop / Download

$ curl -LO https://dlcdn.apache.org/hadoop/common/hadoop-3.3.4/hadoop-3.3.4.tar.gz

展開して、ディレクトリ内へ。

$ tar xf hadoop-3.3.4.tar.gz
$ cd hadoop-3.3.4

こんな感じですね。

$ ll
合計 124
drwxr-xr-x 10 xxxxx xxxxx  4096  7月 29 22:44 ./
drwxrwxr-x  3 xxxxx xxxxx  4096  8月 20 10:09 ../
-rw-rw-r--  1 xxxxx xxxxx 24707  7月 29 05:30 LICENSE-binary
-rw-rw-r--  1 xxxxx xxxxx 15217  7月 17 03:20 LICENSE.txt
-rw-rw-r--  1 xxxxx xxxxx 29473  7月 17 03:20 NOTICE-binary
-rw-rw-r--  1 xxxxx xxxxx  1541  4月 22 23:58 NOTICE.txt
-rw-rw-r--  1 xxxxx xxxxx   175  4月 22 23:58 README.txt
drwxr-xr-x  2 xxxxx xxxxx  4096  7月 29 22:44 bin/
drwxr-xr-x  3 xxxxx xxxxx  4096  7月 29 21:35 etc/
drwxr-xr-x  2 xxxxx xxxxx  4096  7月 29 22:44 include/
drwxr-xr-x  3 xxxxx xxxxx  4096  7月 29 22:44 lib/
drwxr-xr-x  4 xxxxx xxxxx  4096  7月 29 22:44 libexec/
drwxr-xr-x  2 xxxxx xxxxx  4096  7月 29 22:44 licenses-binary/
drwxr-xr-x  3 xxxxx xxxxx  4096  7月 29 21:35 sbin/
drwxr-xr-x  4 xxxxx xxxxx  4096  7月 29 23:21 share/

環境変数HADOOP_HOMEに、Apache Hadoopのインストール先を指定します。

$ export HADOOP_HOME=/paht/to/hadoop-3.3.4

ちなみに、Apache Hadoop自体は起動しなくてもよいみたいです。あくまで、モジュールとして必要なだけみたいですね。

また、HiveメタストアサービスからMinIO…というかAmazon S3にアクセスするためには、Hadoop AWSAWS SDK for Javaをクラスパスに
追加する必要があります。これには、HADOOP_CLASSPATHという環境変数を使用します。

export HADOOP_CLASSPATH=${HADOOP_HOME}/share/hadoop/tools/lib/aws-java-sdk-bundle-1.12.262.jar:${HADOOP_HOME}/share/hadoop/tools/lib/hadoop-aws-3.3.4.jar

ところで、HiveメタストアサービスにはRDBMSが必要のようです。またスキーマの初期化も要るみたいですね。

今回はこちらで初期化。

$ bin/schematool -initSchema -dbType derby

RDBMSは、組み込みのApache Derbyを使います。

AdminManual Metastore 3.0 Administration / RDBMS / Option 1: Embedding Derby

そして、起動。

$ bin/start-metastore

ちなみに、スキーマを初期化せずに起動してしまうと、こんな感じのエラーになります。

MetaException(message:Version information not found in metastore.)
        at org.apache.hadoop.hive.metastore.RetryingHMSHandler.<init>(RetryingHMSHandler.java:84)
        at org.apache.hadoop.hive.metastore.RetryingHMSHandler.getProxy(RetryingHMSHandler.java:93)
        at org.apache.hadoop.hive.metastore.HiveMetaStore.newRetryingHMSHandler(HiveMetaStore.java:8541)
        at org.apache.hadoop.hive.metastore.HiveMetaStore.newRetryingHMSHandler(HiveMetaStore.java:8536)
        at org.apache.hadoop.hive.metastore.HiveMetaStore.startMetaStore(HiveMetaStore.java:8806)
        at org.apache.hadoop.hive.metastore.HiveMetaStore.main(HiveMetaStore.java:8723)
        at java.base/jdk.internal.reflect.NativeMethodAccessorImpl.invoke0(Native Method)
        at java.base/jdk.internal.reflect.NativeMethodAccessorImpl.invoke(NativeMethodAccessorImpl.java:62)
        at java.base/jdk.internal.reflect.DelegatingMethodAccessorImpl.invoke(DelegatingMethodAccessorImpl.java:43)
        at java.base/java.lang.reflect.Method.invoke(Method.java:566)
        at org.apache.hadoop.util.RunJar.run(RunJar.java:323)
        at org.apache.hadoop.util.RunJar.main(RunJar.java:236)

さらにそこからスキーマを初期化しようとしても、エラーになります。

Schema initialization FAILED! Metastore state would be inconsistent !!
Underlying cause: java.io.IOException : Schema script failed, errorcode OTHER
Use --verbose for detailed stacktrace.
*** schemaTool failed ***

こうなった場合は、metastore_dbディレクトリを削除すればよさそうです。

$ rm -rf metastore_db

ちょっと話が逸れましたが、これでHiveメタストアサービスの準備は完了です。

テストデータを用意する

MinIOに登録する、テストデータを用意しましょう。お題は、サザエさんで。

1行目をヘッダーにしたCSVファイルを3つ用意します。

input/isono-family.csv

family_id,id,first_name,last_name,age
1,1,サザエ,フグ田,24
1,2,マスオ,フグ田,28
1,3,波平,磯野,54
1,4,フネ,磯野,50
1,5,カツオ,磯野,11
1,6,ワカメ,磯野,9
1,7,タラオ,フグ田,3

input/namino-family.csv

family_id,id,first_name,last_name,age
2,1,ノリスケ,波野,26
2,2,タイコ,波野,22
2,3,イクラ,波野,1

input/isasaka-family.csv

family_id,id,first_name,last_name,age
3,1,難物,伊佐坂,60
3,2,お軽,伊佐坂,50
3,3,甚六,伊佐坂,20
3,4,浮江,伊佐,16

これらのCSVファイルは、AWS CLIを使ってMinIOにアップロードしましょう。

クレデンシャルを設定して

$ export AWS_ACCESS_KEY_ID=minioadmin
$ export AWS_SECRET_ACCESS_KEY=minioadmin
$ export AWS_DEFAULT_REGION=ap-northeast-1

エンドポイントはこちら。

$ MINIO_ENDPOINT=http://172.17.0.2:9000

バケットを作成。

$ aws s3 mb --endpoint-url $MINIO_ENDPOINT s3://trino-bucket

syncでアップロードします。

$ aws s3 sync --endpoint-url $MINIO_ENDPOINT input s3://trino-bucket/input
upload: input/isono-family.csv to s3://trino-bucket/input/isono-family.csv
upload: input/isasaka-family.csv to s3://trino-bucket/input/isasaka-family.csv
upload: input/namino-family.csv to s3://trino-bucket/input/namino-family.csv

確認。

$ aws s3 ls --endpoint-url $MINIO_ENDPOINT trino-bucket/input/
2022-08-24 00:06:51        131 isasaka-family.csv
2022-08-24 00:06:51        207 isono-family.csv
2022-08-24 00:06:51        112 namino-family.csv

これで、データの準備も完了です。

TrinoからMiniOのデータを読み込んでみる

では、TrinoからMinIOにアクセスしましょう。先ほどMinIOにアップロードしたCSVファイルを読み込んでみます。

Trinoのインストールディレクトリ内に、ディレクトリを作成。

$ mkdir -p etc/catalog data

設定ファイルは、こんな感じで作成しました。

etc/node.properties

node.environment=my_trino
node.id=340fae6b-55fe-486e-b122-d0fbe61d0ebb
node.data-dir=../data

etc/jvm.config

-server
-Xmx2G
-XX:InitialRAMPercentage=80
-XX:MaxRAMPercentage=80
-XX:G1HeapRegionSize=32M
-XX:+ExplicitGCInvokesConcurrent
-XX:+ExitOnOutOfMemoryError
-XX:+HeapDumpOnOutOfMemoryError
-XX:-OmitStackTraceInFastThrow
-XX:ReservedCodeCacheSize=512M
-XX:PerMethodRecompilationCutoff=10000
-XX:PerBytecodeRecompilationCutoff=10000
-Djdk.attach.allowAttachSelf=true
-Djdk.nio.maxCachedBufferSize=2000000
-XX:+UnlockDiagnosticVMOptions
-XX:+UseAESCTRIntrinsics

etc/config.properties

coordinator=true
node-scheduler.include-coordinator=true
http-server.http.port=8080
discovery.uri=http://192.168.0.6:8080

そして、Hive connectorを使ってMinIOに接続する設定ファイルを作成します。カタログ名は、minioとします。

etc/catalog/minio.properties

connector.name=hive
hive.metastore.uri=thrift://localhost:9083
hive.storage-format=ORC
hive.non-managed-table-writes-enabled=true
hive.non-managed-table-creates-enabled=true

hive.s3.aws-access-key=minioadmin
hive.s3.aws-secret-key=minioadmin
hive.s3.endpoint=http://172.17.0.2:9000
hive.s3.path-style-access=true
#hive.s3select-pushdown.enabled=true

ファイルの内容は、こちらのページを見て設定。

Hive connector — Trino 393 Documentation

Hive connector with Amazon S3 — Trino 393 Documentation

hive.metastore.uriには、先ほど用意したHiveメタストアサービスのThriftのURLを設定します。
hive.s3.〜は、MinIOにアクセスするための設定ですね。

では、Trinoを起動。

$ bin/launcher run

TrinoのCLIでアクセス。

$ ./trino
trino> 

先ほどCSVファイルをアップロードしたMinIOのバケットを指定して、スキーマを作成。

trino> create schema minio.bucket with(location = 's3a://trino-bucket/');
CREATE SCHEMA

ちなみに、この時にHiveメタストアサービス側でHadoop AWSAWS SDK for Javaに対してクラスパスが通っていない場合は、こんな感じで
失敗します。

trino> create schema minio.foo with(location = 's3a://trino-bucket/');
CREATE SCHEMA
Query 20220820_030243_00001_cg7ia failed: java.lang.RuntimeException: java.lang.ClassNotFoundException: Class org.apache.hadoop.fs.s3a.S3AFileSystem not found

次に、テーブルを作成します。

create table minio.bucket.people (
  family_id varchar,
  id varchar,
  first_name varchar,
  last_name varchar,
  age varchar
) with (
  format = 'csv',
  csv_separator = ',',
  csv_quote = '"',
  csv_escape = '"',
  skip_header_line_count = 1,
  external_location = 's3a://trino-bucket/input'
);

withで、テーブルに対してプロパティを指定できるようです。

CREATE TABLE — Trino 393 Documentation

Apache Hiveのテーブルの場合、formatにはこのあたりが指定できそうですね。

Hive connector / Supported file type

https://github.com/trinodb/trino/blob/393/plugin/trino-hive/src/main/java/io/trino/plugin/hive/HiveStorageFormat.java#L60-L104

その他のプロパティについては、こちらで確認しました。

https://github.com/trinodb/trino/blob/393/plugin/trino-hive/src/main/java/io/trino/plugin/hive/HiveTableProperties.java#L49-L68

ファイルを読み込む場所。

  external_location = 's3a://trino-bucket/input'

CSVファイルのフォーマットや、スキップする行数の指定。

  csv_separator = ',',
  csv_quote = '"',
  csv_escape = '"',
  skip_header_line_count = 1,

ところで、Hiveメタストアサービスの設定にMinIOにアクセスするための設定が含まれていない場合はここで失敗します。

Query 20220823_152404_00002_t3aw5 failed: Got exception: java.nio.file.AccessDeniedException s3a://trino-bucket/input: org.apache.hadoop.fs.s3a.auth.NoAuthWithAWSException: No AWS Credentials provided by TemporaryAWSCredentialsProvider SimpleAWSCredentialsProvider EnvironmentVariableCredentialsProvider IAMInstanceCredentialsProvider : com.amazonaws.SdkClientException: Unable to load AWS credentials from environment variables (AWS_ACCESS_KEY_ID (or AWS_ACCESS_KEY) and AWS_SECRET_KEY (or AWS_SECRET_ACCESS_KEY))

また、CSVをフォーマットにした場合は、カラムの型はvarcharに限定されるようです。こんな感じの指定をすると

create table minio.bucket.people (
  family_id integer,
  id integer,
  first_name varchar,
  last_name varchar,
  age integer
) with (
  format = 'csv',
  csv_separator = ',',
  csv_quote = '"',
  csv_escape = '"',
  skip_header_line_count = 1,
  external_location = 's3a://trino-bucket/input'
);

こんなエラーになります。

Query 20220822_142349_00007_89i97 failed: Hive CSV storage format only supports VARCHAR (unbounded). Unsupported columns: family_id integer, id integer, age integer

このあたりは、Apache Hiveのドキュメントを見た方がよいでしょう。

Limitation

This SerDe treats all columns to be of type String. Even if you create a table with non-string column types using this SerDe, the DESCRIBE TABLE output would show string column type. The type information is retrieved from the SerDe. To convert columns to the desired type in a table, you can create a view over the table that does the CAST to the desired type.

CSV Serde - Apache Hive - Apache Software Foundation

CSVフォーマットを使った場合、カラムの型はvarcharになるようですが、型変換はできるのでちょっと試しに。

Conversion functions — Trino 393 Documentation

trino> select family_id, id, first_name, last_name, cast(age as integer) as int_age from minio.bucket.people order by int_age;
 family_id | id | first_name | last_name | int_age
-----------+----+------------+-----------+---------
 2         | 3  | イクラ     | 波野      |       1
 1         | 7  | タラオ     | フグ田    |       3
 1         | 6  | ワカメ     | 磯野      |       9
 1         | 5  | カツオ     | 磯野      |      11
 3         | 4  | 浮江       | 伊佐      |      16
 3         | 3  | 甚六       | 伊佐坂    |      20
 2         | 2  | タイコ     | 波野      |      22
 1         | 1  | サザエ     | フグ田    |      24
 2         | 1  | ノリスケ   | 波野      |      26
 1         | 2  | マスオ     | フグ田    |      28
 3         | 2  | お軽       | 伊佐坂    |      50
 1         | 4  | フネ       | 磯野      |      50
 1         | 3  | 波平       | 磯野      |      54
 3         | 1  | 難物       | 伊佐坂    |      60
(14 rows)

Query 20220823_153714_00004_t3aw5, FINISHED, 1 node
Splits: 9 total, 9 done (100.00%)
1.21 [14 rows, 450B] [11 rows/s, 372B/s]

こんな感じになりました。

like検索。

trino> select family_id, id, concat(last_name, first_name) as name, age from minio.bucket.people where concat(last_name, first_name) like '磯野%';
 family_id | id |    name    | age
-----------+----+------------+-----
 1         | 3  | 磯野波平   | 54
 1         | 4  | 磯野フネ   | 50
 1         | 5  | 磯野カツオ | 11
 1         | 6  | 磯野ワカメ | 9
(4 rows)

Query 20220823_153733_00005_t3aw5, FINISHED, 1 node
Splits: 3 total, 3 done (100.00%)
0.68 [14 rows, 450B] [20 rows/s, 662B/s]

こんな感じで、MinIOにアップロードしたCSVファイルを元にしたテーブルに対して、データの読み込みができました。

TrinoからMinIOに対してデータを書き込んでみる

最後に、先ほど作成したCSVフォーマットのテーブルのデータを元に、Parquetフォーマットのテーブルを作成してみましょう。

データの書き込みになります。

こんな感じで、select文の結果からテーブルを作成。

create table minio.bucket.people_parquet
with (
  format = 'parquet',
  external_location = 's3a://trino-bucket/output'
)
as select
  cast(family_id as integer) as family_id,
  cast(id as integer) as id,
  first_name,
  last_name,
  cast(age as integer) as age
from minio.bucket.people;

各カラムには型変換を入れています。

データの格納先は、CSVファイルの配置場所とは別です。

  external_location = 's3a://trino-bucket/output'

ところで、このcreate table文を実行するには、Hive connectorの設定でhive.non-managed-table-writes-enabledtrueにしておく必要が
あります。

これを行っていない場合は、こちらのようなエラーになります。

Query 20220822_145855_00021_89i97 failed: Writes to non-managed Hive tables is disabled

デフォルトの設定がfalseですし、大量のデータを書き込むこともあると考えると、こういうのはApache Sparkなどでやるのが良いのかもですね。

テーブル定義はCSVフォーマットの時と異なり、varchar以外も使えています。

trino> desc minio.bucket.people_parquet;
   Column   |  Type   | Extra | Comment
------------+---------+-------+---------
 family_id  | integer |       |
 id         | integer |       |
 first_name | varchar |       |
 last_name  | varchar |       |
 age        | integer |       |
(5 rows)

Query 20220823_154211_00007_t3aw5, FINISHED, 1 node
Splits: 7 total, 7 done (100.00%)
0.38 [5 rows, 323B] [13 rows/s, 846B/s]

データの表示確認。

trino> select * from minio.bucket.people_parquet order by age;
 family_id | id | first_name | last_name | age
-----------+----+------------+-----------+-----
         2 |  3 | イクラ     | 波野      |   1
         1 |  7 | タラオ     | フグ田    |   3
         1 |  6 | ワカメ     | 磯野      |   9
         1 |  5 | カツオ     | 磯野      |  11
         3 |  4 | 浮江       | 伊佐      |  16
         3 |  3 | 甚六       | 伊佐坂    |  20
         2 |  2 | タイコ     | 波野      |  22
         1 |  1 | サザエ     | フグ田    |  24
         2 |  1 | ノリスケ   | 波野      |  26
         1 |  2 | マスオ     | フグ田    |  28
         3 |  2 | お軽       | 伊佐坂    |  50
         1 |  4 | フネ       | 磯野      |  50
         1 |  3 | 波平       | 磯野      |  54
         3 |  1 | 難物       | 伊佐坂    |  60
(14 rows)

Query 20220823_154254_00008_t3aw5, FINISHED, 1 node
Splits: 7 total, 7 done (100.00%)
0.29 [14 rows, 2.04KB] [48 rows/s, 7.09KB/s]

OKですね。

MinIO上でも確認。

$ aws s3 ls --endpoint-url $MINIO_ENDPOINT trino-bucket/output/
2022-08-24 00:39:40       1479 20220823_153938_00006_t3aw5_c29808d5-1047-486f-a54b-c656d5fc6bbd

中身の表示は、バイナリなので割愛。

今回は、こんなところでしょうか。

まとめ

Trinoから、Amazon S3互換のオブジェクトストレージであるMinIOにアクセスしてみました。

クエリーのエンジンはTrinoになっているとはいえ、そもそもApache Hiveを扱ったことがなかったので、かなりてこずりました。
Hiveメタストアサービスの位置づけと、Amazon S3のようなオブジェクトストレージにアクセスするための設定がよくわからなかったですね。
また、Apache Hadoopが必要になることも驚きましたが。

Hiveメタストアサービスをクリアしたら、今度はApache Hiveのテーブルのプロパティ指定をTrinoでどうしたらいいんだろう?というところに
悩んだり。調べたり、結局ソースコードを見たりしましたが。

まあ、とりあえず目標となるところまでは到達できたので、良しとしましょう。

これで次からは、TrinoでHive connectorを扱う時のハードルが少し下がっているでしょう。